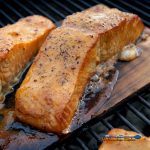
Grilled Cedar Plank Salmon
Learn how to grill salmon on cedar planks in this easy step-by-step guide to grilling cedar plank salmon! Use cedar planks for meats, vegetables and fruits!
Servings 4
Calories 325kcal
Useful Equipment:
- Cedar Plank 6 x 12 inches
Ingredients
- 1½ pound salmon fillet(s) whole fillet or portioned fillets - typically 6-8 ounces per person
- salt and fresh cracked black pepper to taste
- 6 tablespoons Dijon mustard
- 6 tablespoons brown sugar
Instructions
STEP #1 Soak the Plank
- Submerge the cedar plank(s) in water for 20 minutes, then drain. Dry off excess water.
STEP #2 Fire Up the Grill
- Preheat the grill for direct heat to medium-high, about 400 degrees F.
STEP #3 Prep the Salmon
- Pat the salmon dry with paper towels and place the salmon on a platter.
- Remove any pin bones from the fillet. Run your fingers down the center of the fillet and feel for pin bones. Remove any bones you feel or see with a clean pair of needle nose pliers or fish tweezers.
- Season generously with salt and pepper to taste.
- Use a basting brush to spread the Dijon mustard over the salmon. Make sure to cover the edges of the fillet.
- Crumble the brown sugar between your fingers and sprinkle it over the mustard-coated fillet.
STEP #4 Char the Plank
- Charring, the plank brings out the essential oils of the cedar plank that will infuse the fish with smoke flavor.
- Place the soaked plank directly onto the hot grill grate over the fire.
- It will take the plank about 3-5 minutes over direct heat for the plank to char. When the plank starts to smoke, use tongs to peek at the bottom side. Flip it over when it has a good amount of char on it.
- Place the prepared salmon fillet skin side down directly onto the charred cedar plank.
STEP #5 Grill the Salmon
- Don’t Flip the Fish: This is one time you DO NOT have to flip the fillet while it is cooking.
- Cover the Grill: cook over medium-high heat until the salmon is opaque and slightly browned on the edges, about 20 to 30 minutes, depending on the thickness of your fillet.
- Check for Doneness: use an instant-read thermometer to check the temperature of the fish. You should pull the salmon off the grill at about 130 degrees F. The carry-over heat will take it up to an internal temperature of 140 degrees F which has a better texture. The flesh should flake easily in the center when pierced with a fork.
STEP #6 Remove From the Plank and Serve
- Allow the salmon to cool 5 minutes before serving.
- Transfer the salmon to a platter or serve right off the plank. Note: eating from the plank is a bit smutty but delicious!
Oven Instructions: (follow the same preparation as above)
- Preheat the oven to 400 degrees F.
- Bake until the salmon is opaque and slightly browned on the edges, about 20 to 30 minutes, depending on the thickness of your fillet.Check for Doneness: use an instant-read thermometer to check the temperature of the fish. The salmon is done at 130 degrees F. The carry-over heat will take it up to an internal temperature of 140 degrees F, which has a better texture. The flesh should flake easily in the center when pierced with a fork.
Notes
Cedar planks are readily available online, at some grocery stores, and in the grilling section of your local hardware store. We love Jaccard Seal’ n Soak Cedar Grilling Planks. They come in a reusable soaking bag, are ready fast, with a soak time of only 20 minutes, and are easy to prepare. Highly recommended, and NO, we were not paid to say that!
Cedar planks should be at least 6 x 12 inches to fit whole fish filets.
Planks should be untreated and made for grilling. (Check out this video, How to Cedar Plank on a Budget.)
Plan ahead and ensure enough time to soak the cedar planks. We recommend about 15-20 minutes before you plan on grilling the salmon, 30 minutes max.
To soak the plank, fill the sink with about two inches of water. Submerge the planks in the water. Use a weighted object such as a can of beans from the pantry to help hold them under the water. Soak the planks for 15-20 minutes. You can usually get a charcoal grill prepped for filling in the same amount of time it takes to soak the planks.
Dry any excess water from the planks before placing the fillets on them.
Recipe adapted by Steve Raichlen.
Nutrition
Calories: 325kcal | Carbohydrates: 19g | Protein: 35g | Fat: 12g | Saturated Fat: 2g | Polyunsaturated Fat: 5g | Monounsaturated Fat: 4g | Trans Fat: 1g | Cholesterol: 94mg | Sodium: 335mg | Potassium: 888mg | Fiber: 1g | Sugar: 18g | Vitamin A: 84IU | Vitamin C: 1mg | Calcium: 48mg | Iron: 2mg
Did you try this recipe? Tell us what you think!Give this recipe a star rating, leave a comment below and share pictures of your food with us on Instagram, Facebook or Twitter! We can't wait to see them! Don't forget to mention @TheMountainKitchen or tag #TheMountainKitchen!