
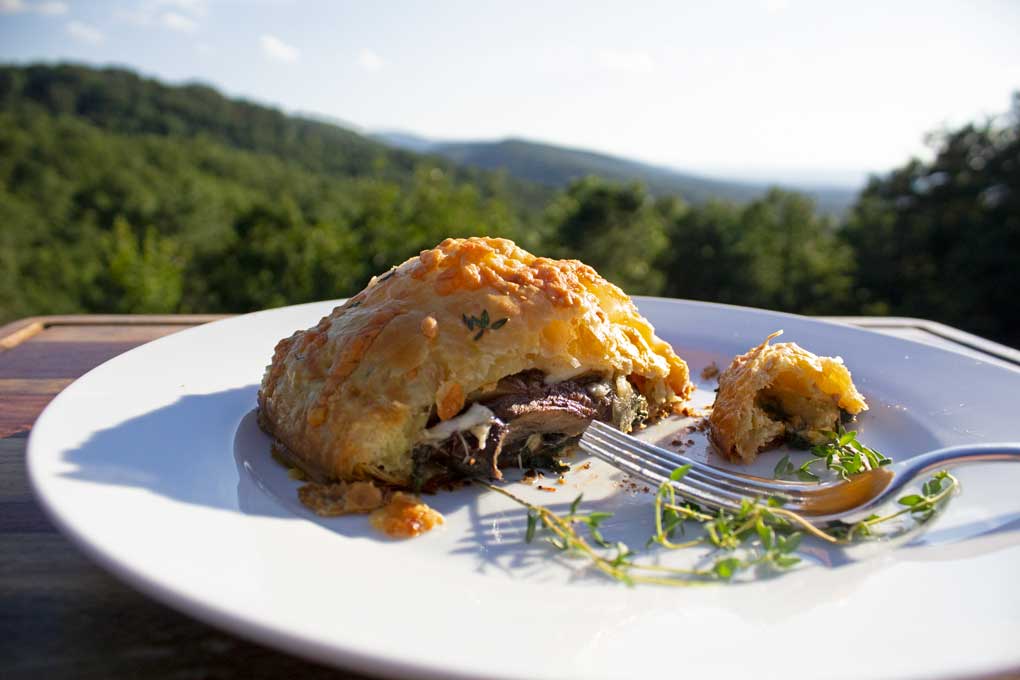
I made Mushroom Wellington last Monday for Meatless Monday. I was so excited how it turned out, that I almost could not wait to share this recipe with you.
Mushroom Wellington is a vegetarian spin-off of the classic Beef Wellington recipe. Instead of beef, this version of the recipe uses portobello mushroom caps with spinach and cheese stuffed inside a flaky pastry crust. Something also a little different from the traditional beef wellington recipe is the fact that the mushroom wellington is made into individual servings instead of a sliced loaf.

If this recipe looks vaguely familiar, that is because I first shared this recipe back in 2014. I decided to revisit this recipe again and give this post a much-needed update with new photos. I’ve also made a few tweaks to the recipe that I think you will enjoy.
With the holidays coming up, this is a great recipe to save for your vegetarian family and friends.
Let’s make Mushroom Wellington!
How To Make Mushroom Wellington
Thaw the frozen puff pastry according to package directions, then preheat the oven to 400 degrees F.
Line a baking sheet with parchment paper; set aside.
As you can see from the photos, I ran out. However, I recommend using parchment paper for easy cleanup. If you do not have parchment aluminum foil will work, but grease either of those options lightly with cooking spray.

Prepare The Mushrooms:
Remove stems from the mushrooms (if they have any). Heat two tablespoons of the olive oil in a large skillet over medium-high heat. Sauté the mushrooms for 3 to 4 minutes on each side or until golden and cooked through.
It’s important not to overcrowd the pan. If all four mushroom caps do not fit at one time, you’ll need to cook them in batches. Add a drop or two more of the olive oil if needed.
Remove the mushrooms from the pan and place onto a paper towel to drain.
DO NOT OVERCROWD THE PAN: It’s important not to overcrowd the pan. If all four mushroom caps do not fit at one time, you’ll need to cook them in batches. Add a drop or two more of the olive oil if needed. [Learn more here!]
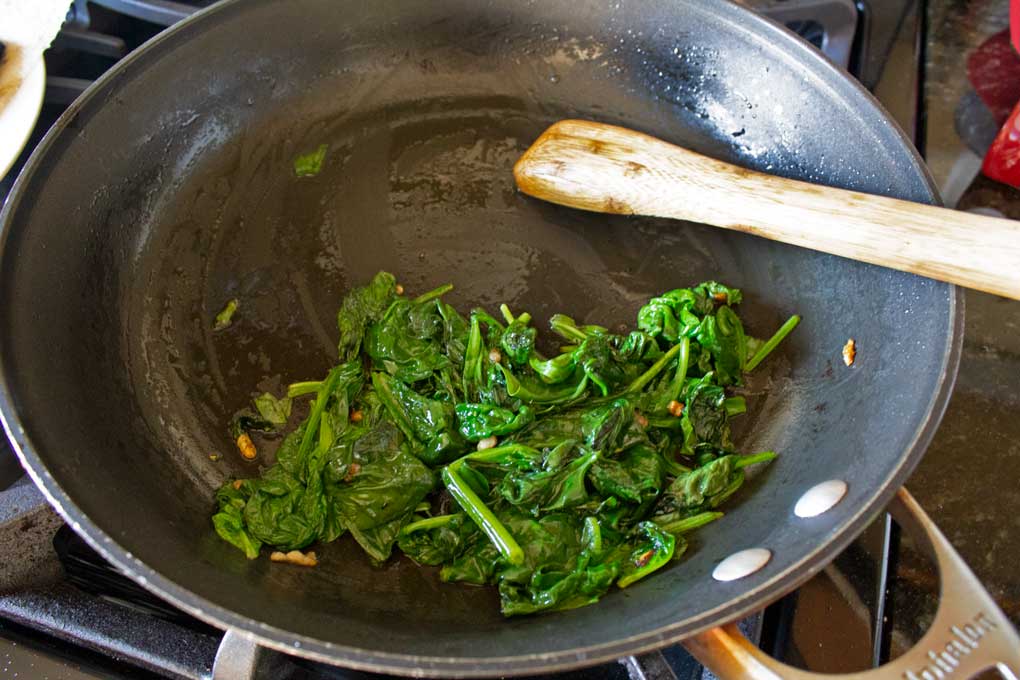
Cook The Spinach:
Place the same pan back over the heat. Pour in the remaining two tablespoons of olive oil. Sauté the garlic for about 30 seconds so that it becomes fragrant (DO NOT BURN).
Add the spinach to the pan with the garlic and cook for 2 to 3 minutes until completely wilted. Season with salt and pepper, to taste.
Transfer the spinach to a sieve to drain thoroughly, while preparing the pastry.
Prepare the Pastry Dough:
Using prepared puff pastry takes a lot of work out of any recipe. Let me share with you how I prepared it.
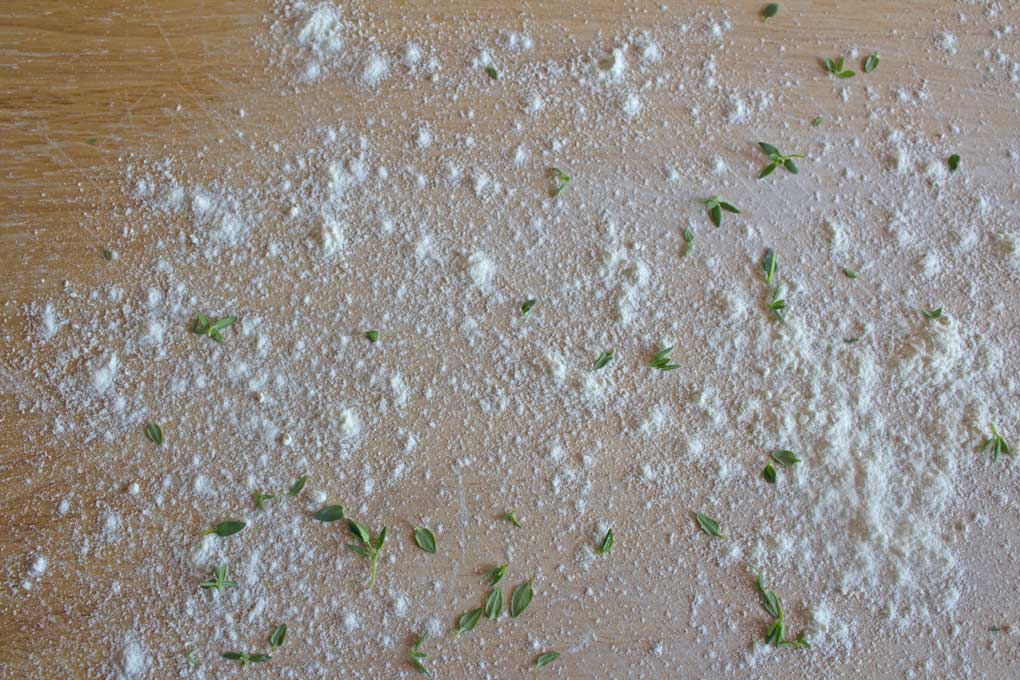
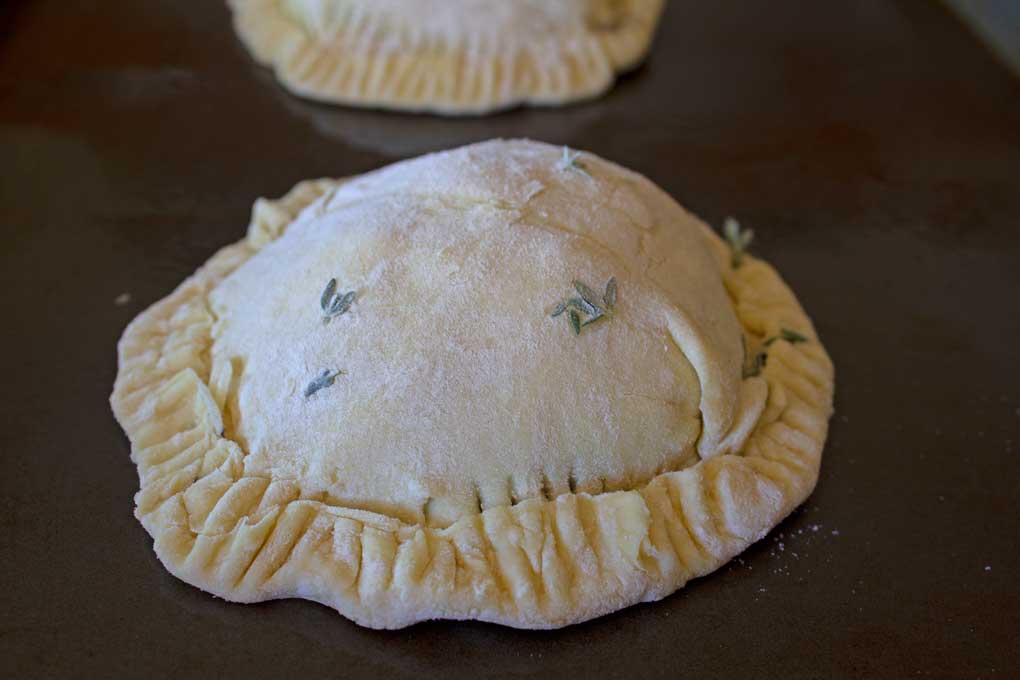
Scatter half of the thyme leaves over a lightly floured surface.
Roll a sheet of thawed puff pastry out on the prepared floured surface to the thickness of a coin.
Using a saucer or lid to a plastic container, cut out 3 to 4 circles about ½-inch wider than the mushrooms (for the bottoms).
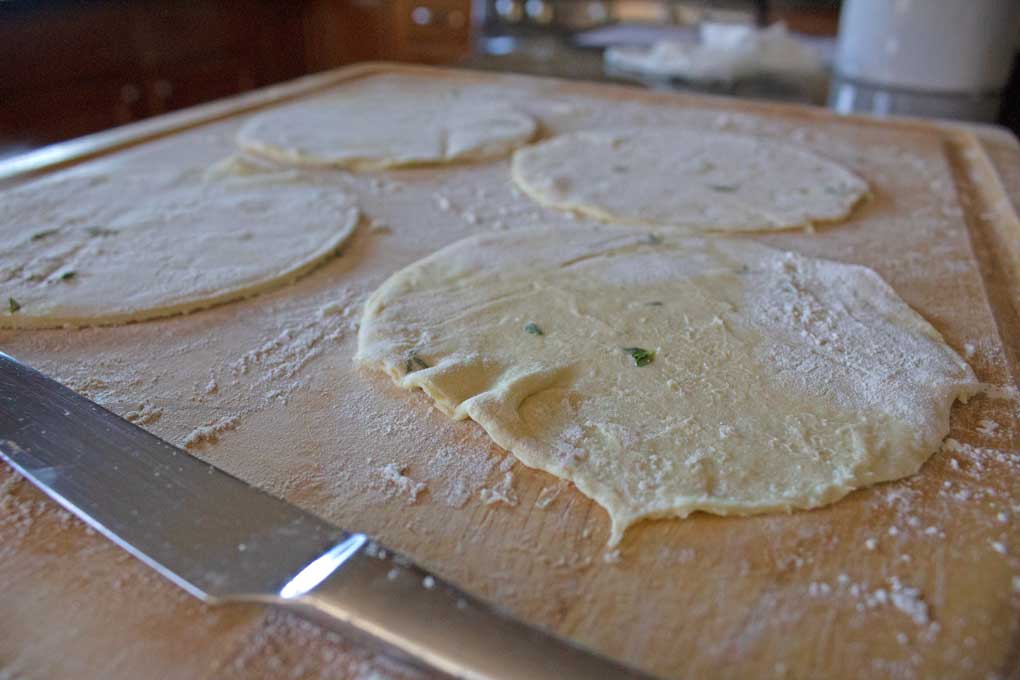
Next, re-flour the workspace and sprinkle with the rest of the thyme leaves. Roll out the second sheet of puff pastry. Cut out 3 to 4 circles about 1-inch wider than the previous sheet (for the tops).
Place the smaller circles onto the prepared baking sheet.
Don’t throw away the scraps of puff pastry dough. Check out THIS SITE to learn what you can do with them.
Assemble The Mushroom Wellington:
Divide the spinach among the four circles of dough on the baking sheet. Make sure the pile of spinach isn’t wider than the mushrooms.
Top the spinach with cheese, then a mushroom cap, smooth-side up.
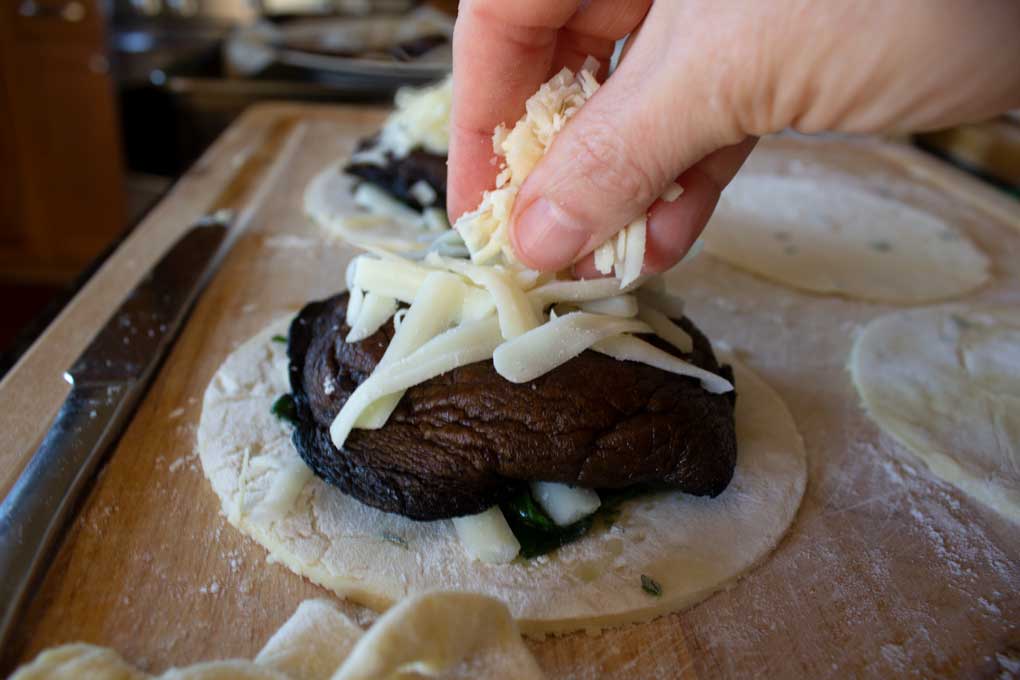
Finally, top the mushroom with a little more cheese and freshly grated Parmesan cheese.
Mix the egg wash and brush the border of each circle with some of it.
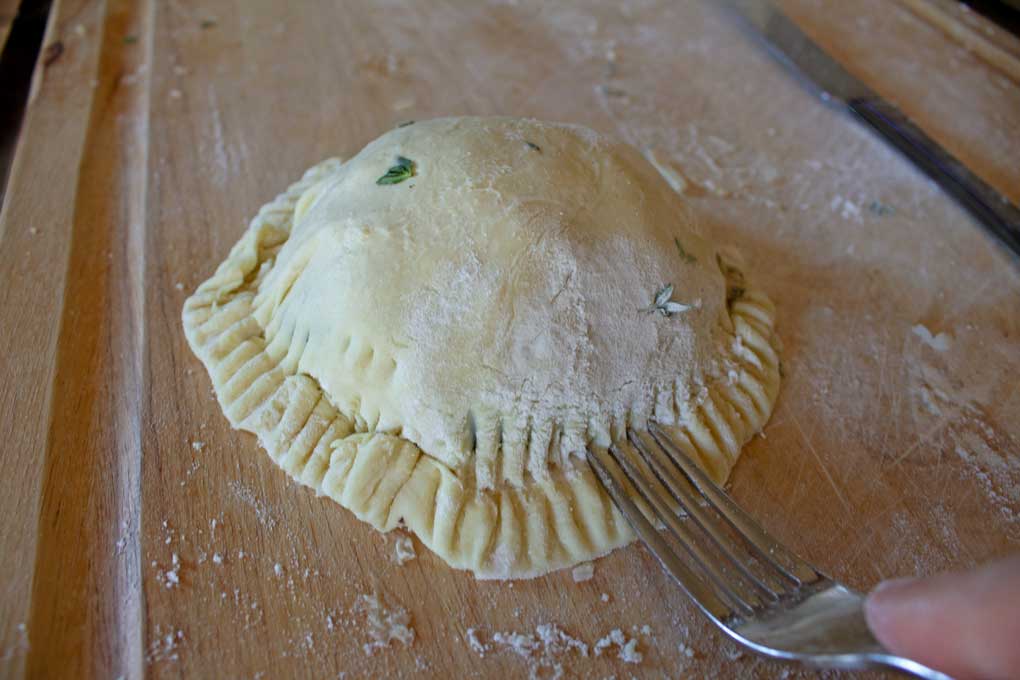
Gently stretch the larger circle over the mushroom, trying not to trap any air.
Fold the edges over and press the edges together with a fork.
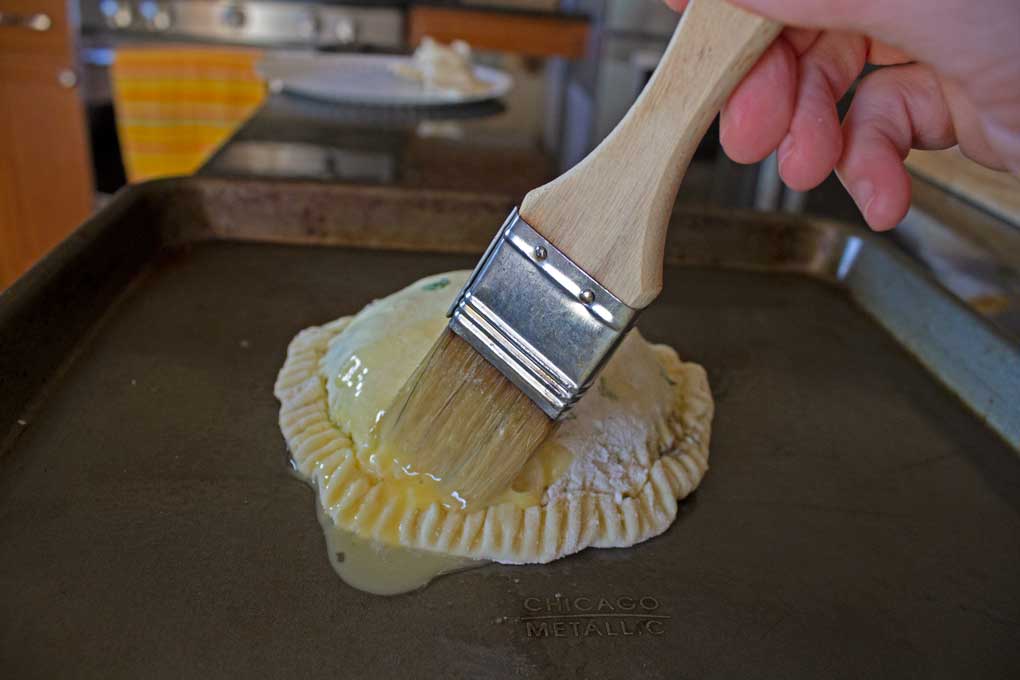
Use a pastry brush to brush each mushroom wellington generously with egg wash. Sprinkle each mushroom Wellington with Parmesan cheese on top and more thyme leaves.
Place the mushroom wellingtons in the refrigerator for about 15 minutes to chill the pastry dough back down.
NOTE: Chilling the pastry dough allows the gluten strands time to settle down and relax after being worked. This cuts down on any shrinking during baking and lets the available moisture find its way back into all parts of the dough.

Bake The Mushroom Wellingtons:
Place the sheet pan inside the oven. Bake the mushroom wellingtons until golden brown; about 30 to 40 minutes, or until the puff pastry is golden brown.
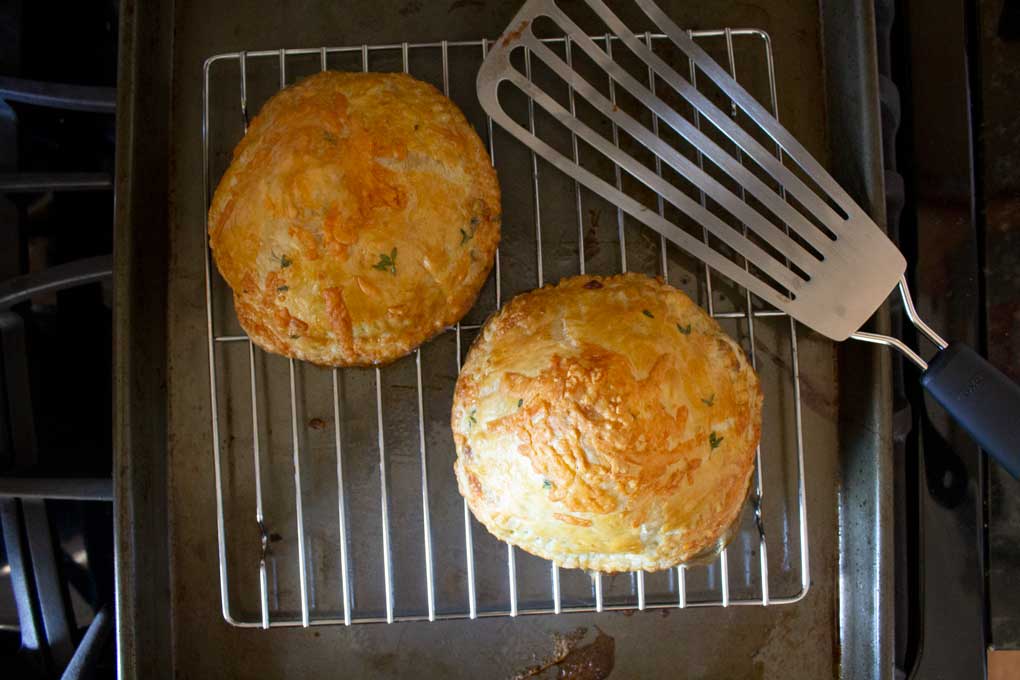
Transfer the mushroom Wellington to a wire cooling rack and allow them to cool for five minutes before serving.


These mushroom Wellingtons take a little bit of prep, but they are a lot of fun to make. I have never had the meat version, but the meatless version of this recipe is awesome!
If you love mushrooms, you should definitely give these a try.


Mushroom Wellingtons
Useful Equipment:
Ingredients
- 4 large Portobello mushroom caps
- 4 tablespoons extra-virgin olive oil (divided)
- 1 garlic clove minced
- 1 cup fresh spinach
- 1 dusting flour for workspace
- 1½ teaspoons fresh thyme leaves
- 1 package puff pastry dough (2 sheets)
- 1 ½ cups mozzarella cheese shredded or sliced
- ¾ cup parmesan cheese freshly grated
Egg Wash:
- 1 large egg beaten
- 2 tablespoons water
Instructions
- Thaw the frozen puff pastry according to package directions, then preheat the oven to 400 degrees F.
- Line a baking sheet with parchment paper; set aside.
Prepare The Mushrooms:
- Remove stems from the mushrooms (if they have any). Heat two tablespoons of the olive oil in a large skillet over medium-high heat. Sauté the mushrooms for 3 to 4 minutes on each side or until golden and cooked through. (see notes)
- Remove the mushrooms from the pan and place onto a paper towel to drain.
Cook The Spinach:
- Place the same pan back over the heat. Pour in the remaining two tablespoons of olive oil. Sauté the garlic for about 30 seconds so that it becomes fragrant (DO NOT BURN).
- Add the spinach to the pan with the garlic and cook for 2 to 3 minutes until completely wilted. Season with salt and pepper, to taste.
- Transfer the spinach to a sieve to drain thoroughly, while preparing the pastry.
Prepare the Pastry Dough:
- Scatter ½ teaspoon of the fresh thyme leaves over a lightly floured surface. Roll a sheet of thawed puff pastry out on the prepared floured surface to the thickness of a coin.
- Using a saucer or lid to a plastic container, cut out 3 to 4 circles about ½-inch wider than the mushrooms (for the bottoms).
- Next, re-flour the workspace and sprinkle with the rest of the thyme leaves. Roll out the second sheet of puff pastry. Cut out 3 to 4 circles about 1-inch wider than the previous sheet (for the tops).
- Place the smaller circles onto the prepared baking sheet.
Assemble The Mushroom Wellingtons:
- Divide the spinach among the four circles of dough on the baking sheet. Make sure the pile of spinach isn’t wider than the mushrooms.
- Top the spinach with cheese, then a mushroom cap, smooth-side up.
- Finally, top the mushroom with a little more cheese and freshly grated Parmesan cheese.
- Mix the egg wash and brush the border of each circle with some of it.
- Gently stretch the larger circle over the mushroom, trying not to trap any air.
- Fold the edges over and press the edges together with a fork.
- Use a pastry brush to brush each mushroom wellington generously with egg wash. Sprinkle each mushroom Wellington with Parmesan cheese on top and more thyme leaves.
- Place the mushroom wellingtons in the refrigerator for about 15 minutes to chill the pastry dough back down. (see notes)
Bake The Mushroom Wellingtons:
- Place the sheet pan inside the oven. Bake the mushroom wellingtons until golden brown; about 30 to 40 minutes, or until the puff pastry is golden brown.
Serving:
- Transfer the mushroom Wellington to a wire cooling rack and allow them to cool for five minutes before serving.


Laura Eure says
I am so going to try these….
Debbie Spivey says
They were really good. Tedious work but I had fun! 🙂
Modern Day Farm chick says
These look awesome! I’m going to have to give these a try.
Debbie Spivey says
Let me know what you think!
Hayley says
These look delicious! I think I’d personally miss the meat but these are what we have chosen from our wedding caterers menu for our veggie guests, I hope they turn out as yummy as yours look for them!
Debbie Spivey says
They are an excellent choice. Congrats and Best Wishes!! 🙂
Hayley says
Thanks Debbie 🙂
Leslee says
Is is possible to make this wellington the day before and bake the following day? Is there anything to change in the recipe to do this successfully?
The Mountain Kitchen says
Hi Leslee, I have never made them ahead, so I’m not exactly sure how they turn out. I would only make them 24 hours in advance. Allow the mushrooms and spinach to cool and drain well before assembling. Seal them well in plastic wrap before you refrigerate. Also, hold off on brushing it with eggwash until you are ready to bake them. Let me know how they turn out. Good luck!