Make authentic homemade tiramisu with creamy mascarpone, coffee-soaked ladyfingers, and rich cocoa. This easy step-by-step tiramisu recipe is perfect for birthdays, holidays, and special occasions.
Looking for the best homemade tiramisu recipe? This classic Italian dessert is rich, creamy, and layered with coffee-soaked ladyfingers, fluffy mascarpone custard, chocolate, and cocoa powder. In Italian, “Tiramisu” literally means “pick me up,” and this recipe truly does just that!
Homemade tiramisu got its name because it has layers of sponge cake (ladyfingers) soaked in coffee or coffee-flavored liqueur. The layers of coffee-flavored ladyfingers are separated by a fluffy, sweetened custard of Mascarpone cheese and egg yolks, whipped cream, and then topped with chocolate and cocoa powder.
Learn more about the history of tiramisu.
Why I Made This Tiramisu
My husband David’s birthday falls right at the start of Virginia deer season, which is perfect for him because he absolutely loves hunting and talks about it nonstop, from gear and licenses to deer reports and long conversations with his uncle Wayne, who taught him to hunt as a kid. As much as I tease him, I love seeing how excited and passionate he gets, even waking up at 3:30 a.m. to head out in the freezing cold. So while he was out chasing deer, I was on my own hunt, tracking down ladyfingers with the help of half the grocery store to make his requested birthday dessert recipe this year: homemade tiramisu.
This is not a traditional tiramisu recipe, but it is a great one. I’ve made this homemade tiramisu recipe several times, and I even got someone who doesn’t usually like coffee to love it!
Ingredients for this Homemade Tiramisu Recipe
The recipe card at the end of this post lists the complete ingredient list with measurements.
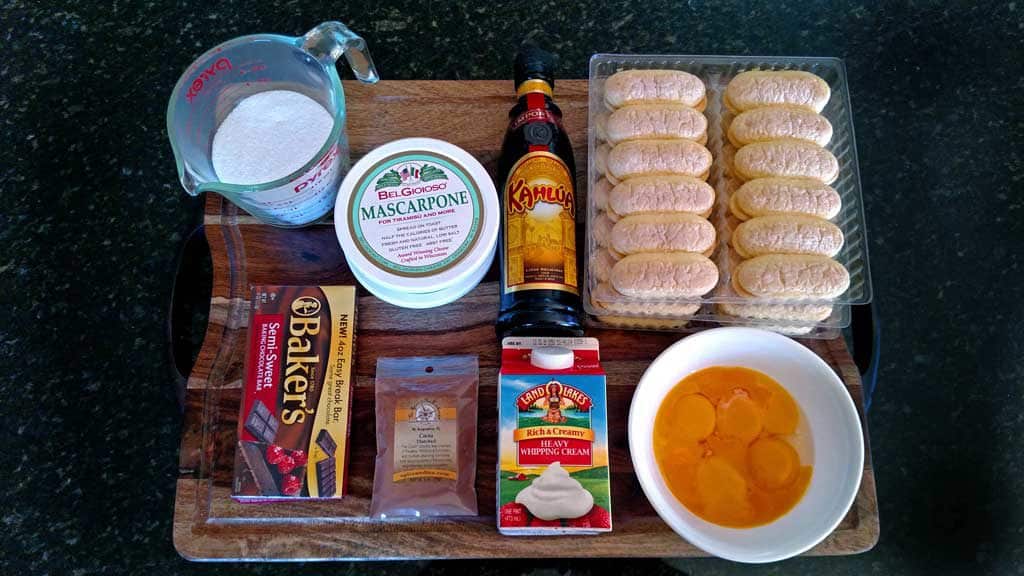
Ladyfingers (Savoiardi): Crisp Italian biscuits that form the layers. Use firm, Italian-style ones so they don’t get soggy.
Coffee or Espresso: Traditionally, strong brewed coffee or espresso gives tiramisu its signature flavor. But David LOVES Kahlúa! You can opt for coffee liquor or add a deeper flavor with Tia Maria, rum, or brandy, but skip if avoiding alcohol.
Egg Yolks: Create a rich, silky custard base.
Sugar: Sweetens and helps stabilize the custard.
Mascarpone Cheese: The creamy heart of tiramisu. Use real mascarpone for authentic flavor.
Heavy Whipping Cream: Whipped to stiff peaks to make the filling light and fluffy.
Cocoa Powder: Unsweetened cocoa for the classic finishing dusting.
Chocolate (Optional): Chocolate shavings or curls for garnish and extra richness (another David Must-Have).
How To Make Homemade Tiramisu
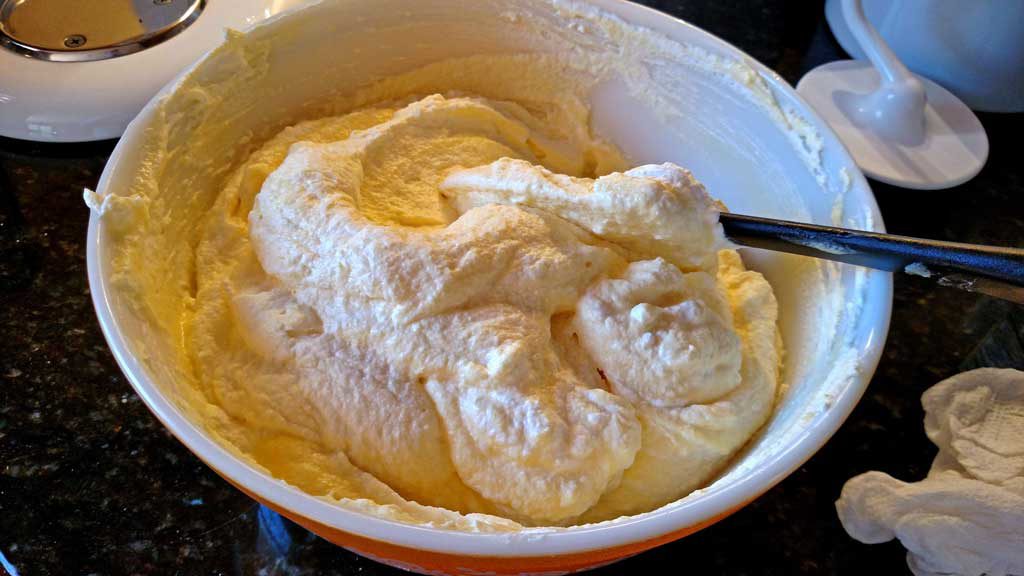
1. Make Whipped Cream
Chill your bowl and whisk. Whip cream until stiff peaks form.
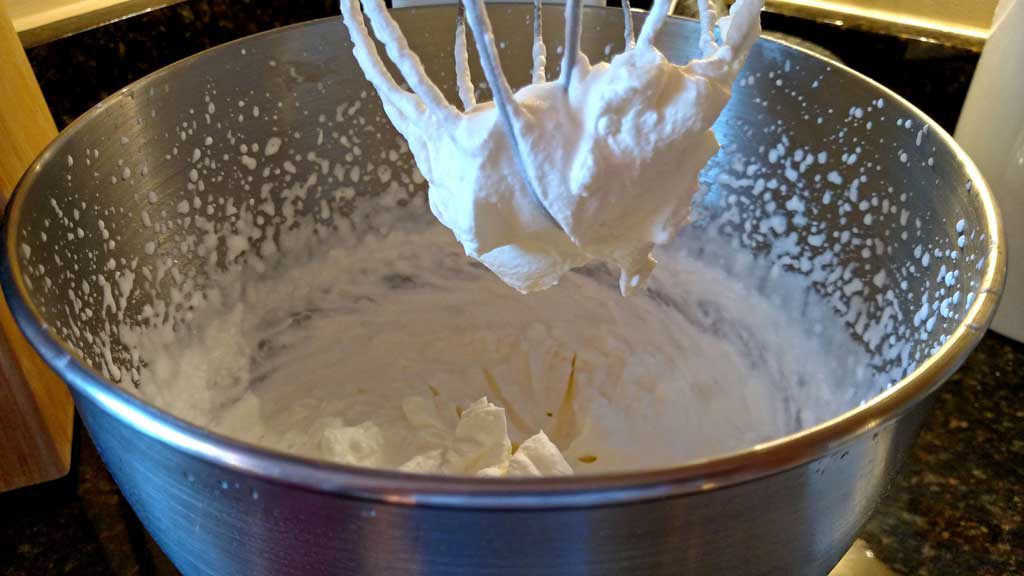
Place the bowl of whipped cream in the fridge until needed.
2. Prepare the Custard
Bring mascarpone to room temperature.
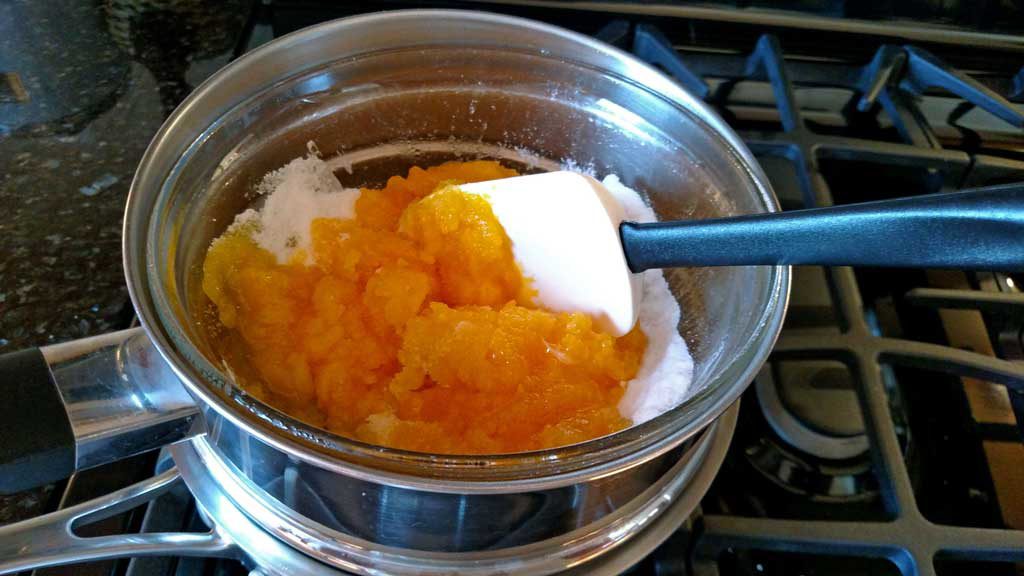
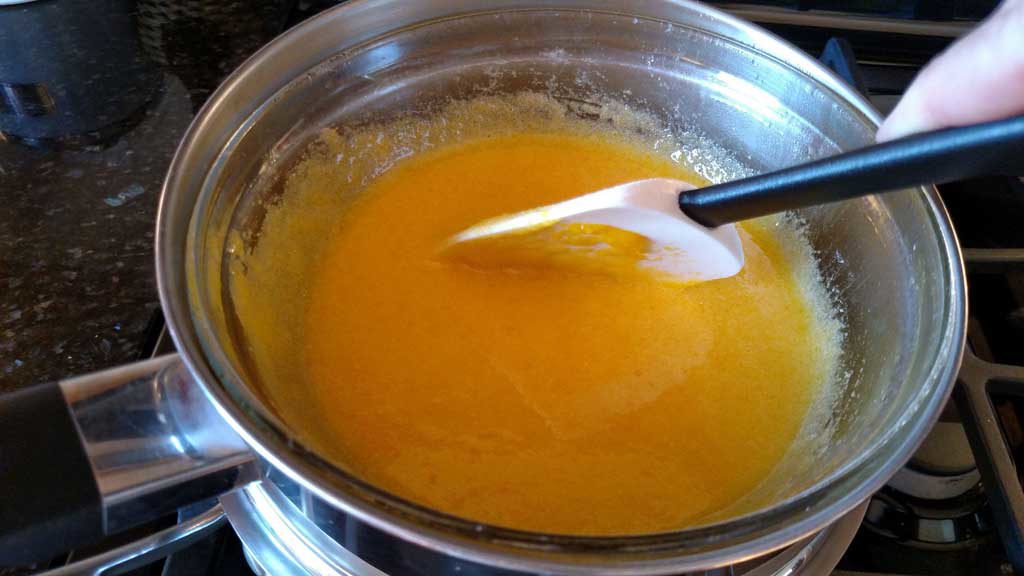
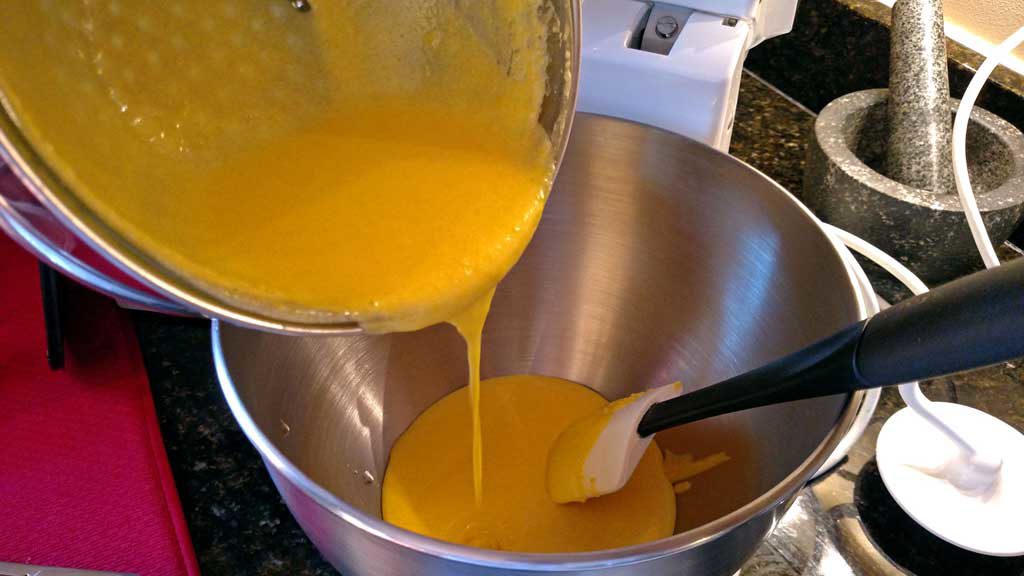
Combine egg yolks and sugar in a bowl over a double boiler. Stir constantly for about 10 minutes until smooth and silky. Remove from heat and whip until thick and pale. When you first mix the yolks and sugar, it is very clumpy.
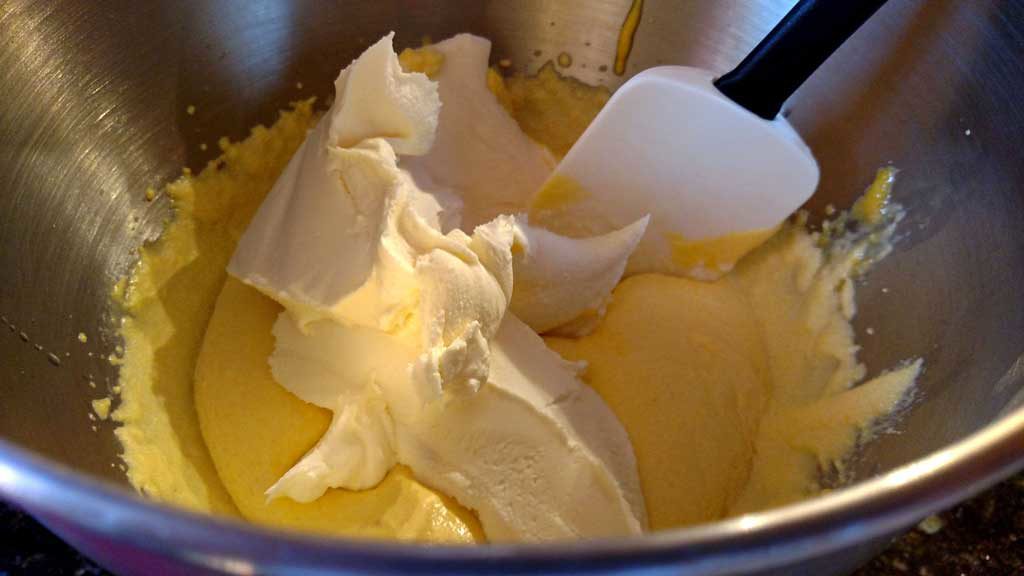
3. Add Mascarpone and Fold in the Whipped Cream
Beat mascarpone into the yolk mixture on medium-high speed until thoroughly combined.
The darker the yolks, the darker the color, but they should be a lemon color when ready for the addition of Mascarpone.
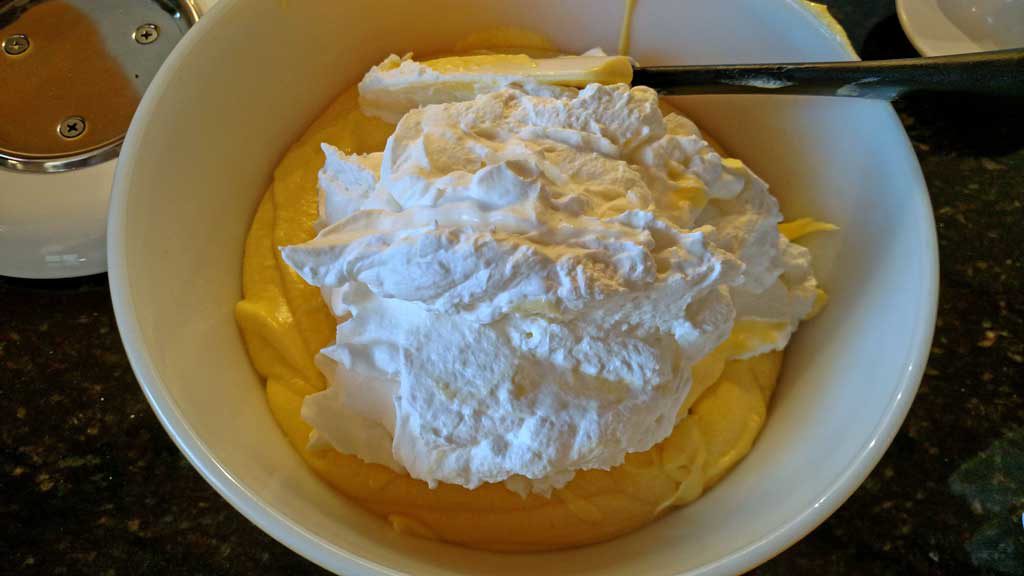
Gently fold the whipped cream into the custard mixture and set aside.
It’s important to fold the whipped cream into the custard without deflating the mixture. It is best to use a spatula or a large spoon. Using a gentle touch, run the spatula or spoon around the sides, then along the bottom of the bowl, basically pulling the bottom of the custard up onto itself. Rotate the bowl 90 degrees and repeat the same motion a few times, until just combined.
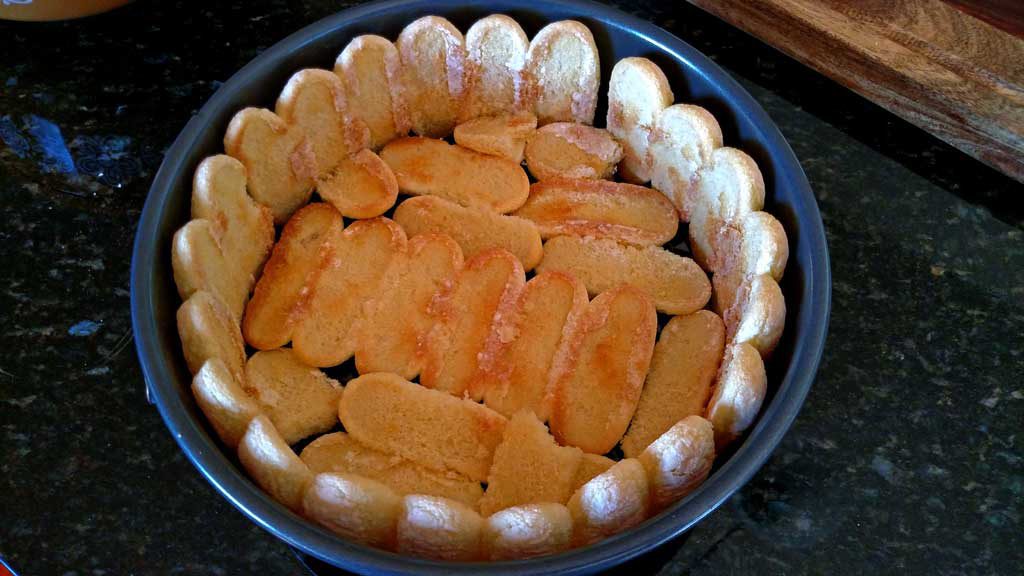
4. Prepare the Ladyfingers
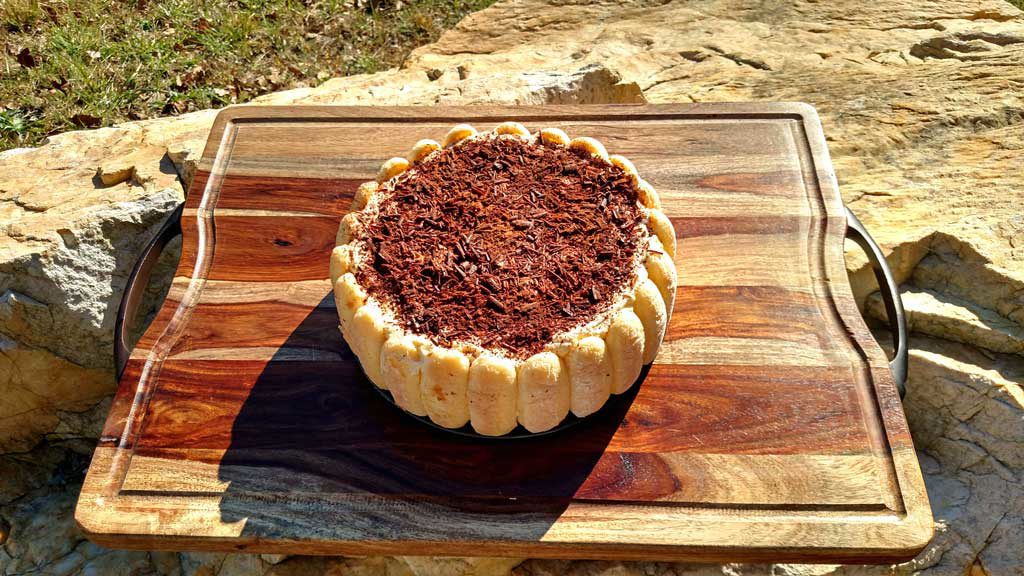
Line a springform pan or bowl with ladyfingers. Lightly brush the bottom layer with coffee or coffee liqueur.
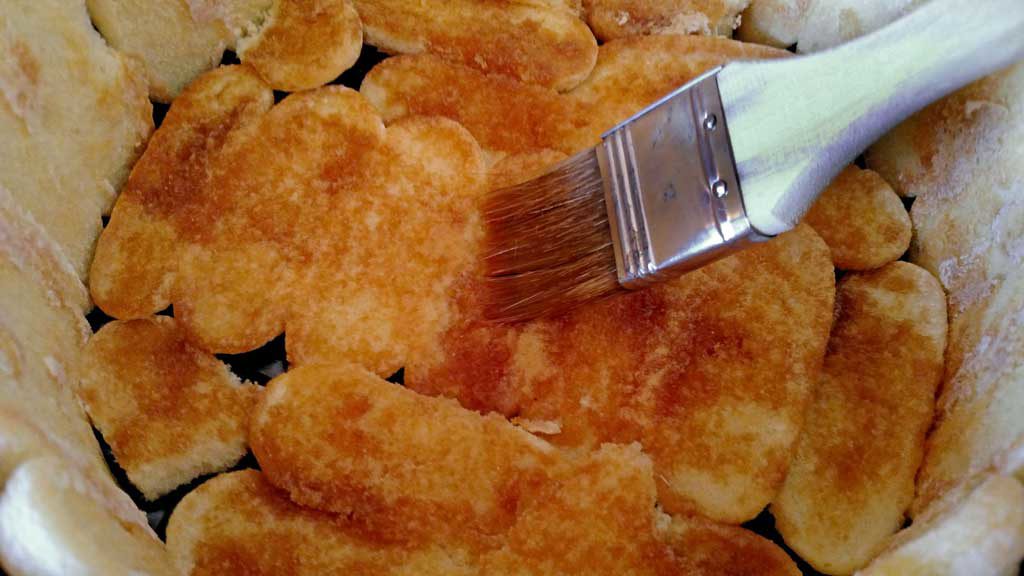
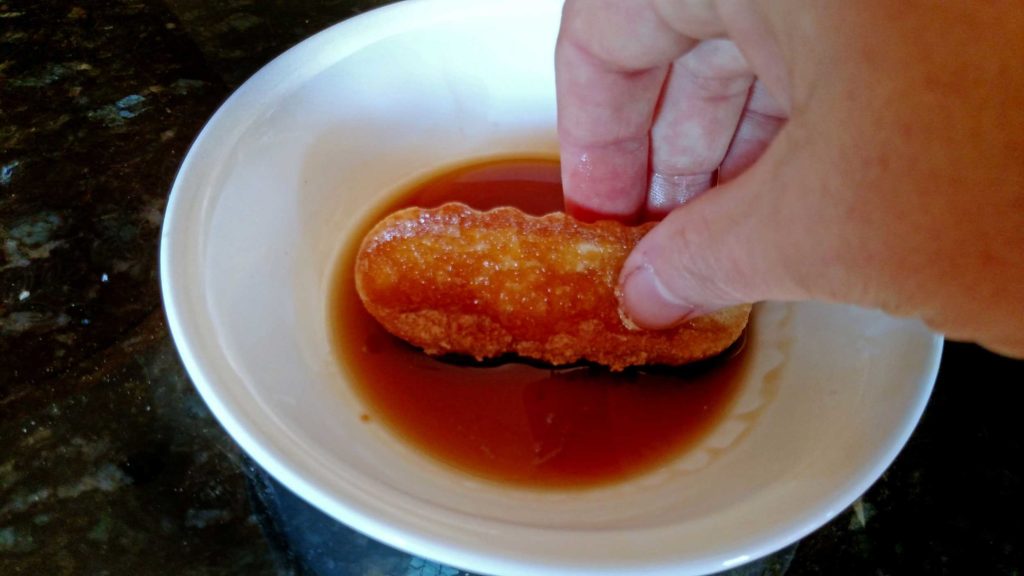
Make a quick dunk into the coffee liquor in a shallow bowl. DO NOT oversoak or they will get mushy.
5. Layer the Tiramisu
Spread an even layer of the mascarpone mixture.
Add another layer of coffee-dipped ladyfingers.
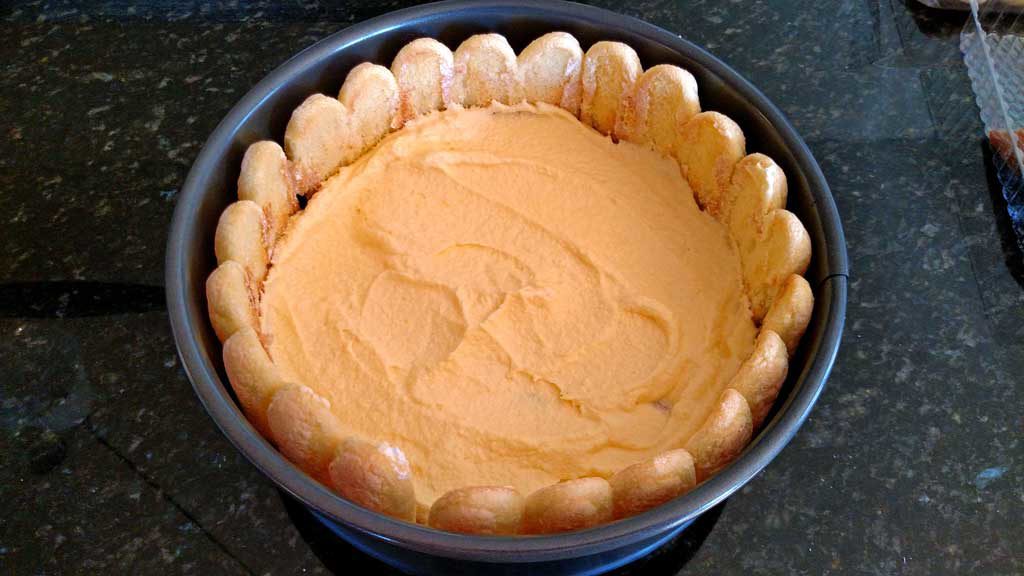
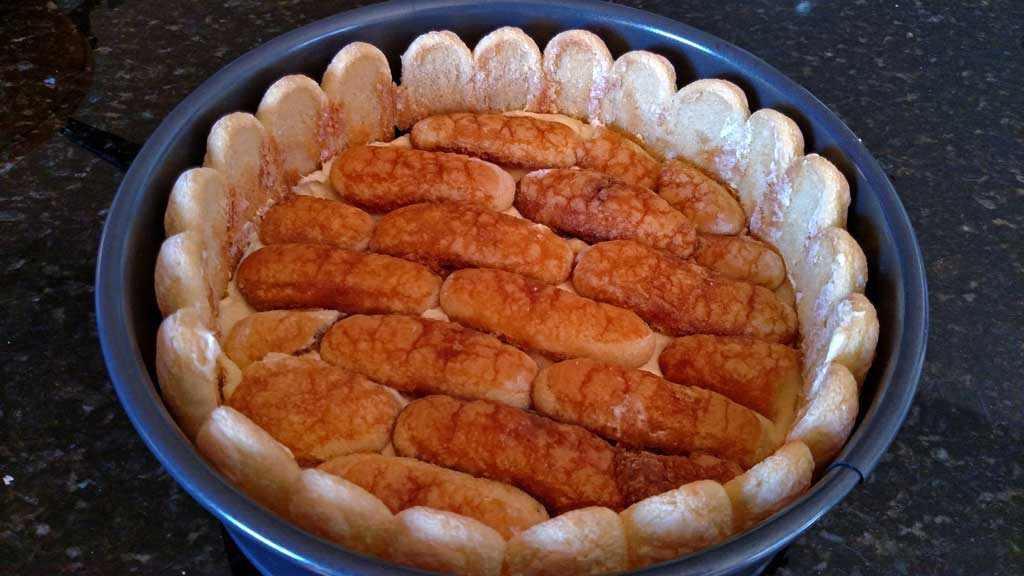
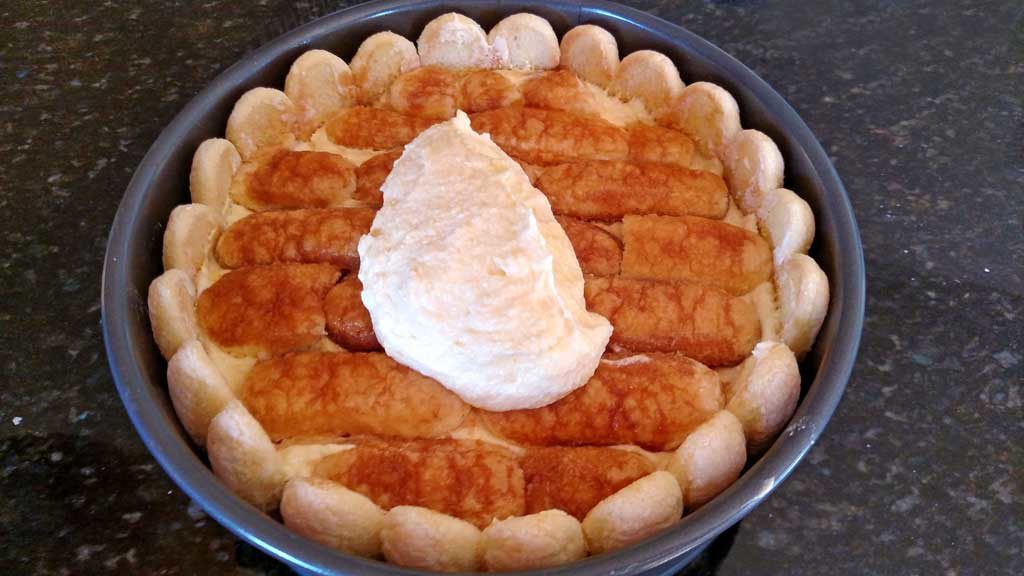
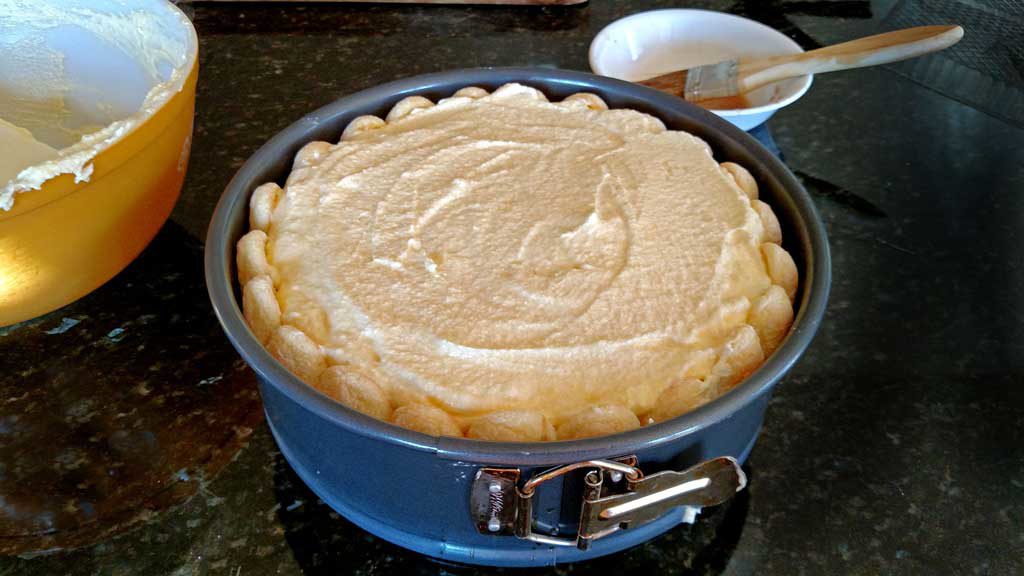
Repeat until you finish with a creamy top layer.
6️⃣ Chill and Garnish
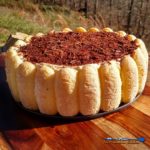
Dust generously with cocoa powder and chocolate curls.
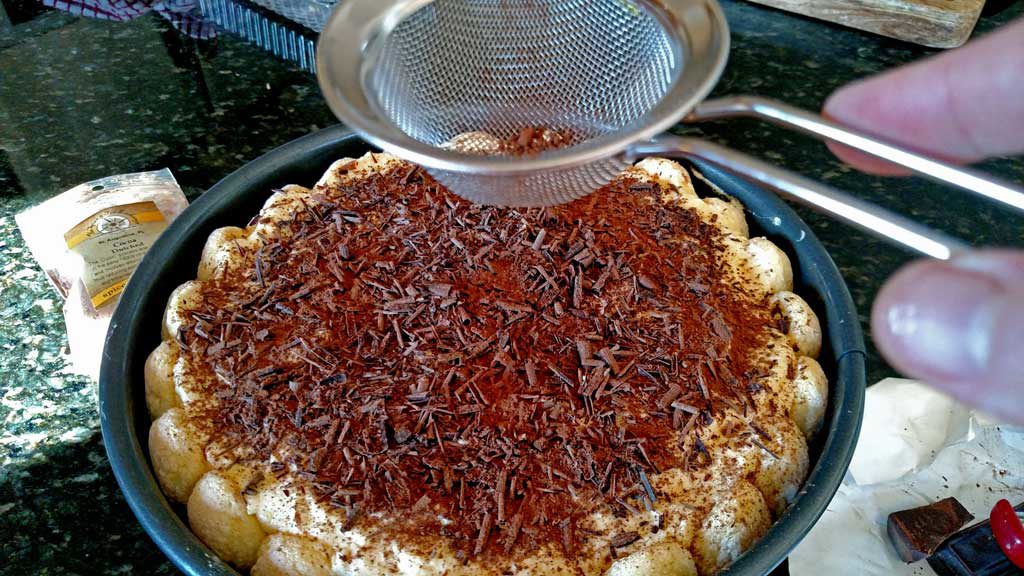
Refrigerate at least 4 hours or overnight.
Then slice, serve, and enjoy!
Recipe Tips
- If sugar and eggs get grainy, strain before whipping.
- Only lightly soak ladyfingers to avoid sogginess.
- For chocolate curls, use a fresh chocolate bar and peel with a vegetable peeler.
- Make ahead: This tiramisu tastes even better the next day after the flavors have melded.
- Use the leftover egg whites to make an omelette or fritada.
How to Store Homemade Tiramisu
- Refrigerator: Cover tightly with plastic wrap or a lid and store in the fridge for up to 3-4 days. The flavors actually improve after a few hours as the ladyfingers soak up the coffee and custard.
- Freezer: I do not recommend freezing this dessert. It’s just not good when defrosted.

David may live for deer season, but nothing makes him light up quite like a slice of homemade tiramisu. This creamy, coffee-kissed no-bake dessert is always a favorite. He happily polished off his slice, then went right back for mine too!

Homemade Tiramisu
Ingredients
- 6 egg yolks
- 1¼ cups powdered sugar
- 1 ¼ cups mascarpone cheese
- 1 ¾ cups heavy cream
- 24-30 ladyfingers split in half
- ⅓ cup coffee flavored liqueur I use Kahlúa
- 1 teaspoon unsweetened cocoa powder for dusting
- 1 ounce square semi-sweet chocolate or dark chocolate candy bar grated or curls for garnish
Instructions
Step 1: Prepare the Whipped Cream
- Chill a mixing bowl and whisk attachment in the fridge for 10–15 minutes.
- Pour heavy whipping cream into the cold bowl and whip until stiff peaks form.
- Cover and refrigerate until needed.
Step 2: Make the Custard
- Combine egg yolks and sugar in the top of a double boiler over simmering water.
- Reduce heat to low and cook, stirring constantly, for about 10 minutes until smooth and slightly thickened.
- Remove from heat and transfer to a mixing bowl. Whip until thick and lighter in color.
- Beat in mascarpone on medium-high speed until smooth and fully combined.
Step 3: Fold in the Whipped Cream
- Gently fold the chilled whipped cream into the custard mixture with a spatula, keeping the mixture light and airy.
- Set aside while assembling the tiramisu.
Step 4: Assemble the Tiramisu
- Line the bottom and sides of a springform pan or large glass bowl with ladyfingers.
- Lightly brush the bottom layer with coffee or coffee liqueur, avoiding oversaturating. (Do not brush the outside edge ladyfingers in a springform pan.)
- Spread ⅓ of the custard evenly over the ladyfingers.
- Dunk the next layer of ladyfingers quickly in coffee or coffee liqueur and place on top of the custard, staggering gaps as needed.
- Cover with another ⅓ of custard, then repeat with the final layer of coffee-dipped ladyfingers.
- Top with the remaining custard and smooth the surface.
Step 5: Garnish and Chill
- Dust the top with cocoa powder and decorate with chocolate curls.
- Refrigerate for at least 4 hours or overnight before slicing and serving.
Notes
- Use Italian Savoiardi ladyfingers for the best texture.
- Lightly soak the ladyfingers; over-soaking makes them mushy.
- Chill the whipped cream before folding it into the custard to keep the custard light and airy.
- Make ahead: This tiramisu tastes even better the next day after the flavors have melded.


Colleen says
I always love it when you “bake!” I’m right along there along with you feeling your pain about the only having one mixing bowl for your stand mixer. I’ve put one of my Christmas list this year.
The Mountain Kitchen says
Thanks, girl! I never need more than one until I do something like this. I’m surprised you do not have one as much baking as you do. YOU NEED ONE!!
Cheryl "Cheffie Cooks" Wiser says
Nice job Debbie-it was a win-win situation! Woo Hoo. Have a great weekend. Cheryl
The Mountain Kitchen says
Thanks Cheryl! You and your crew enjoy those mountains! 🙂
Sarah says
Happy belated Birthday to David! Love me some tiramisu 🙂
The Mountain Kitchen says
I will pass on the birthday wishes, Sarah. Hope you have a great weekend!
Dana @ IveGotCake says
Oh wow!!
Kudos to you for tackling this! Not gonna lie, I had no idea what Ladyfingers were either lol
Happy belated birthday David!!
The Mountain Kitchen says
Thanks Girl. Have a good weekend!!
Anna Buckley says
Now that’s my kind of birthday cake!
The Mountain Kitchen says
Ain’t it purdy?!? ?
Karen (Back Road Journal) says
There is no doubt that David liked the tiramisu if he ate two helpings. A belated birthday wish to him, may he have many more happy birthdays.
The Mountain Kitchen says
Thank you so much, Karen!
Jenny says
Your tiramisu looks lovely! That is my husband’s and my special dessert too. But we have only ordered it at restaurants. I have never tried to make it. Yours looks great–maybe I can do it too!! 🙂
The Mountain Kitchen says
It’s easy, Jenny! Go for it!!
Chitra jagadish says
Belated B’day to David and gorgeous tiramisu, feel like digging into it…am drooling st my screen… awesome Debbie…
The Mountain Kitchen says
Thank you so much Chitra. I will pass along the birthday wishes. This is a great recipe. Hope you’ll try it!
Hayley says
David looks like he had a GREAT birthday. I’ve been reading your posts for a while now and loving them. Your “Mountain Kitchen” lifestyle is my dream. Thanks for sharing!
The Mountain Kitchen says
Hi Hayley! Thanks so much for taking time to comment. I hope your dream of mountain life comes true. We love living on the mountain and I love sharing our adventures with people like you! 🙂
thomas vedora says
When I make this , I have an issue with the lady fingers that I stand upright around the outside fall off. How do I keep them from falling iff and securing them better?
The Mountain Kitchen says
Hi Thomas, I’m sorry the ladyfingers did not stand up. Can I ask how long it stayed in the springform pan before taking the ring off? I haven’t had any trouble with them falling off, so I am not sure if it’s because of the length of time it stayed in the springform pan or not. The addition of the filling in the center of the layers should give them enough to stick to. Perhaps the filling wasn’t spread out to the edges of the pan (vertical ladyfingers) enough? I would say make sure the filling in between the layers is spread out to the edges. I hope this helps!
Marian says
I’m anxious to try this recipe, however I don’t see anywhere in the recipe where it states what size pan is needed. Please let me know, as I have already purchased all the ingredients. Thank you for all your wonderful recipes. Marian
The Mountain Kitchen says
Hi Marian! Thanks for bringing this to my attention. I’ll have to update my recipe. It’s a 9″ springform pan. Enjoy this delicious recipe!
Pam says
Made your recipe for our son-in-love and it was beyond delicious! His favorite dessert is Tiramisu and yours is definitely a keeper! It was decadent and beautiful and easy to make using the best ingredients! (I did add a teeny bit of cinnamon in the custard.😎)
Thanks so very much! Pam
The Mountain Kitchen says
Thank you, Pam! I may have to try adding cinnamon next time. Yum!