
Smoked chuck roast is cheaper than prime rib, easier to get along with than brisket, and easier to come by in the grocery store.
A smoked chuck roast would be a great way to impress guests at your holiday party. Besides the fact that it’s a little different from ordinary holiday meats, beef chuck is cheaper than prime rib or beef tenderloin, easier to get along with than brisket, and is a lot easier to come by in the grocery store.
Follow our guide to take ordinary pot roast to a new level by smoking it like a brisket!
What is A Chuck Roast?
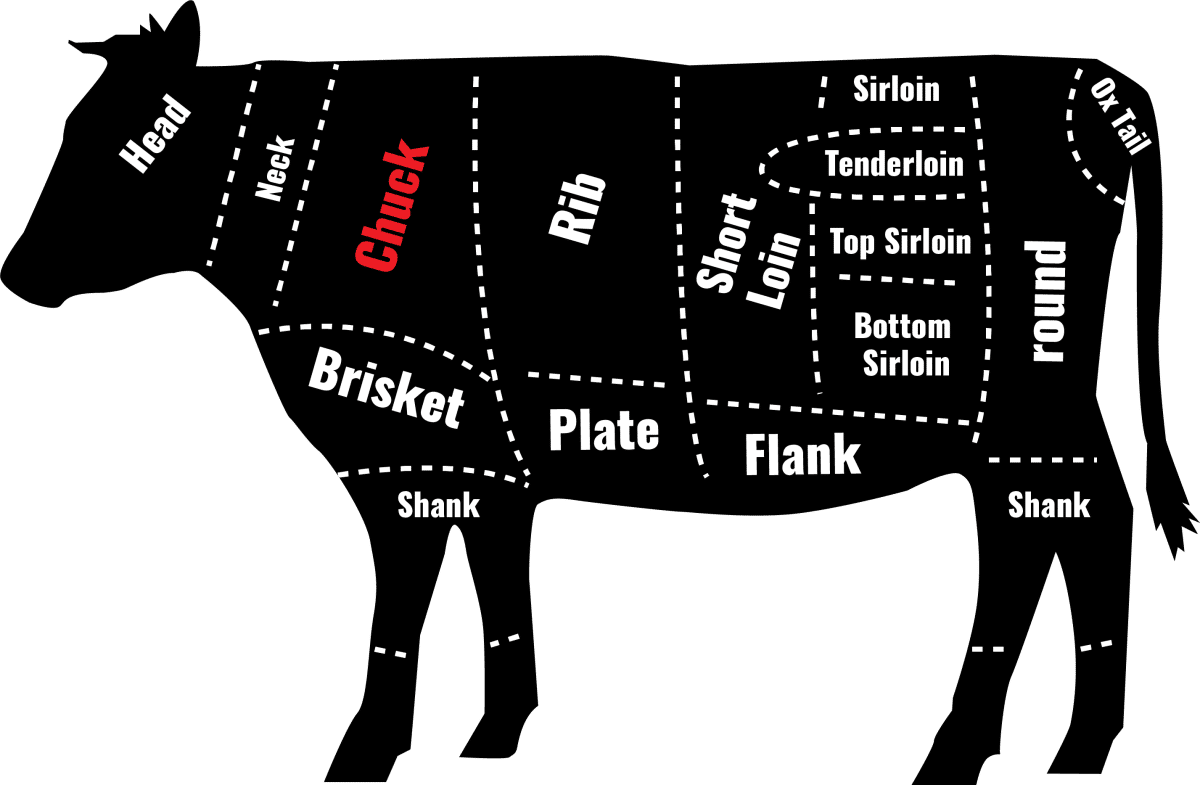
A chuck roast is a cut of beef from the cow’s shoulder. This cut of meat has superb marbling. However, chuck comes from the exercised shoulder area of the cow; it can be tough if not cooked properly. A chuck roast benefits from slow cooking to break down the tough connective tissue of the meat, making it fall apart tender and flavorful. It’s perfect for slow cooking, making it ideal for placing on your grill or smoker.

What You’ll Need To Smoke A Chuck Roast
Meat: Beef chuck roasts can range from 2-5 pounds. You should plan on feeding a half pound of meat per adult guest and a quarter pound per child. Of course, just in case, having an extra pound of meat is always a good idea.
Select a roast with a bright, white marbling of fat throughout the meat. Fat is the key to the meat’s tenderness, juiciness, and flavor.
Butcher’s Twine: A raw chuck roast is floppy, and the intramuscular fat and connective tissue are the only things holding the meat together. When you cook the roast, the fat, and tissues melt. We recommend tying the meat up with butcher’s twine to hold the meat together and make it easier to transfer the meat to the cutting board when it is done. You can find Butcher’s Twine on Amazon HERE.
Beef Rub: Use a beef rub to help you achieve a “flavorful bark” on the surface of the meat. Many use a mixture of kosher salt, black pepper, and garlic. You can use your favorite brisket rub or make our recipe found HERE.
Grill or Smoker: David smoked chuck roasts on his Weber Kettle charcoal grill and his Weber Smokey Mountain Cooker. You should follow the same principles and treat the chuck roast like a brisket, no matter what grill or smoker you use.
Charcoal: if using a charcoal grill, then you’ll need charcoal. We recommend using a charcoal chimney to get it hot.
Wood: use wood chunks or wood chips to smoke your roast. Chuck roast is like a brisket, and it takes on smoke well. We recommend Mesquite. Other options include post oak, pecan, hickory, or cherry wood.

Water Pan: we highly recommend placing a water pan underneath the meat to help stabilize and maintain your cooking temperature.

Meat Thermometer: Use a probe thermometer and/or an instant-read thermometer
Wrapping: You will need heavy-duty aluminum foil or butcher paper to wrap the meat once you get the desired bark. (Keep reading to find out what that is.)

How to Smoke A Chuck Roast
Here’s a basic overview of our smoked chuck roast recipe. The recipe card at the end of this post provides detailed instructions with times and temperatures.


#1 Prepare the Chuck Roast for Smoking
You’ll want to tie up the meat before rubbing it so you don’t knock off the rub while trussing it.
Truss The Meat: Secure chuck roast with 1 to 2 pieces of twine tied around the circumference of the meat and 3 to 4 pieces going around the width at 1 to 1 ½ inch intervals, making a grid pattern with the twine.
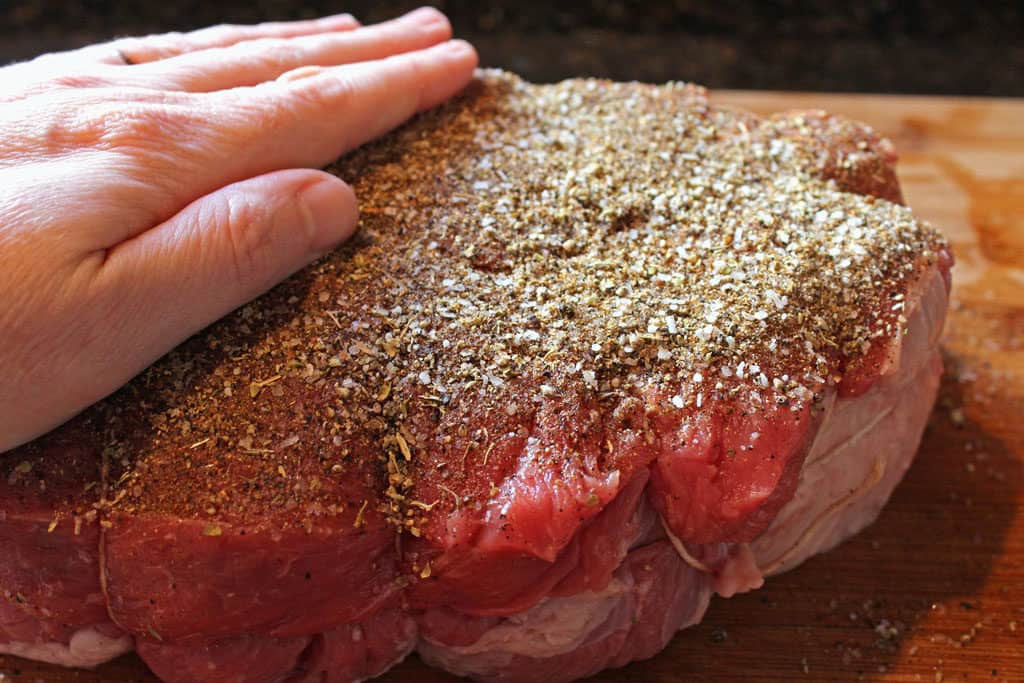
Rub The Meat: Rub the beef rub onto the chuck roast on all sides.
If making homemade beef rub, combine all the ingredients in a small bowl; stir with a whisk to mix and remove clumps. – Learn more about rubs HERE!

#2 Prepare the Grill or Smoker
- If using wood chips, soak a few handfuls for about 30 minutes in water before placing them on the coals.
- Preheat the smoker or charcoal grill to 250 degrees F. To maintain this low temperature, use only half as much charcoal as usual. (A half chimney-full.)
- If using a charcoal grill, set it up for indirect heat using a 3-zone split fire. A drip pan of water directly underneath the meat helps maintain and stabilize the temperature. A disposable pan is great for this grill setup.

#3 Smoking the Chuck Roast
When the coals are ready to cook, place the prepared chuck roast onto the center of the hot grate, over the drip pan filled with water, and insert temperature probes (if using).
Toss a few dry wood chunks or a handful of soaked wood chips onto the hot coals; cover and allow the beef to smoke. David uses dry wood chunks. The dry wood chunks provide a quick, intense smoke that increases the heat.
Bring the temperature up to 225-250 degrees F, using the grill or smoker vents, charcoal, and wood to regulate the temperature. You will need to add fresh coals and more wood almost every hour for at least the first 3-4 hours.

#4 Low and Slow Smoke
Check the smoker’s hourly temperature, staying as close to 225-250 degrees F as possible. Resist the temptation to open the lid unless you need to add more charcoal or wood to maintain temperature and smoke.

Wrapping the Smoked Chuck Roast
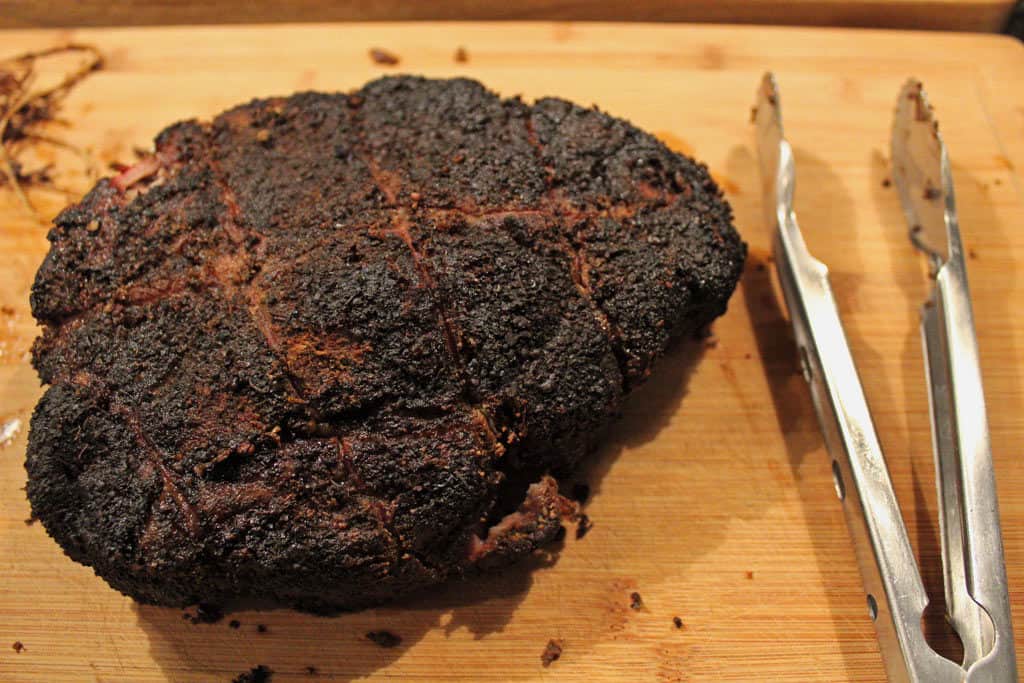
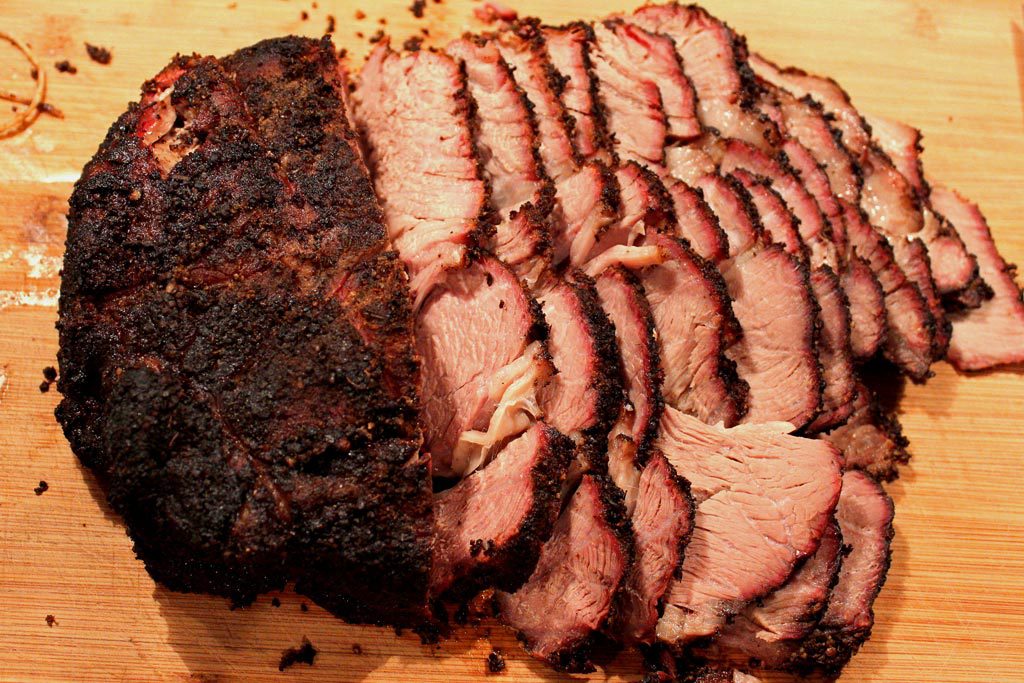
Smoke the chuck roast until a nice dark mahogany “bark” (outside crust) forms. At this point, the meat’s internal temperature is usually between 165-180 degrees F.
Remove the meat and wrap it tightly in heavy-duty aluminum foil or pink butcher paper. Then return the wrapped meat to the pit. Reinsert the temperature probe to help monitor the temperature. At this point, you do not need to add any more wood to the coals.
Wrapping the meat will stop the chuck roast from taking on any more smoke flavor, and it also allows you to stoke up the heat to finish the cook. It also helps with tenderness.
#5 Testing For Doneness
Once the meat is wrapped and placed over indirect heat, you can crank up the grill’s heat to about 350 degrees F for the remainder of the cook.
- Cook the chuck roast until the internal temperature reaches 205 degrees F. Cook time can take anywhere from 4 to 8 hours, depending on the weight of the meat and the amount of heat put under it.
- Monitor the temp with a probe thermometer and use an instant-read thermometer, such as a ThermapenOne, to help double-check for doneness.
- It is important to remember that the meat’s internal temperature can increase by 5-10 degrees even after removing it from the grill.
#6 Holding and Resting
Remove the roast from the offset smoker. Leave the beef wrapped tightly in foil or butcher paper, wrap it in a clean towel, and place it inside a cooler to rest for at least 1 hour.
Holding helps tenderize by allowing some carryover cooking which helps melt tough connective tissue. The foil captures the natural au jus for use in a sauce, and holding allows the surface parts that have dried out during cooking to absorb some of the juice.

#7 Slicing the Smoked Chuck Roast
Remove the foil-wrapped chuck roast from the smoker. Carefully unwrap the layers of foil and transfer the meat to a cutting board, tent with foil for about 15 minutes to cool to less than 150 degrees F.
- Don’t slice until the last possible minute. The smoked chuck roast dries out quickly once it is cut.
- When you are ready, start by cutting off and discarding the twine.
- With a sharp chef’s knife, slice the chuck roast thinly against the grain, about ⅛ to ¼-inch thick. For best results, slice only what you are serving, leaving the remaining meat whole.
#8 Serving the Smoked Chuck Roast
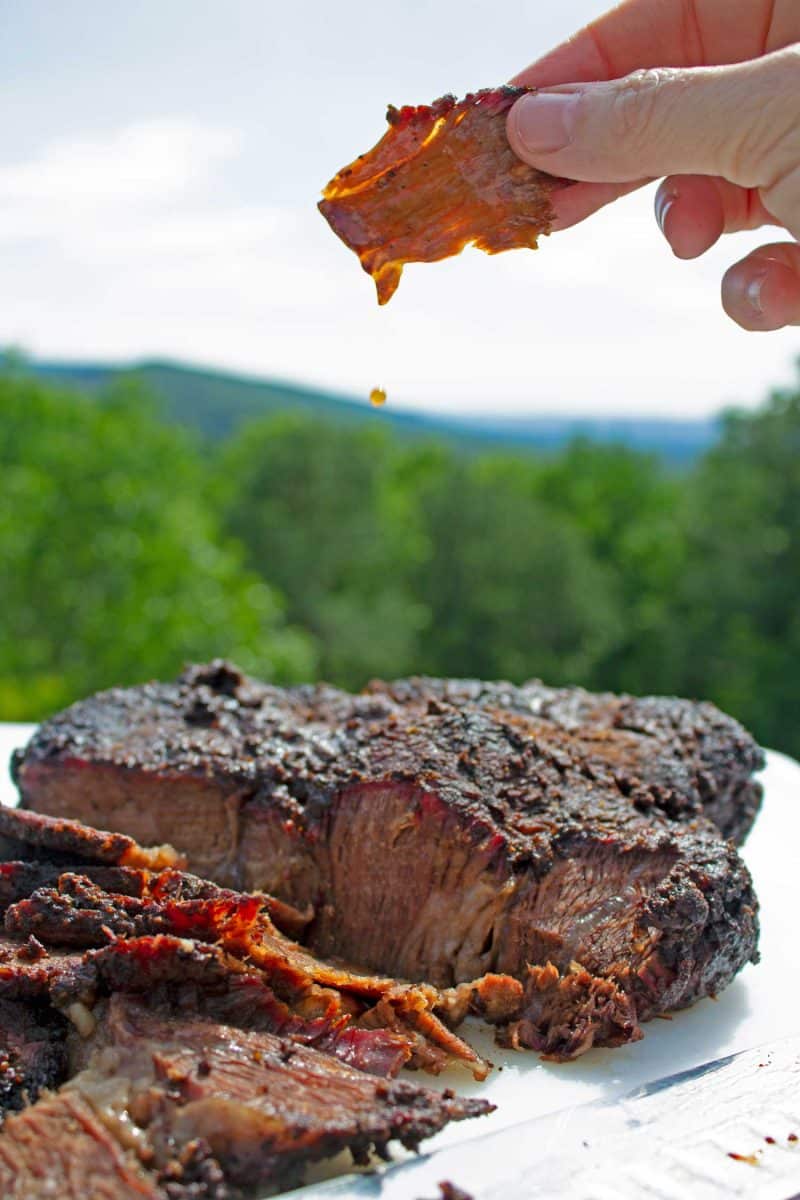
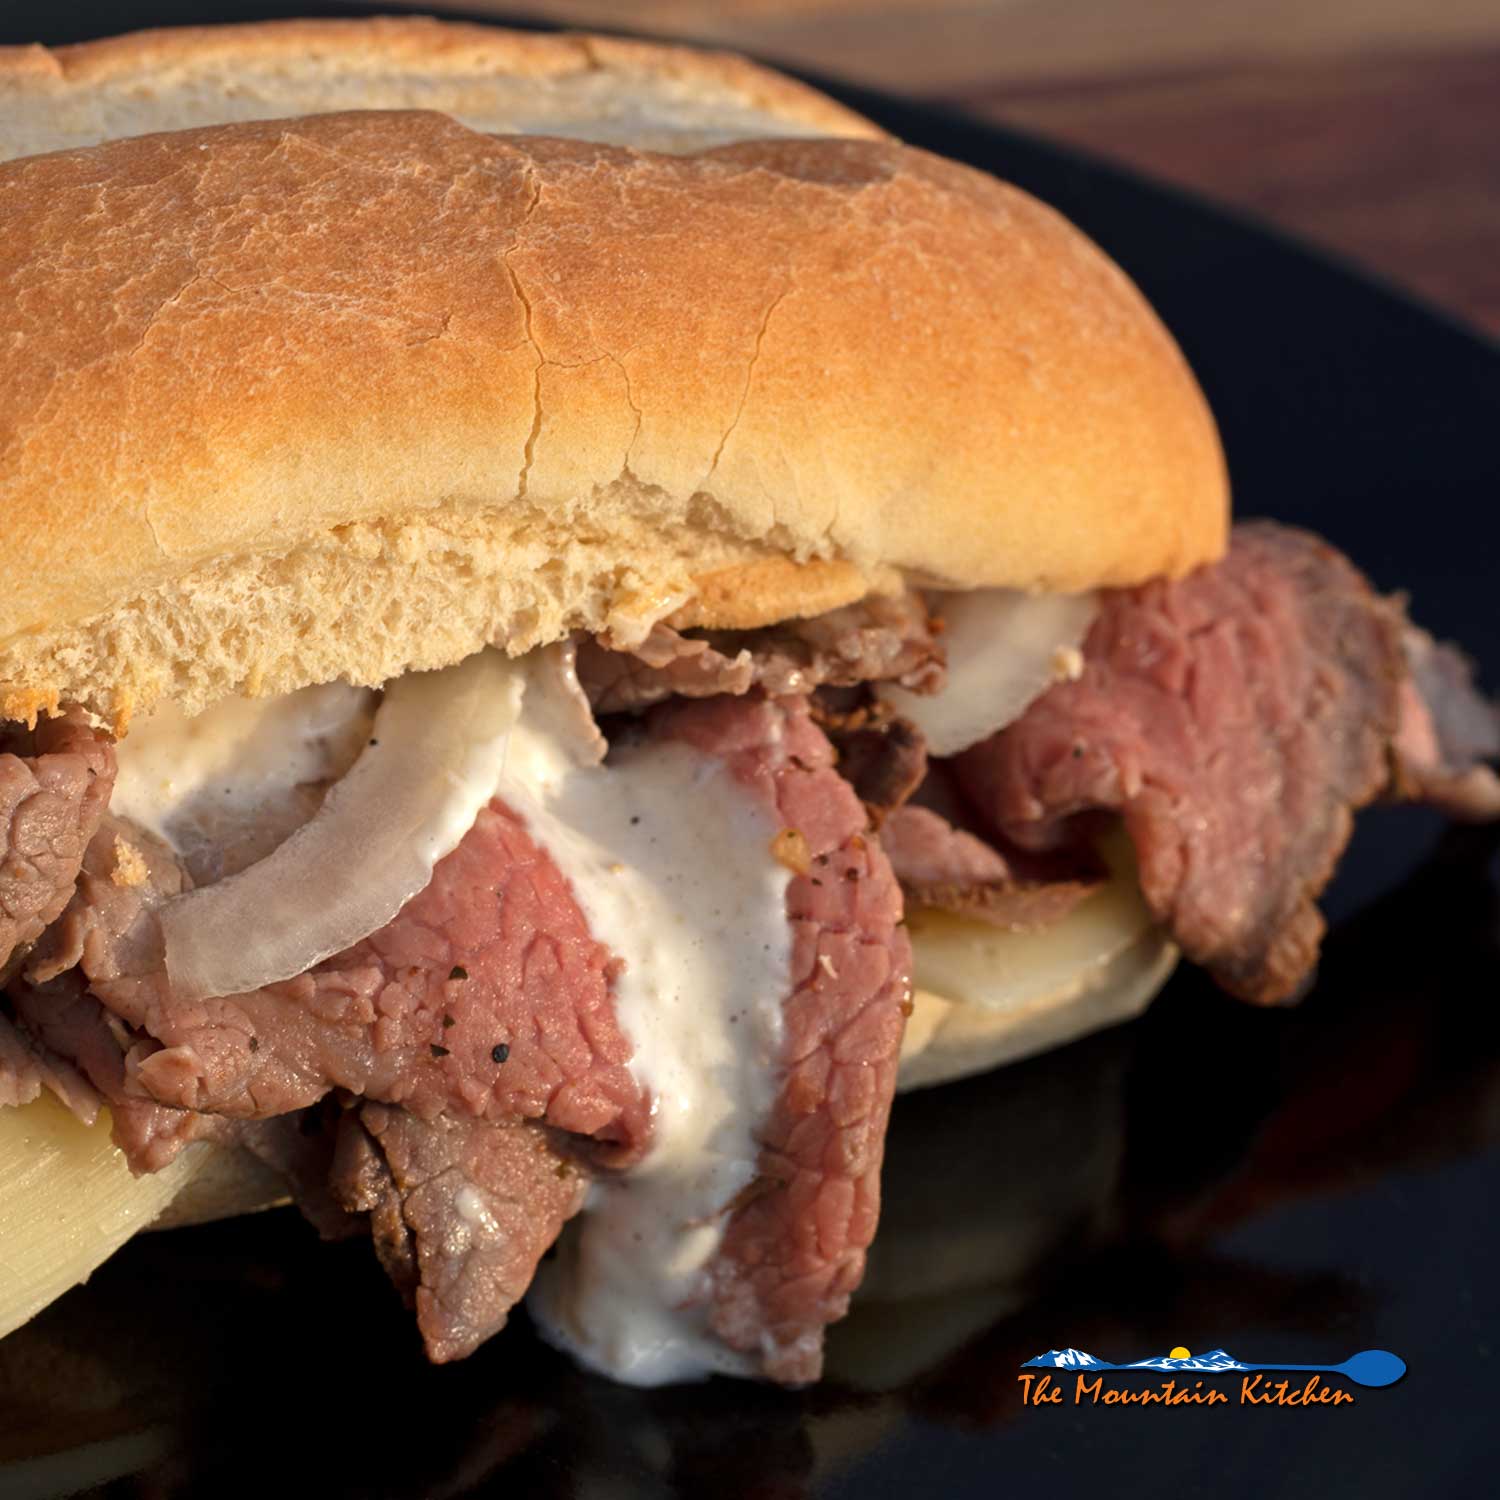
Perfectly cooked meat should be moist and juicy. You can serve it sliced on a plate or as a sandwich. If you wish, drizzle some sauce (cheese or BBQ sauce) and serve slices of flat fanned out like a deck of cards surrounded by chunks of burnt ends.
We made sandwiches with the slices for this smoked chuck roast and topped them with a homemade Beer Horseradish Cheddar Cheese Sauce.

Recipe Tips
- If you have time, wrap the roast in plastic wrap and let it cure in the refrigerator for at least 4 hours or as long as overnight. Smoking the roast immediately is ok, but sitting in the fridge for several hours allows the rub to penetrate the meat.
- Knowing the temp in your grill is crucial, so if your grill doesn’t have a temperature gauge, purchase a digital BBQ thermometer. David uses a Thermoworks Smoke™ probe thermometer. It has two channels, one for the meat and one for the smoker, with remote control. David is in love with it. The remote control saves him a lot of worrying about the smoker’s temperature. The alarm sounds each time it falls below the ideal smoking temperature. If you are a serious pit master, we highly recommend it.
- Store leftover smoked chuck in an airtight container for up to 3 days or freeze for up to 6 months.
What to Serve With Smoked Chuck Roast
Serve any of your favorite side dishes with this entre. Here are some of our favorites:
- Potato Salad
- Coleslaw
- Grilled Brussels Sprouts
- Quick Collard Greens
- Grilled Potato Wedges
- All Types of Salads
We hope you will use this step-by-step guide to smoke a beef chuck roast to enjoy with your family and friends. You’ll love this recipe and especially the cost savings!
Get smokin’!

Smoked Chuck Roast
Useful Equipment:
- Mesquite Wood Chunks Post oak, pecan, hickory, or cherry wood are also great for smoking beef.
Ingredients
What You’ll Need
- 5 pound beef chuck roast (3 to 5 pound)
Beef Rub – Use your favorite or make the following.
- 1 tablespoon salt
- 2 teaspoons black pepper
- ½ teaspoon cayenne pepper (use less if you do not like spicy food)
- 1 teaspoon oregano
- ½ teaspoon chili powder
- 2 teaspoons garlic powder
Instructions
#1 Prep the Chuck Roast for Smoking
- Secure chuck roast with 1 to 2 pieces of twine tied around the circumference of the meat and 3 to 4 pieces going around the width at 1 to 1 ½ inch intervals, making a grid pattern with the twine.
- Combine all the ingredients for the rub in a small bowl; stir with a whisk to mix and remove any clumps. Rub the spice rub onto the chuck roast on all sides. (see notes)
#2 Prep the Smoker
- If using wood chips, soak a few handfuls for about 30 minutes in water before placing them on the coals.
- Preheat the smoker or charcoal grill to 250 degrees F. Use only half as much charcoal as usual to maintain this low temperature. (A half chimney-full.)
- If using a charcoal grill, set it up for indirect heat with a drip pan (A disposable pan works great!) of water directly underneath the meat to help maintain and stabilize the temperature.
#3 Smoking the Chuck Roast
- When the coals are ready to cook, place the prepared chuck roast onto the center of the hot grate, over the drip pan filled with water, and insert temperature probes (if using). Toss a few dry wood chunks or a handful of soaked wood chips onto the hot coals; cover and allow the beef to smoke.
- Bring the temperature up to 225-250 degrees F, using the grill or smoker vents, charcoal, and wood to regulate the temperature. You will need to add fresh coals and more wood almost every hour for at least the first 3-4 hours.
#4 Low and Slow
- Check the smoker’s hourly temperature, staying as close to 225-250 degrees F as possible. Resist the temptation to open the lid unless you need to add more charcoal or wood to maintain temperature and smoke.
Wrapping the Smoked Chuck Roast
- Smoke the chuck roast until a nice dark mahogany “bark” (outside crust) forms. At this point, the internal temperature of the meat is usually somewhere around 165-180 degrees F.
- Remove the meat and wrap it tightly in heavy-duty aluminum foil or pink butcher paper. Then return the wrapped meat to the pit. Reinsert the temperature probe to help monitor the temperature. You do not need to add any more wood to the coals, and you can stoke up the grill or smoker to 350 degrees F for the remainder of the cook.
#5 Testing For Doneness
- Cook the chuck roast until the internal temperature reaches 200-205 degrees F. The cook time can take anywhere from 4 to 8 hours. Monitor the temp with a probe thermometer and use an instant-read thermometer to help double-check for doneness.It is important to remember that the meat’s internal temperature can increase by 5-10 degrees even after removing it from the grill.
#6 Holding & Resting
- Remove the roast from the offset smoker. Leave the beef wrapped tightly in foil or butcher paper, wrap it in a clean towel, and place it inside a cooler to rest for at least 1 hour.
#7 Slicing the Chuck Roast
- Remove the foil-wrapped chuck roast from the smoker. Carefully unwrap the layers of foil and transfer the meat to a cutting board, tent with foil for about 15 minutes to cool to less than 150 degrees F.
- Don’t slice until the last possible minute. The chuck roast dries out quickly once it is cut. When you are ready, start by cutting off and discarding the twine. With a sharp chef’s knife, slice the chuck roast thinly, against the grain, about ⅛ to ¼-inch thick. For best results, slice only what you are serving.
#8 Serving the Chuck Roast
- Perfectly cooked meat should be moist and juicy. You can serve it sliced on a plate or as a sandwich. If you wish, drizzle some sauce (cheese or BBQ sauce) and serve slices of flat fanned out like a deck of cards surrounded by chunks of burnt ends.
Notes
- If you have time, wrap the roast in plastic wrap and let it cure in the refrigerator for at least 4 hours or as long as overnight. Smoking the roast immediately is ok, but sitting in the fridge for several hours allows the rub to penetrate the meat.
- Always focus on the internal temp of the meat vs. the time. Cook time can vary, especially the size of the roast.
- Knowing the temp in your grill is crucial, so if your grill doesn’t have a temperature gauge, purchase a digital BBQ thermometer. David uses a Thermoworks Smoke™ probe thermometer. It has two channels, one for the meat and one for the smoker, with remote control. David is in love with it. The remote control saves him a lot of worrying about the smoker’s temperature. The alarm sounds each time it falls below the ideal smoking temperature. If you are a serious pit master, we highly recommend it.
- Store leftover smoked chuck in an airtight container for up to 3 days or freeze for up to 6 months.


J Cam from Oklahoma says
I used these instructions to smoke my first chuck roast in a pellet grill. I used a therm pro to monitor the grill temp and meat temp for the 1st time. The final results were amazing. The whole family was thrilled with the results. In order to save some pellets, I modified the instructions just a bit. After wrapping the meat in foil, I baked it in the oven at 225 for one hour.
Paya says
Hi! I only have a 2.5 pound roast. Would the time be cut in half or still
About the same?
The Mountain Kitchen says
Sorry for the delayed response. A good rule of thumb is 1 hour per pound, so a 2.5-pound recipe should take around 2.5-3 hours. It’s good to have a meat thermometer handy to measure the temp. Always go by temperature vs the amount of time. Thanks!
Don says
looks interesting but directions about holding are confusing. Do you get meet to 190 and then cook for another hour wrapped or pull it some temp before (Say 160) and finish wrapped which is what I do with brisket.
The Mountain Kitchen says
Hi Don! Sorry for the confusion. We need to make a few updates to this recipe. Treat this the same way you would a brisket. Since this recipe was written, we wrap the roast after we get the color on the bark we like (a rich mahogany color) and stoke up the heat, so it gets done a little faster. Remove from the smoker between 195-200 degrees and hold – the temp should shoot up to the ideal 205 degrees F. Hope this helps!
Katlan says
Made this tonight and smoked it for about 4 hours and let it rest for about 30 min. My pellet smoker is tiny so everything always cooks way faster than recipes say. I served it on King’s Hawaiian Pretzel Buns with the Horseradish Beer Cheese linked above. I added Swiss cheese slices leftover from another recipe and it was an excellent addition. My fiancé said it was amazing and insisted we eat the leftovers tomorrow for lunch. My brother said, “It slaps”. High praise from a Gen Z. Thank you for sharing!
The Mountain Kitchen says
Awesome, Katlan! So glad to share our recipe with you. Thanks for the great feedback!
Ron K says
Wow, what an amazing recipe. Tender, juicy, flavorful. I certainly understand it was not a brisket but honestly you could have easily fooled me and I’m sure most others. Mine got to temperature a little early so I wrapped it and put it in a cooler for 2 hours. It was still 155 degrees when I pulled it out so let it cool down a bit more before cutting. Again wow. Wish I was able to post a pic, it would make your mouth water.
The Mountain Kitchen says
Awesome, Ron! Thank you for taking time to review this recipe.