Homemade pastrami may seem complicated, but our step-by-step pastrami recipe will teach you how to make smoked pastrami from curing to smoking!

CALLING ALL SMOKED PASTRAMI LOVERS, it’s time to smoke deli meat!!
Smoked pastrami may seem like a complicated and lengthy process, but the truth be told, it’s really no different than smoking a brisket. Yes, it is a little bit of a process, but honestly, the hardest part is having the time and patience to allow it to cure.
We are excited to share our step-by-step pastrami recipe guide with you. This guide will walk you through the entire process.
Once you taste your very own smoked pastrami, it will be all worth it!
What is Pastrami?
Deli-Style Pastrami, also known as “Jewish Barbecue,” is a cured and smoked beef, often made from the flat (or deckle) portion of brisket.
It originated in what is now known as Romania. Then emerged in New York by Jewish immigrants in the 19th century.
Today it remains to be the best-selling deli meat, and you can find it on most deli menus. Very few delis still make pastrami due to the lengthy process of brining, drying, seasoning, smoking, and steaming the meat.
What’s the Difference Between Corned Beef and Pastrami?
Pastrami should not be confused with corned beef. The two are very different: corned beef is not smoked and pastrami is. Good pastrami is ultra smoky and super-seasoned with a peppery rub, marbled with melted fat, and melt in your mouth tender.
About Our Process
We were not satisfied with our original pastrami recipe. It was really salty, and it didn’t cure long enough. So we have extensively tested how to make really good smoked pastrami that isn’t too salty and amazingly flavorful.
Although David and I have never had the pleasure of visiting the great deli capital of the world in New York City, we can only imagine the delicious smoked pastrami that we made is just as good in comparison.
Our homemade pastrami develops layers of flavor through a process of brine curing, seasoning, smoking, and steaming the meat. We have put everything we have learned into this pastrami recipe step-by-step guide to help you bring something different to your table!
About Meat Selection
- Weight: Select a brisket flat that is about 5 pounds.
- Quality: The quality of the meat is very important, so don’t get cheap. Save up if you have to and buy the best brisket you can find. A local butcher with grass-fed, grain-finished beef should be your best friend.
- Cheaper Alternatives:
- Buy a whole brisket and separate the point, and flat yourself. Brisket is not as cheap.

- If you are new to smoking meat and this is your first time smoking pastrami, we recommend purchasing a chuck roast to test this on. That way, if it doesn’t turn out, you aren’t out a whole lot of money.
- Buy a whole brisket and separate the point, and flat yourself. Brisket is not as cheap.
About Curing Salt
- No Salt Substitutions: It is important to know that even though you only need a small amount of curing salt or prague powder, you cannot substitute the curing salt with another type of salt. Curing salt contains sodium nitrate that keeps bacteria from growing during prolonged curing.
- This Pastrami Recipe Is Not Too Salty: If you feel your blood pressure rising by the amount of salt used, don’t worry about it too much. Most of the salt will be poured off and never be eaten.
- Plan Ahead: Make sure you have the curing salt before you buy the meat. The first time we cured a brisket, we didn’t realize how difficult it can be to find curing salt at the store.
- Where Can I Get Curing Salt? I had to call several grocery stores, home goods, and sporting goods stores until I finally found a bag of curing salt at Wegmans.
Purchase a bag from Amazon here: Morton’s Tender Quick.
NOTE: Not all curing salt is pink. Pink curing salt is actually dyed pink so that it doesn’t get confused with table salt. The classic pink color of the meat comes from the sodium nitrate found in the curing salt, regardless of the color of the curing salt. So don’t worry if your curing salt is not pink.

How Long Does it Take To Cure the Meat?
God, I wish we knew…lol! Honestly, I wish we could tell you the exact time at which your meat will cure completely. This is where we struggled the most.
The reality is there are a lot of hidden variables inside the meat itself. We brined the brisket in the brine solution for anywhere from 4 to 7 days. The longest brine we did was on a 5-pound brisket for 7 days. It, too, had a larger uncured spot in the thickest part of the brisket. This may have been larger than one of the smaller briskets we tested with less time.
Our best recommendation is to purchase the thinnest brisket flat you can find and let it brine for 5 to 10 days. Even then, you still may want to try injecting it with an injector (see instructions below).
There are still no guarantees that it won’t have the dreaded gray spot in the center. However, it will still be extremely good, and you can still eat your misfortune. Darn, you’ll have to try again…
Can I buy Corned Beef from the store and smoke it instead of curing it myself?
Absolutely! We actually tested our pastrami recipe with a small 2-pound Boar’s Head of corned beef. It was lacking in some of our brine solution flavors, but nothing was wrong with it.
We recommend soaking store-bought corned beef in fresh water for two hours, draining and replenishing it with more water after 1 hour. This will help prevent it from being too salty.
HOW TO MAKE SMOKED PASTRAMI
THINGS NEEDED:
- 2-Gallon Zip-Top Bag or Briner Bucket
- Charcoal Grill or Smoker
- Aluminum Pan (if using a charcoal grill)
- A bag of maple wood chunks
- Charcoal
- Charcoal Chimney
- Tongs
- Meat Thermometer
- Heavy-Duty Aluminum Foil
- Meat Injector (optional)
3 Components of Smoked Pastrami:
- Meat: 5-pound beef brisket
- Brine Solution: In addition to Kosher salt and water, you will need Curing salt or prague powder, garlic powder, fresh garlic, black pepper, and pickling spice.
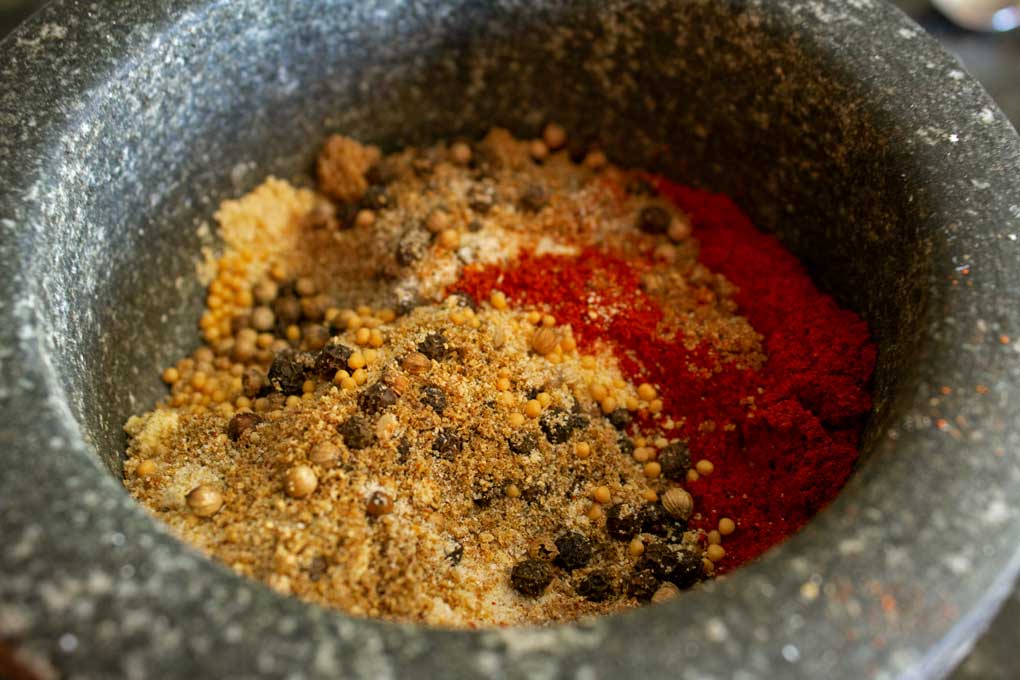
- Rub: whole black peppercorns + fresh ground black pepper, whole coriander seeds + ground coriander, brown sugar, paprika, garlic powder, whole mustard seed + ground mustard.
The exact measurements of each ingredient are provided in the recipe card at the end of this post.
Prepare the Brisket to be Corned Beef
- Rinse the brisket under cold running water and blot dry with paper towels.
- Trim the brisket to leave a ¼-inch cap of fat to melt over the meat while smoking. Any less and the brisket will dry out; any more, and will prevent the seasoning from penetrating the meat, set aside.
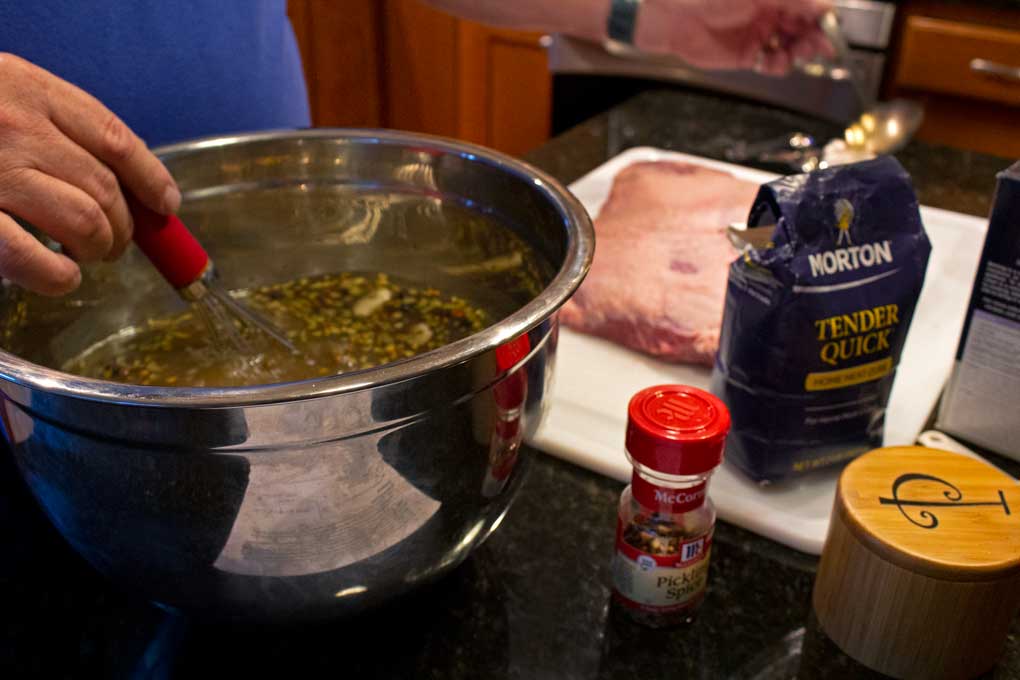
- Combine all the brine ingredients, except for the water, in a large bowl. Stir with a whisk to ensure there are no clumps. Add the water and stir until the salt has dissolved.
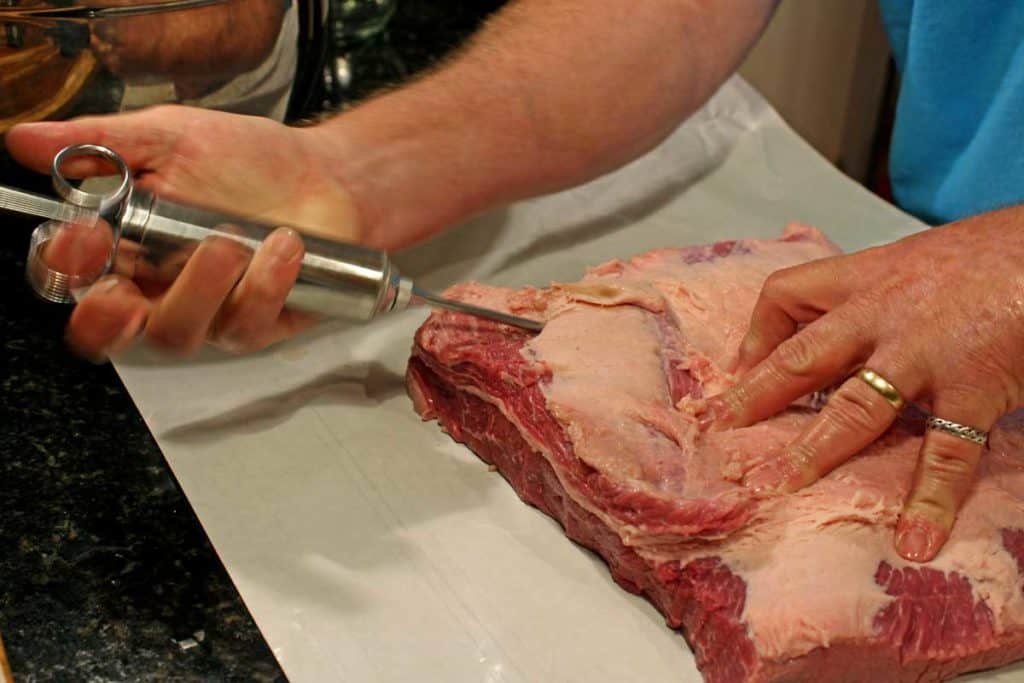
Injecting the Meat (optional)
To help the curing salt penetrate the meat, you can use a meat injector to inject the brine into the brisket. This step is optional and may or may not help it along.
You will need about ½ cup of brine solution to inject the meat. Inject some of the brine every one to two inches, about halfway into the thickness of the meat, to form small pockets.
How to Turn A Brisket Into Corned Beef
Plastic Bag:
- Place the meat inside a large 2-gallon zip-top bag.
- Pour all the brine inside. Squeeze as much air from the bag as possible and seal it tight.
- Place the bag inside a deep casserole dish large enough to hold it or a double bag to ensure it doesn’t leak.
Briner Bucket:
Alternatively, you can use a briner bucket to submerge the meat into the brine solution to cure it. It’s cleaner with less hassle. (Read more HERE)
Leave the curing meat inside the refrigerator for about 6 days (minimum of 5 days/maximum of 10 days).
Flip the brisket once every 24 hours to ensure even contact with the meat.
The result of the curing process is corned beef.
Rub the Corned Beef For Smoking
The flavors inside the corned beef have already begun to develop from the brine. To take the flavors a step further, we developed a rub. This will help the pastrami form a flavorful crust (also known as bark)on the outside of the smoked pastrami.
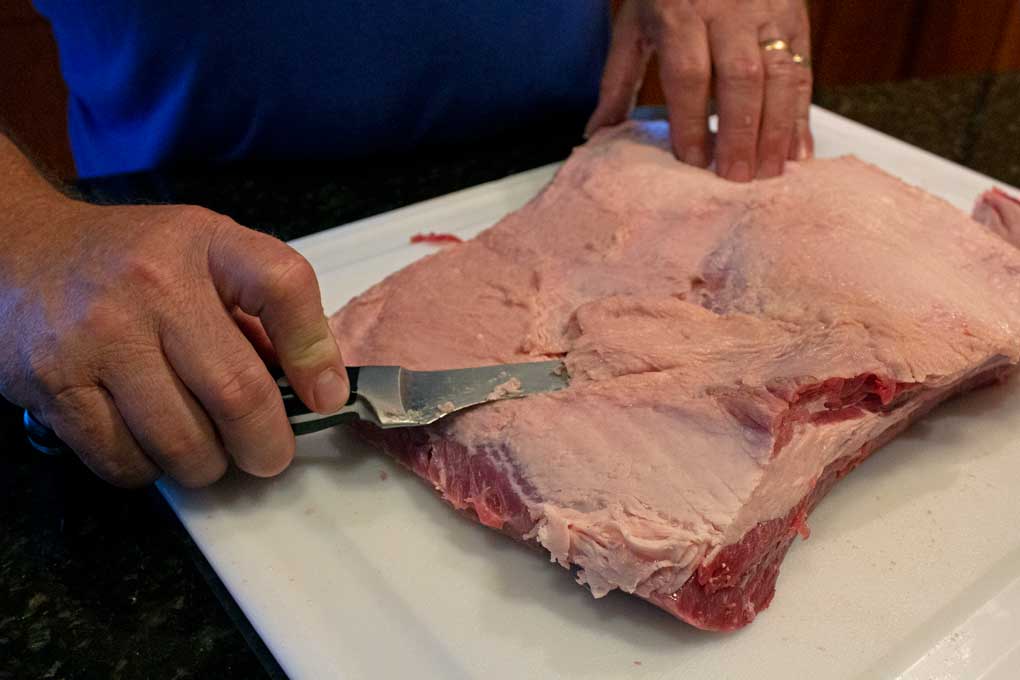
- Remove the meat from the brine, and rinse it under cool running water.
- Blot the corned beef dry with paper towels.
- Place the corned beef fat cap down onto a large cutting board or sheet pan.
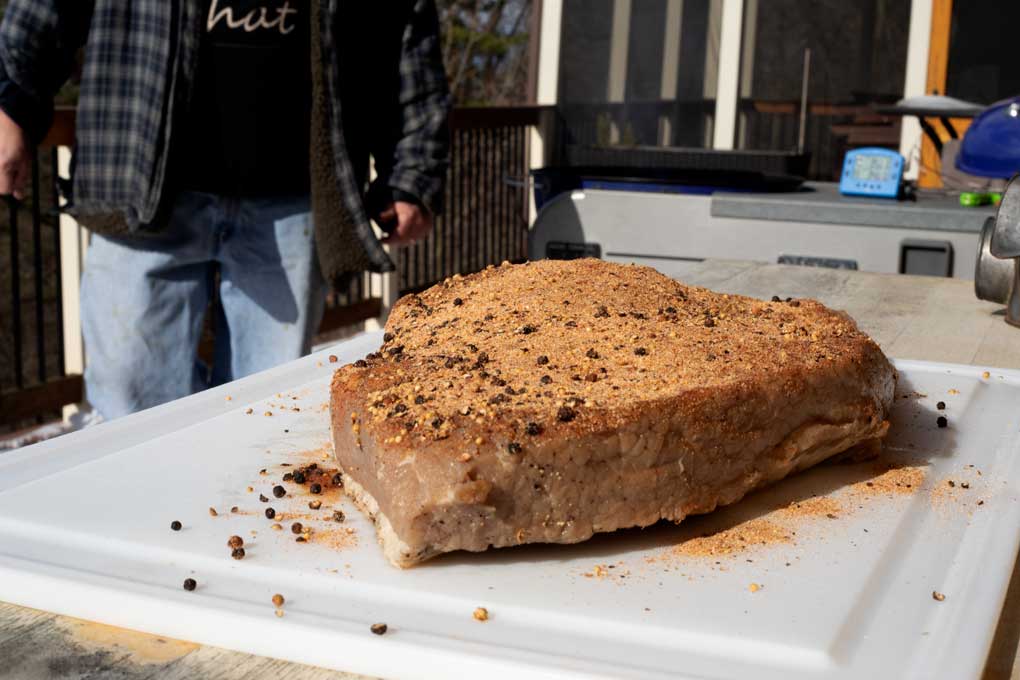
- Generously sprinkle the meat with the rub on both sides and the top (non-fat-cap-side, pressing it into the surface to help it adhere. The fat-cap side will be done after placing it on the smoker. Set aside while preparing the smoker.
How to Set Up the Grill or Smoker to Make Smoked Pastrami
Smoking is a form of indirect cooking and usually takes place over a period of hours over low temperatures.
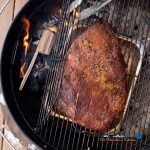
For this smoke, David uses maple wood chunks and charcoal with his 22-inch Weber Performer. We chose maple because of its mild, sweet flavor that won’t overpower the already well-seasoned meat with strong wood smoke. Any fruitwood or mild smoking wood will do if you can’t find maple.
For long cooks, David loves using the snake method (also known as the fuse method) when using the Weber kettle. It’s easy to control and practically maintains a consistent heat without having to tend the grill.
To cook using the snake method, lay a chain of charcoal in a half-circle along the outer edge of the grill. There should be 3 layers with 2 charcoals on the bottom with one charcoal on top. Place a chunk of maple wood every few inches along the top of the “snake.”
Turn the charcoal chimney upside down and light only a small handful of charcoal. When the charcoals are hot, you just drop the lit coals onto one end of the “snake” to start the cook.
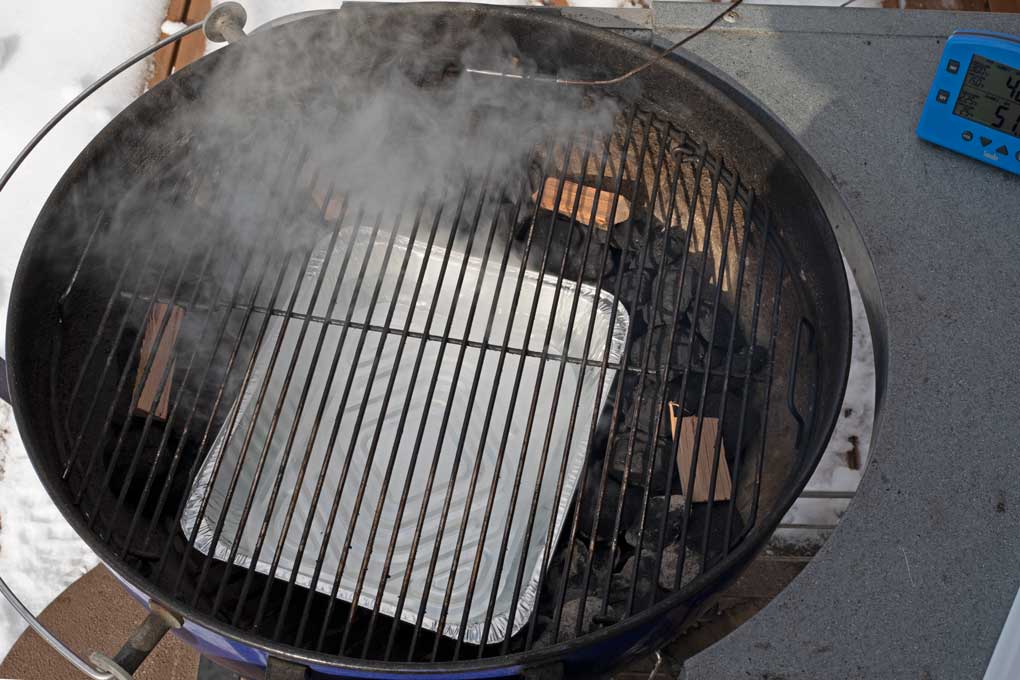
Place a pan of water underneath where you will be placing the meat. The warm water helps stabilize the temperature inside the grill.
Prepare the grill or smoker for indirect heat and preheat it to between 225 and 250 degrees F.
How To Smoke Pastrami
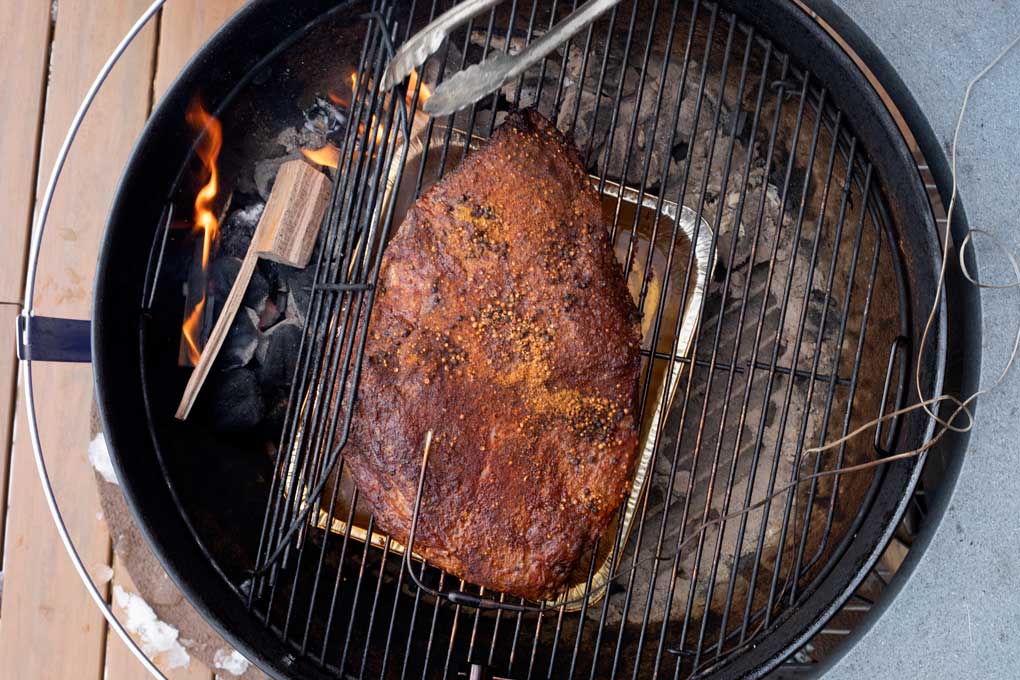
When the coals are ready to cook, place the corned beef on the hot grate over the drip pan, fat side up. Sprinkle the other fat cap with the remaining rub, insert the
Close the lid and bring the temperature back up to 225 degrees F, using the vents to regulate the temperature.
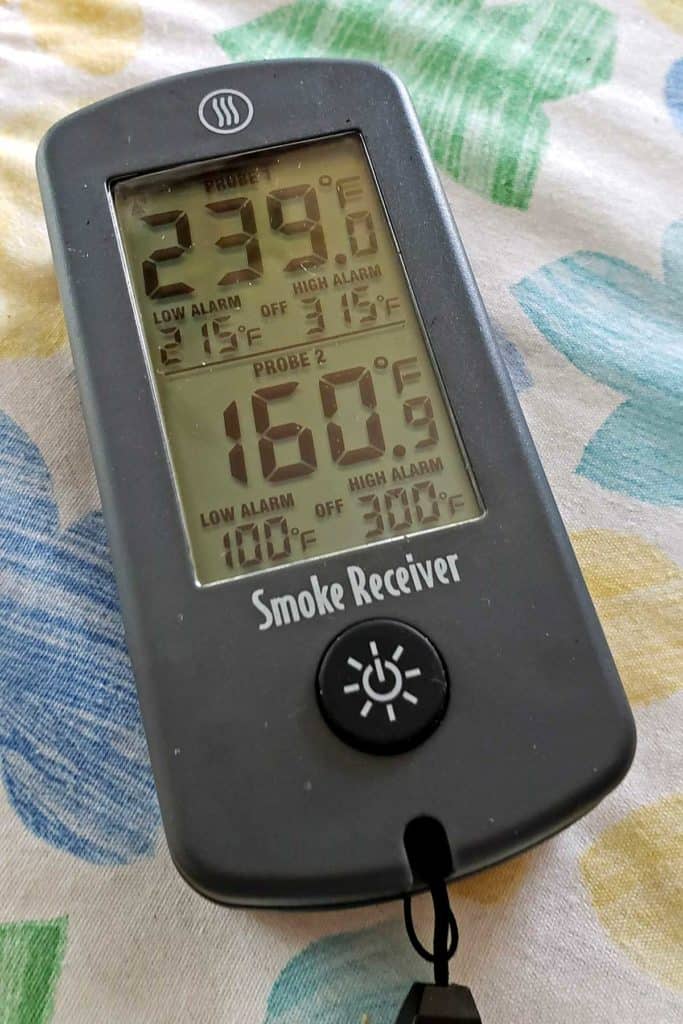
Thermoworks Smoke™
Knowing the temperature inside your smoker or grill is crucial. Even if your smoker or grill has a temperature gauge, we still highly recommend purchasing a digital BBQ thermometer such as Smoke™ from Thermoworks.
READ MORE [HERE]
LOW AND SLOW
Ensure the grill or smoker stays as close to 225 degrees F as possible. Resist the temptation to open the lid unless you need to add more charcoal or soaked wood chips to maintain the temperature and the amount of smoke.
NEVER MIND THE STALL
When the internal temperature of the pastrami reaches about 150 to 160 degrees F, the surface evaporation of the pastrami causes the meat’s internal temperature to plateau. Pitmasters call this “the stall.” Don’t panic. Just wait out the stall.
Wrap the Meat and Crank Up the Heat!
Traditionally, pastrami should stop smoking at 150 degrees F. At this time, it is steamed until it reaches an internal temperature of about 200 degrees F.
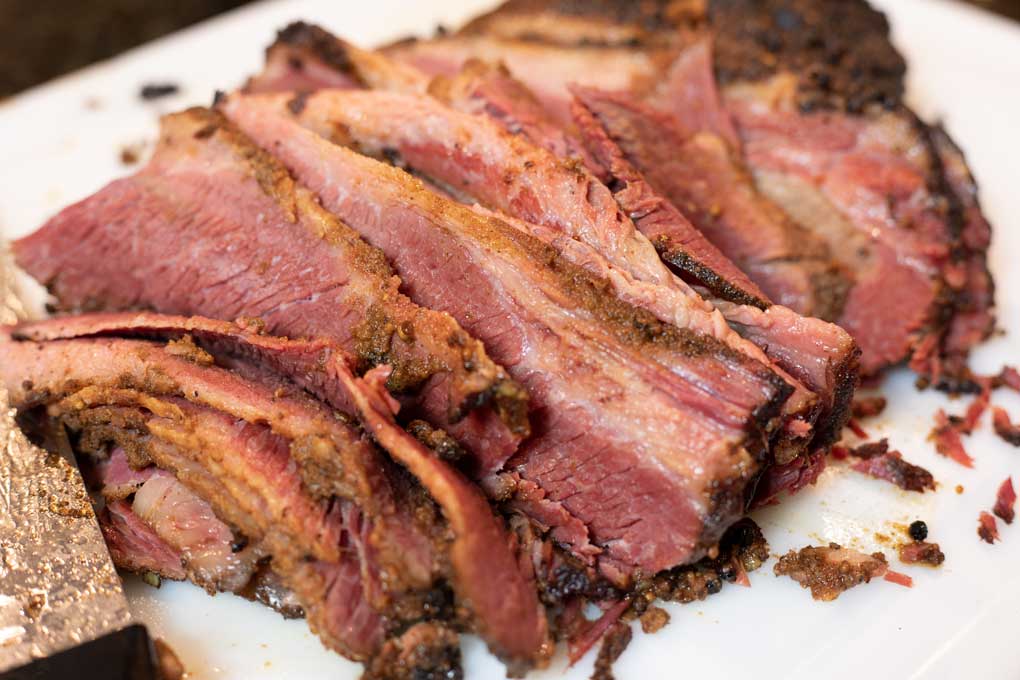
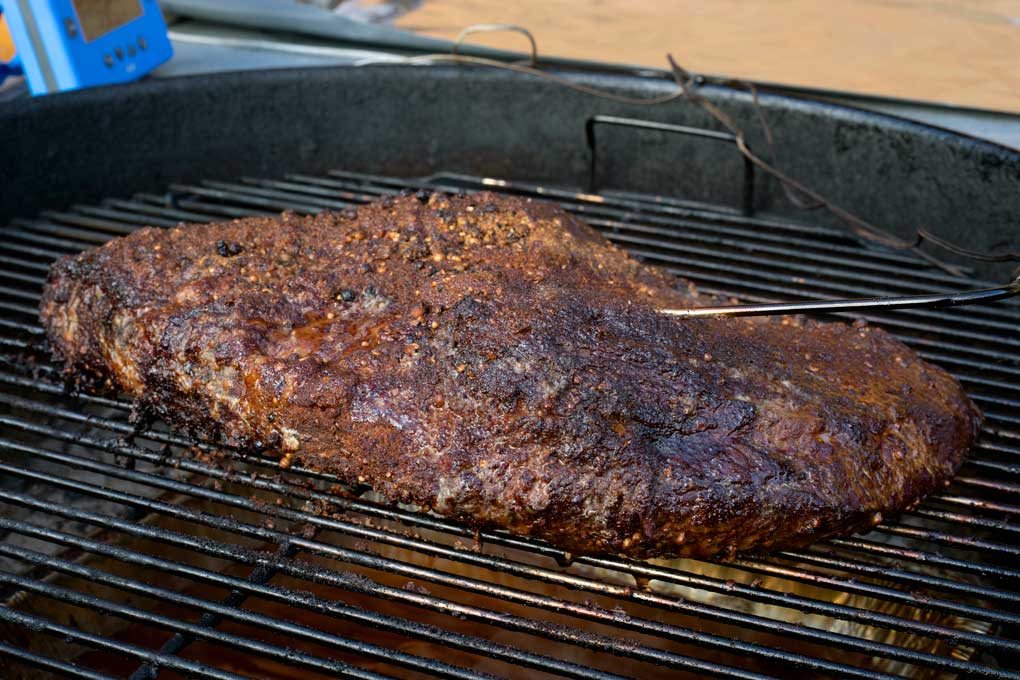
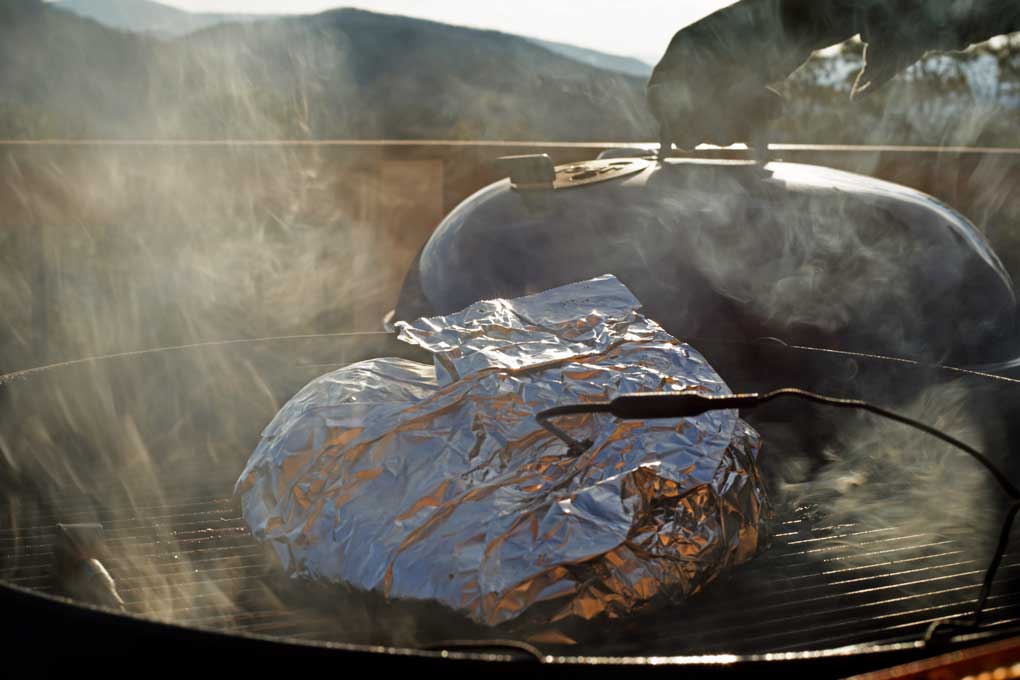
Smoke the pastrami until a nice “bark” (outside crust) forms and the internal temperature is close to 150 degrees (ours was about 160 when we were happy with the color). Remove the temperature probe and wrap the meat in aluminum foil just like you would a beef brisket for the duration of the cook.
Once the meat is wrapped, you can also increase the grill’s temperature since the foil will keep it from drying out. Make sure you reinsert the temperature probe through the foil so you can continue to monitor the temperature.
Test for Doneness
The pastrami is done when the internal temperature is about 190 to 195 degrees F.
This can take anywhere from 4 to 6 hours, but as always, go by temperature and not time.
The size and weight of the meat are something to take into consideration. Monitor the meat thermometer to help check for doneness. Even a simple instant-read thermometer will be your best friend when smoking meat, and it always tells the truth!

When is the Pastrami Done?
The ideal temperature of a properly smoked pastrami is 200 degrees F. Once those tissues break down, the smoked pastrami will melt in your mouth. Any hotter than 200 degrees F could overcook the meat.
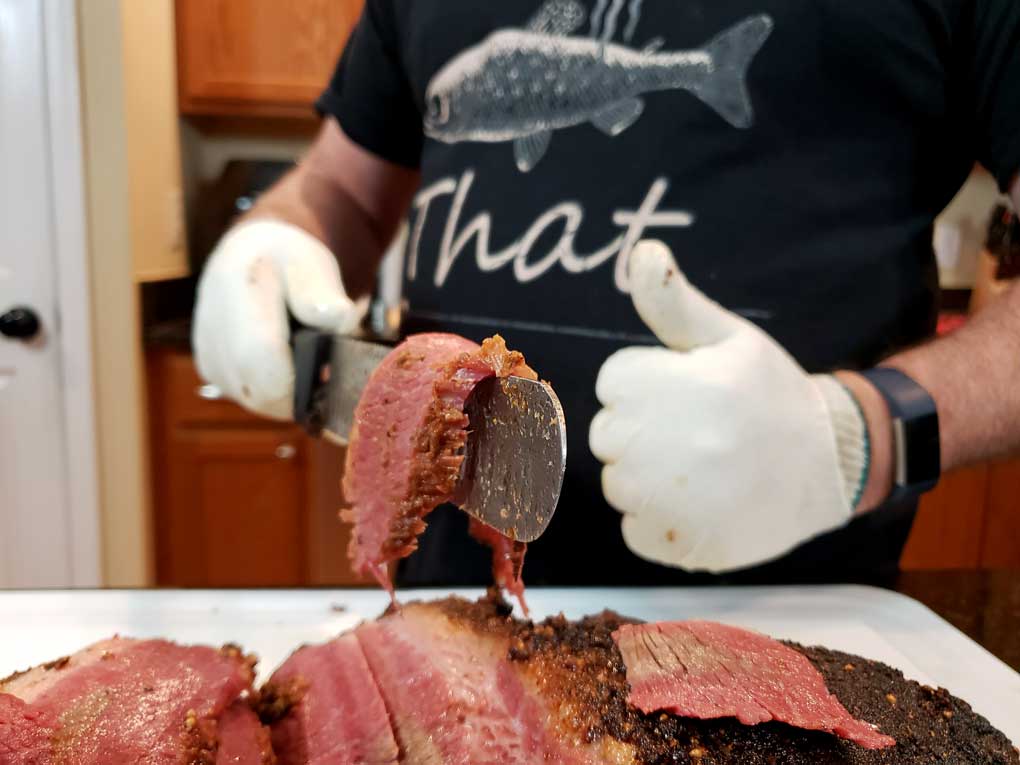
The Cool Down and Slicing
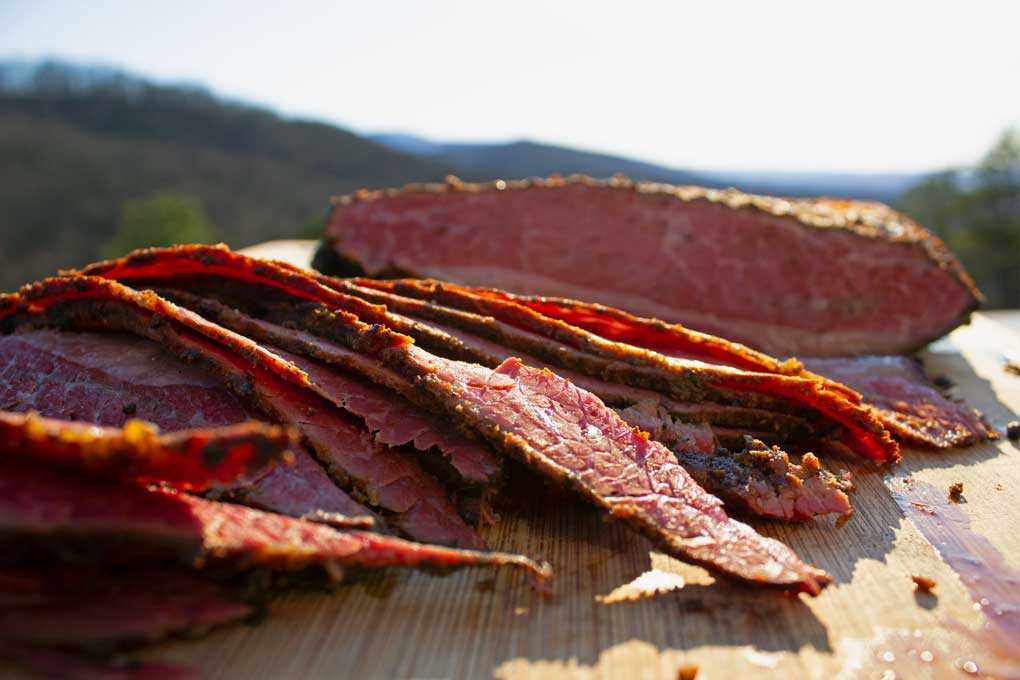
ALWAYS allow your smoked pastrami to rest, covered in foil at room temperature, for at least 15 minutes before carving.
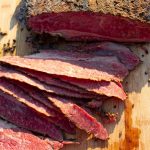
Use a sharp knife, mandoline, or a food slicer to cut the pastrami against the meat’s grain.
If serving right away, only slice off what you need. Wrap the Meat and Crank Up the Heat!

Serving Pastrami
Perfectly cooked pastrami should be moist and juicy. You can serve it simply sliced on a plate if you so desire.
Most often, this complex smoky meat is enjoyed as a Pastrami Sandwich, with warm, thinly sliced meat loaded on freshly baked rye bread, laced with Swiss cheese, and dripping with creamy homemade thousand island dressing.
How To Reheat Pastrami
David and I have found the best way to reheat pastrami is in a skillet. Simply add slices of pastrami to a nonstick skillet over medium-high heat with any of the leftover au jus and a little splash of water. Allow it to steam until it is warmed through.
How to Store Smoked Pastrami
Wrap any remaining unsliced pastrami back inside the foil with the nature au jus. Let it cool to room temperature. Refrigerate until needed. You can store the smoked pastrami in the refrigerator for up to 7 to 10 days.
How To Freeze Smoked Pastrami
To further extend its life, you can freeze the smoked pastrami for up to 3 months. Wrap it tightly in freezer paper or place it in a zip-top freezer bag, sealing as much air out as possible.

This Jewish delicacy easily feeds a large crowd, so a meaty indulgent smoked pastrami is perfect for any backyard BBQ. And it’s especially good to make for tailgating or watching football games with family and friends in the fall.
We worked very hard on this pastrami recipe, and we believe it’s some of the best you can make at home. We hope it will become your go-to recipe for pastrami.
Enjoy the smoke!

Delicious Homemade Pastrami Recipe {A Step-By-Step Guide
Useful Equipment:
- 2-Gallon Zip-Top Bag or Briner Bucket
- Maple Wood Chunks
- Charcoal
- Heavy-Duty Aluminum Foil
Ingredients
- 5 pound beef brisket
- Brine Solution recipe to follow
- Rub recipe to follow
The Brine Solution
- ⅔ cup kosher salt
- 2 tablespoons curing salt or prague powder
- ¼ cup garlic powder
- 5 cloves garlic peeled and smashed
- 4 tablespoons ground black pepper
- 3 tablespoons pickling spice
- 3 quarts water
THE RUB:
- 2 tablespoons whole black peppercorns
- 1 tablespoon fresh ground black pepper
- ½ tablespoon whole coriander seeds
- 1 tablespoon ground coriander freshly ground preferred
- 1 tablespoon brown sugar
- 1 tablespoon paprika
- 2 ½ teaspoons garlic powder
- 1 teaspoon whole mustard seeds
- ½ teaspoon ground mustard
Instructions
How To Cure the Brisket and Make Corned Beef
- Rinse the brisket under cold running water and blot dry with paper towels.
- Trim the brisket to leave a ¼-inch cap of fat to melt over the meat while smoking. Any less and the brisket will dry out; any more, and will prevent the seasoning from penetrating the meat; set aside.
- Combine all the brine ingredients together, except for the water in a large bowl. Stir with a whisk to ensure there are no clumps. Add the water and stir until the salt has dissolved.
Injecting the Meat (optional)
- To help the curing salt penetrate the meat, you can use a meat injector, to inject the brine into the brisket. This step is optional and may or may not help the cure.To inject the meat, you will need about ½ cup of the brine solution. Inject some of the brine every one to two inches, about halfway into the thickness of the meat to form small pockets.
Brine and Cure the Brisket Into Corned Beef
- Place the meat inside a large 2-gallon zip-top bag.
- Pour all the brine inside. Squeeze as much air out of the bag as you can and seal tight.
- Place the bag inside a deep casserole dish large enough to hold it or double-bag to ensure it doesn’t leak.Briner Bucket: Alternatively, you can use a briner bucket to submerge the meat into the brine solution to cure. It’s cleaner with less hassle.
- Leave the meat to cure inside the refrigerator for about 6 days (minimum of 5 days / maximum of 10 days).
- Flip the brisket once every 24-hours to ensure even contact with the meat.
- The result of the curing process is corned beef.
Rub the Corned Beef for Smoking
- The flavors inside the corned beef have already begun to develop from the brine. To take the flavors a step further we developed a rub. This will help the pastrami form a flavorful crust (also known as bark)on the outside of the smoked pastrami.
- Remove the meat from the brine, give it a good rinse under cool running water.
- Blot the corned beef dry with paper towels.
- Place the corned beef fat-cap down onto a large cutting board or sheet pan.
- Generously sprinkle the meat with the rub on both sides and the top (non-fat-cap-side, pressing it into the surface to help it adhere. The fat-cap side will be done after placing it on the smoker. Set aside while preparing the smoker.
Fire Up the Grill or Smoker
- Prepare the grill or smoker for indirect heat and preheat it to between 225 and 250 degrees F.
- Place a pan of water underneath where you will be placing the meat. The warm water helps stabilize the temperature inside the grill.
- To cook using the snake method lay a chain of charcoal in a half-circle along the outer edge of the grill. There should be 3 layers with 2 charcoals on the bottom with one charcoal on top. Place a chunk of maple wood every few inches along the top of the “snake”.
- Turn the charcoal chimney upside down and light only a small handful of charcoal. When the charcoals are hot, you just drop the lit coals onto one end of the “snake” to start the cook.
Smoke the Corned Beef
- When the coals are ready to cook, place the corned beef on the hot grate over the drip pan, fat side up. Sprinkle the other fat cap with the remaining rub, insert the
- Close the lid and bring the temperature back up to 225 degrees F, using the vents to regulate the temperature.
Low and Slow
- Make sure the grill or smoker stays as close to 225 degrees F as possible. Resist the temptation to open the lid unless you need to add more charcoal or soaked wood chips to maintain temperature and smoke.
Nevermind the Stall
- When the internal temperature of the pastrami reaches about 150 to 160 degrees F, the surface evaporation of the pastrami causes the meat’s internal temperature to plateau. Pitmasters call this “the stall.” Don’t panic. Just wait out the stall.
Wrap the Meat and Crank Up the Heat!
- Traditionally, the pastrami is taken off the smoke at 150 degrees F and then is steamed until it reaches an internal temperature of about 200 degrees F.
- Smoke the pastrami until a nice “bark” (outside crust) forms and the internal temperature is close to 150 degrees (ours was about 160 when we were happy with the color). Remove the temperature probe and wrap the meat in aluminum foil just like you would a beef brisket for the duration of the cook.
- Once the meat is wrapped you can also increase the temperature of the grill since the foil will keep it from drying out. Set up the grill for indirect heat and crank up the heat! Make sure you reinsert the temperature probe through the foil so you can continue to monitor the temperature.
Test for Doneness
- The pastrami is done when the internal temperature is about 190 to 195 degrees F. This can take anywhere from 4 to 6 hours, but as always go by temperature and not time.
- The size and weight of the meat are something to take into consideration. Monitor the meat thermometer to help check for doneness. Even a simple meat thermometer will be your best friend when smoking meat and it always tells the truth!
When is the Pastrami Done?
- The ideal temperature of a properly smoked pastrami is 200 degrees F. Once those tissues get broken down the smoked pastrami will pretty much melt in your mouth. Any hotter than 200 degrees F could overcook the meat.Tip: A pastrami can increase by another 10 degrees even if it has been removed from the smoker or grill. Pastrami can increase by another 10 degrees even if it has been removed from the smoker or grill.
The Cooldown and Slicing
- ALWAYS allow your smoked pastrami to rest, covered in foil at room temperature for at least 15 minutes before carving.
- Turn the meat fat side up so the juices will run onto the meat as you slice. Slice thinly using the sharpest knife you own, a mandoline or food slicer against the grain of the meat.
- If serving right away, only slice off what you need.
Serving
- Perfectly cooked pastrami should be moist and juicy. You can serve it simply sliced on a plate if you so desire.
- Most often this complex smoky meat is most often enjoyed as a Pastrami Sandwich, with warm thinly sliced meat loaded on freshly baked rye bread, laced with Swiss cheese, and dripping with creamy homemade thousand island dressing.


Tasty Eats Ronit Penso says
Great tutorial! Wish I had the facility to make this. It looks so good!
The Mountain Kitchen says
Thanks, Ronit. I wish you could too! It’s a labor of love for sure!
givememeatloaf says
Debbie + David, all I can say is HELL YES!!!
The Mountain Kitchen says
Annie, you and Dave would love this!!! I hope you can try this some time.
Roy Fleming says
31,279 mg Sodium?? enough to make your blood boil
Scott says
The overly saltiness you encountered is more than likely the result of using TenderQuick as it contains salt in addition to the cure. I’d recommend getting a small scale with a capacity of 100 grams and a calibration weight to make sure you are using the exact amount of cure needed
Scott says
The action of the cure is what gives the meat its color. In your first picture, the brown spot in the middle is where the cure didn’t penetrate.
Jim says
You probably should emphasize more clearly that this recipe will not produce the same kind of pastrami that is eaten in New York City. Anybody who has eaten pastrami there and makes this will be at least very disappointed and probably angry at the wasted time, work and expense.
Duplicating NYC pastrami is extremely difficult, because the few people who know how to make it guard their secrets vigilantly. Many have tried, and very few have succeeded. You don’t even include coriander in the rub, which is astonishing. I don’t see how you can even call it pastrami without coriander — you might just as well leave off the pepper.
For people who have never eaten real pastrami (available only in NYC), it won’t matter, as long as it tastes good. They can tell themselves they’re eating pastrami, and they won’t know the difference.
But since you’re not aiming for the real thing anyway, why go to so much trouble and expense? Forget “buy the best brisket you can find. A local butcher with grass-fed, grain finished beef should be your best friend.” You can get just as close to real pastrami by starting with a whole brisket of store-brand, vacuum-packed raw (not deli) corned beef from the supermarket, saving a LOT of work and money.
Corned beef is cheap leading up to St Patrick’s Day, and any time of year it’ll cost a LOT less than the fancy brisket you call for. Remember — pastrami was invented to make very cheap, tough, nearly rancid meat taste good. You’re already off by a mile when you start with the premium beef you describe.
If you start with corned beef, it’ll turn out just as close to real pastrami as starting from scratch, at a fraction of the cost — and the meat will be cured all the way through. Your photo shows a significant un-cured chunk (brown instead of pink) in the center of the thickest part, which isn’t good.
You will also save about a week out of the prep time, and you won’t have to find a meat injector or curing salt, because the curing has already been done for you. Just skip the whole “The Brisket & Curing It” section and start with “Pour Off The Brine & Soak the Corned Beef”. NO ONE who eats the end product will know the difference, and you’ll have saved a ton of money, time, effort, and refrigerator space.
There also seems to be a very significant error in your Nutrition Facts data. You say that one serving contains 31279 mg of sodium, or a little more than 31 grams. That is impossible. 31 grams is the amount of sodium in a little over half a cup of kosher salt. That’s like putting half a cup of salt on one sandwich. There CANNOT be that much sodium in this pastrami.
The Mountain Kitchen says
Thanks for your comments, Jim. We are not experts, nor claim to be, so any and all opinions are welcome!
Jonathan says
I know that I’m replying to a comment from 2018 but I’ve got a few things to say regarding your NYC pastrami comments. I’m a Jewish native NYer, who was raised by a woman who made her own pastrami albeit without using a smoker. I then graduated to NYC restaurants that smoked their own and then Katz’s, that venerated institution of all things smoked. That being said this recipe, which I used for the first time yesterday, came out exactly like my NYC pastrami that I used to make from a very old recipe, which has since been lost, alas. My wife, who has consumed her fair share of Katz’s pastrami herself declared it to be equal to Katz’s and said it’s the best pastrami that I’ve ever made. So kudos to David and Debbie for providing me with the keeperest of pastrami recipes. I think I’ll frame it.
P.S.- I smoked it in my electric smoker @225 and then @250 for the wrapped part
The Mountain Kitchen says
Jonathan, thank you so much for your very kind words and rebuttal to the comment about the pastrami. We worked hard on this recipe and we are delighted that you found it to be comparable to Katz. What an honor. Thank you!
LCNSAC says
To adapt this good recipe to a pellet grill, smoke at 160° – 175°F for 3 hours prior to bumping to 225° to cook. I finish over a flame grill.
The Mountain Kitchen says
Very nice! Thanks for commenting!
Bill Bailey says
Thanks Debbie and David! I smoked my first brisket about a month ago, New Years, using your recipe. I use an acorn smoker\grille. It was absolutely delicious! I decided to try your pastrami recipe with the left over flat. We had some of the best Rubens I’ve ever eaten, for dinner last night! I am not a pastrami expert by any means but I can’t imagine any being much better! I do have one question regarding the curing salt. Your recipe calls for 2 ozs and the curing salt I purchased said 1 teaspoon for 5 lbs of meat. I used 1 1/2 teaspoons. My piece of flat was just over 4 lbs. Probably won’t matter because it won’t be around that long! Anyway thanks so much for your expertise!
The Mountain Kitchen says
Hi Bill! So glad you liked the recipe. Yes, the curing salt has been questioned by a few. Our recipe works perfectly, and we have tried made it many times. We understand your concern and it’s worth questioning. Thanks for your feedback!
Jason says
The one teaspoon for 5 pounds of meat is for when you are mixing it into ground meat to make sausage. The package of curing salt I have says to use 3oz per gallon when making brine.
The Mountain Kitchen says
Thanks for clarifying that, Jason!