This smoked pork shoulder is brined in a flavorful brine with a nice balance of sugar, savoriness, aromatics, and spices. Great for any cookout or BBQ, no matter how you pull or slice it!

The pork shoulder is soaked in a flavorful brine penetrating the meat with a nice balance of sugar, savoriness, aromatics, and spices, then smoked low and slow until it nearly falls apart.
If you have tried some of our other recipes, the brine for this recipe may seem familiar to you. It’s the same brine for our duck and chicken wings. It has become our go-to brine recipe for pork and poultry, making it hard to develop new brine recipes.
The meat from this tender and juicy brined smoked pork shoulder is so versatile. It’s so good it doesn’t need a sauce, but you can serve it many ways, from plain slices on a plate to shredded in sauce on a bun.
Serve this smoked pork shoulder at your next cookout or BBQ; it can feed a crowd!

This is the perfect smoked meat guaranteed to please a large crowd.
And!! The bone can be used to season soups and beans.
Let us share our experience with you!
What Is A Pork Shoulder?

The pork shoulder, also known as a “Picnic Shoulder or “Picnic Roast,” is a portion of the pig’s shoulder, the triangular portion of a pig’s lower leg. This muscle is used often, making the meat tough with much less marbling. It is usually sold with the skin on.
Look for a picnic shoulder between 10-12 pounds for this recipe.
Ingredients Needed To Smoke Pork Shoulder
The recipe card at the end of this post lists the full ingredient list with measurements.
- Pork Shoulder: Look for a 10-12 pound pork shoulder
- Brine Solution: water, apple juice, kosher salt, maple syrup, brown sugar, crushed red pepper, garlic powder, and onion powder.
Helpful Equipment to have:
- 2-gallon zip-top bag or Briner Bucket
- water smoker or charcoal grill
- Hickory wood chunks or chips
- grilling gloves
- charcoal
- charcoal chimney
- water
- tongs
- probe thermometer and/or instant-read thermometer
- meat injector
- heavy-duty aluminum foil
How To Make Brined Smoked Pork Shoulder
Here’s a basic overview of how to smoke a pork shoulder. The recipe card at the end of this post provides detailed instructions with times and temperatures.
PREPARE THE PORK FOR BRINE
The brine used for this brined smoked pork shoulder has a nice balance of sugar, savoriness, aromatics, and spices that pair nicely with pork. The flavorful brine gets deep inside the pork because the pork soak in the brine solution for almost two days, and David also uses a meat injector to inject the brine solution deep into the meat.
A 2-gallon zip-top bag should hold the pork shoulder with the brine. However, if the pork shoulder does not fit inside the 2-gallon zip-top bag, you may need to use a larger container such as a Briner Bucket. Make sure the pork is completely covered with brine. You may need to mix up another batch of brine.
- Remove the pork shoulder from the package and blot it dry with paper towels; place the prepared pork shoulder into a 2-gallon zip-top bag, and set aside.
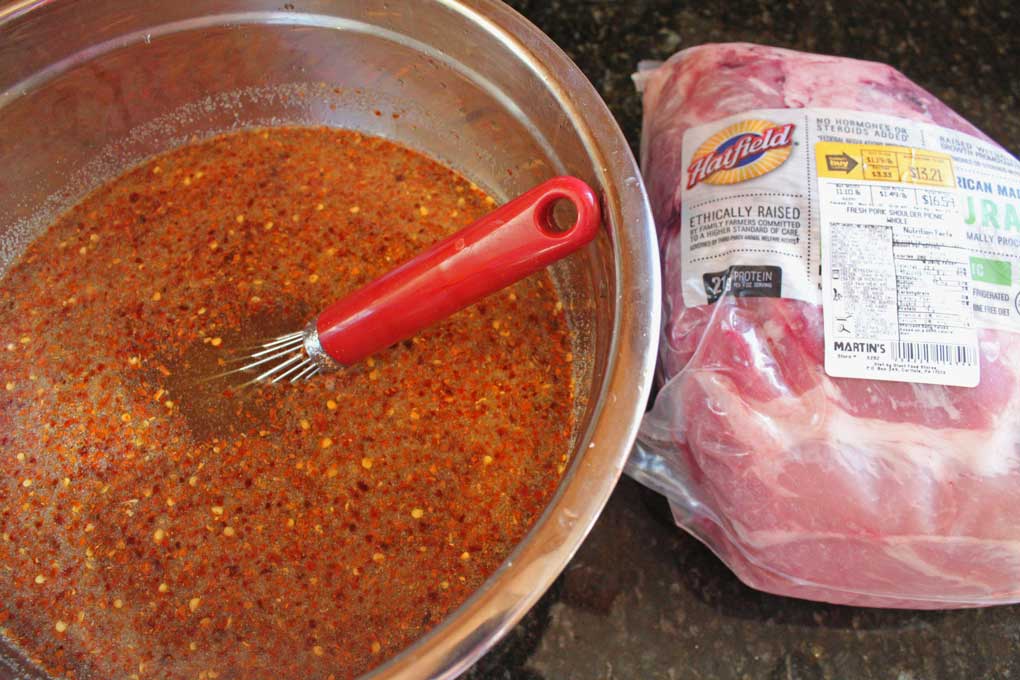
- Combine the brine ingredients in a bowl. Whisk until the salt dissolves completely.
- Let the brine sit undisturbed for about 5 minutes, allowing the pepper flakes to rise to the top to keep the meat injector from clogging.
INJECT THE PORK WITH BRINE
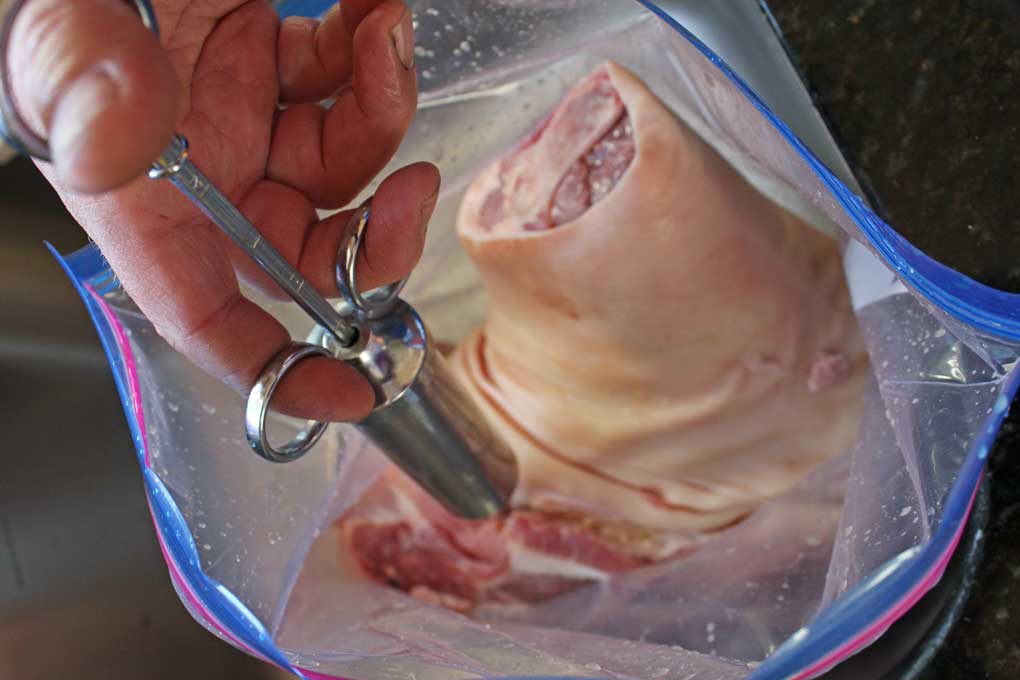
- Submerge the meat injector into the bowl and fill it with brine. If the meat injector clogs, push the plunger to release some brine solution and then pull the plunger back again to continue filling the injector with brine.
- Plunge the needle deep inside the meat while slowly pushing the plunger. Withdraw the needle gradually with each plunge.
- Minimizing the number of holes you put into the meat is essential. You can do this by angling the needle in 2 or 3 different directions using the same entry point. Continue to inject the meat until the meat cannot hold any more liquid and the brine solution begins to leak from the holes.
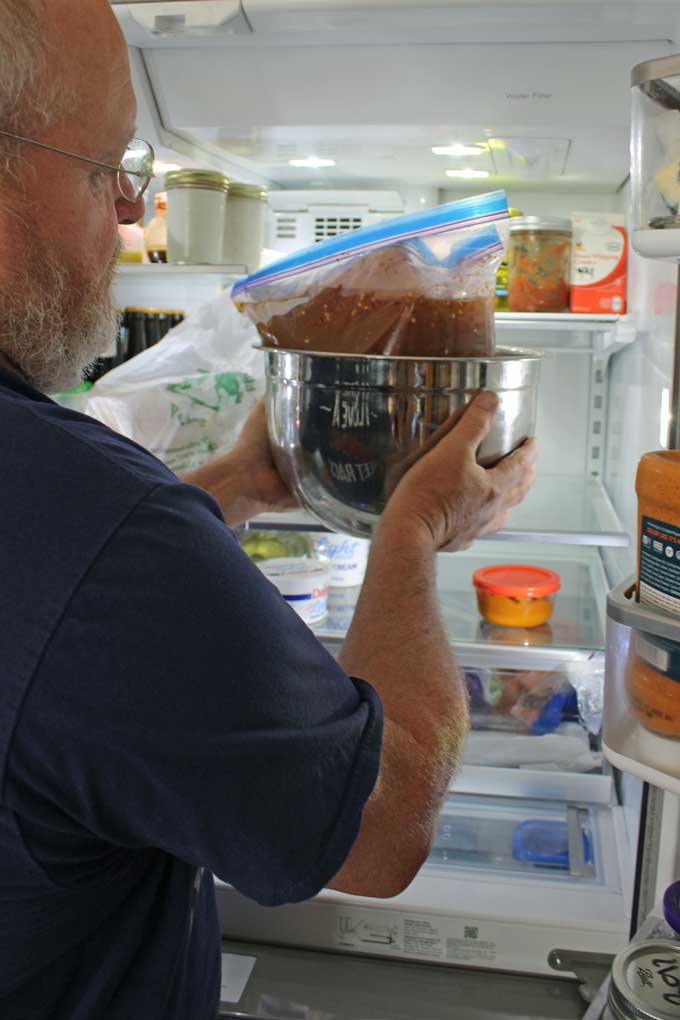
- Pour the rest of the brine solution over the pork shoulder inside the zip-top bag covering the pork thoroughly. Seal the bag, squeezing as much air out of the bag as possible.
- Place the bag inside a bowl (to ensure there are no messy leaks inside the refrigerator).
- Refrigerate for 44 to 48 hours. Keep the pork shoulder cold inside the refrigerator until you can smoke it.
PREP THE PORK SHOULDER FOR SMOKING
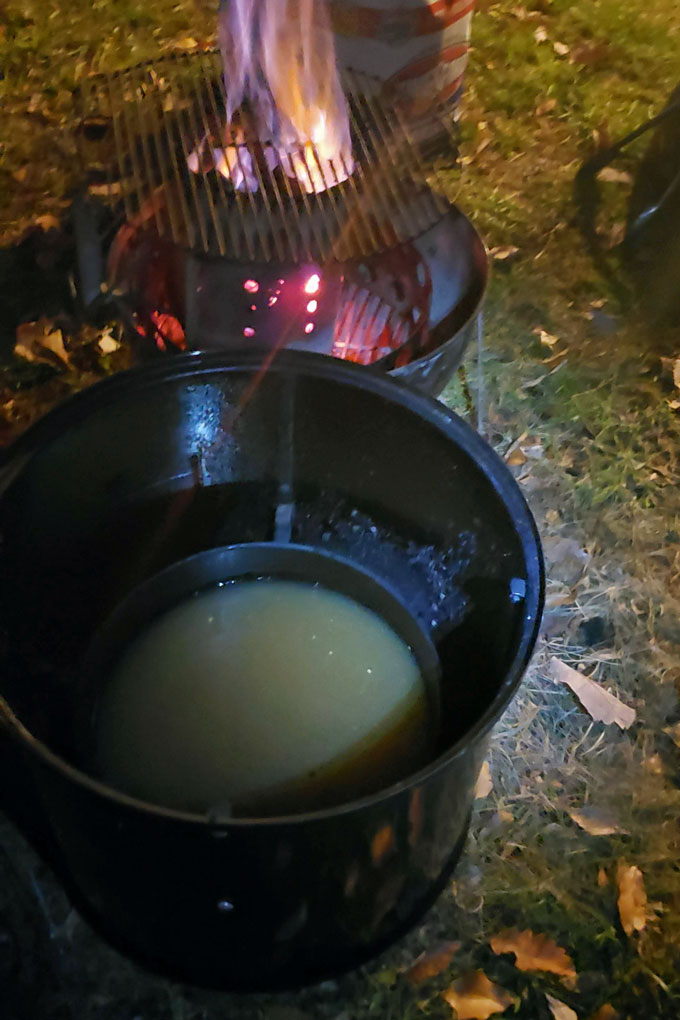
When ready to smoke the meat, remove the pork shoulder from the brine and pat dry with paper towels. Reserve the brine solution and use it in the water pan underneath the meat on the smoker or grill.

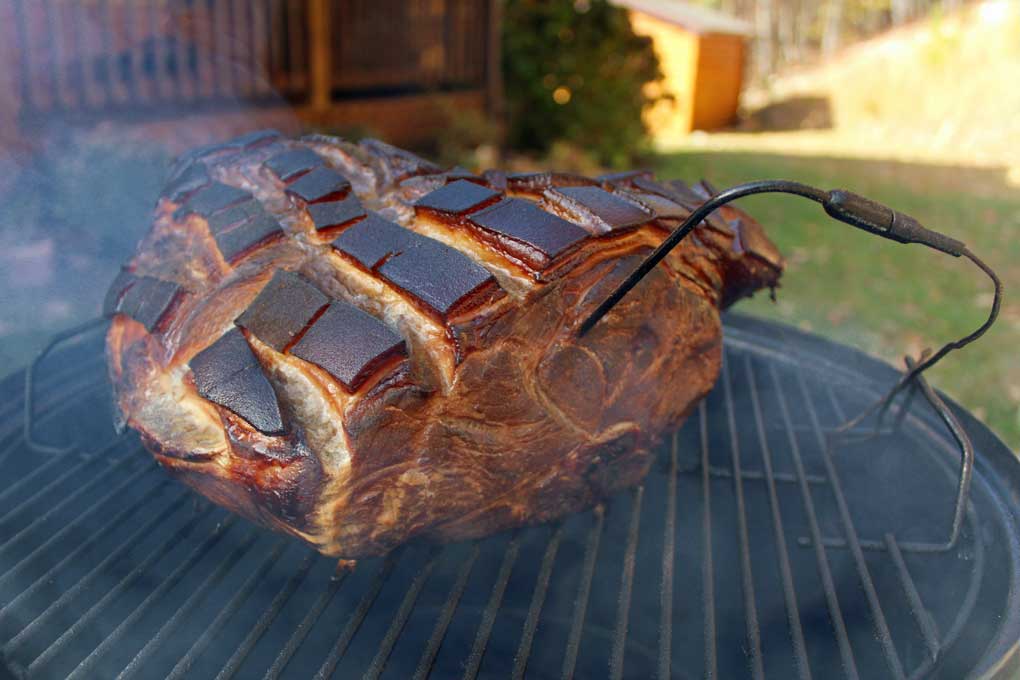
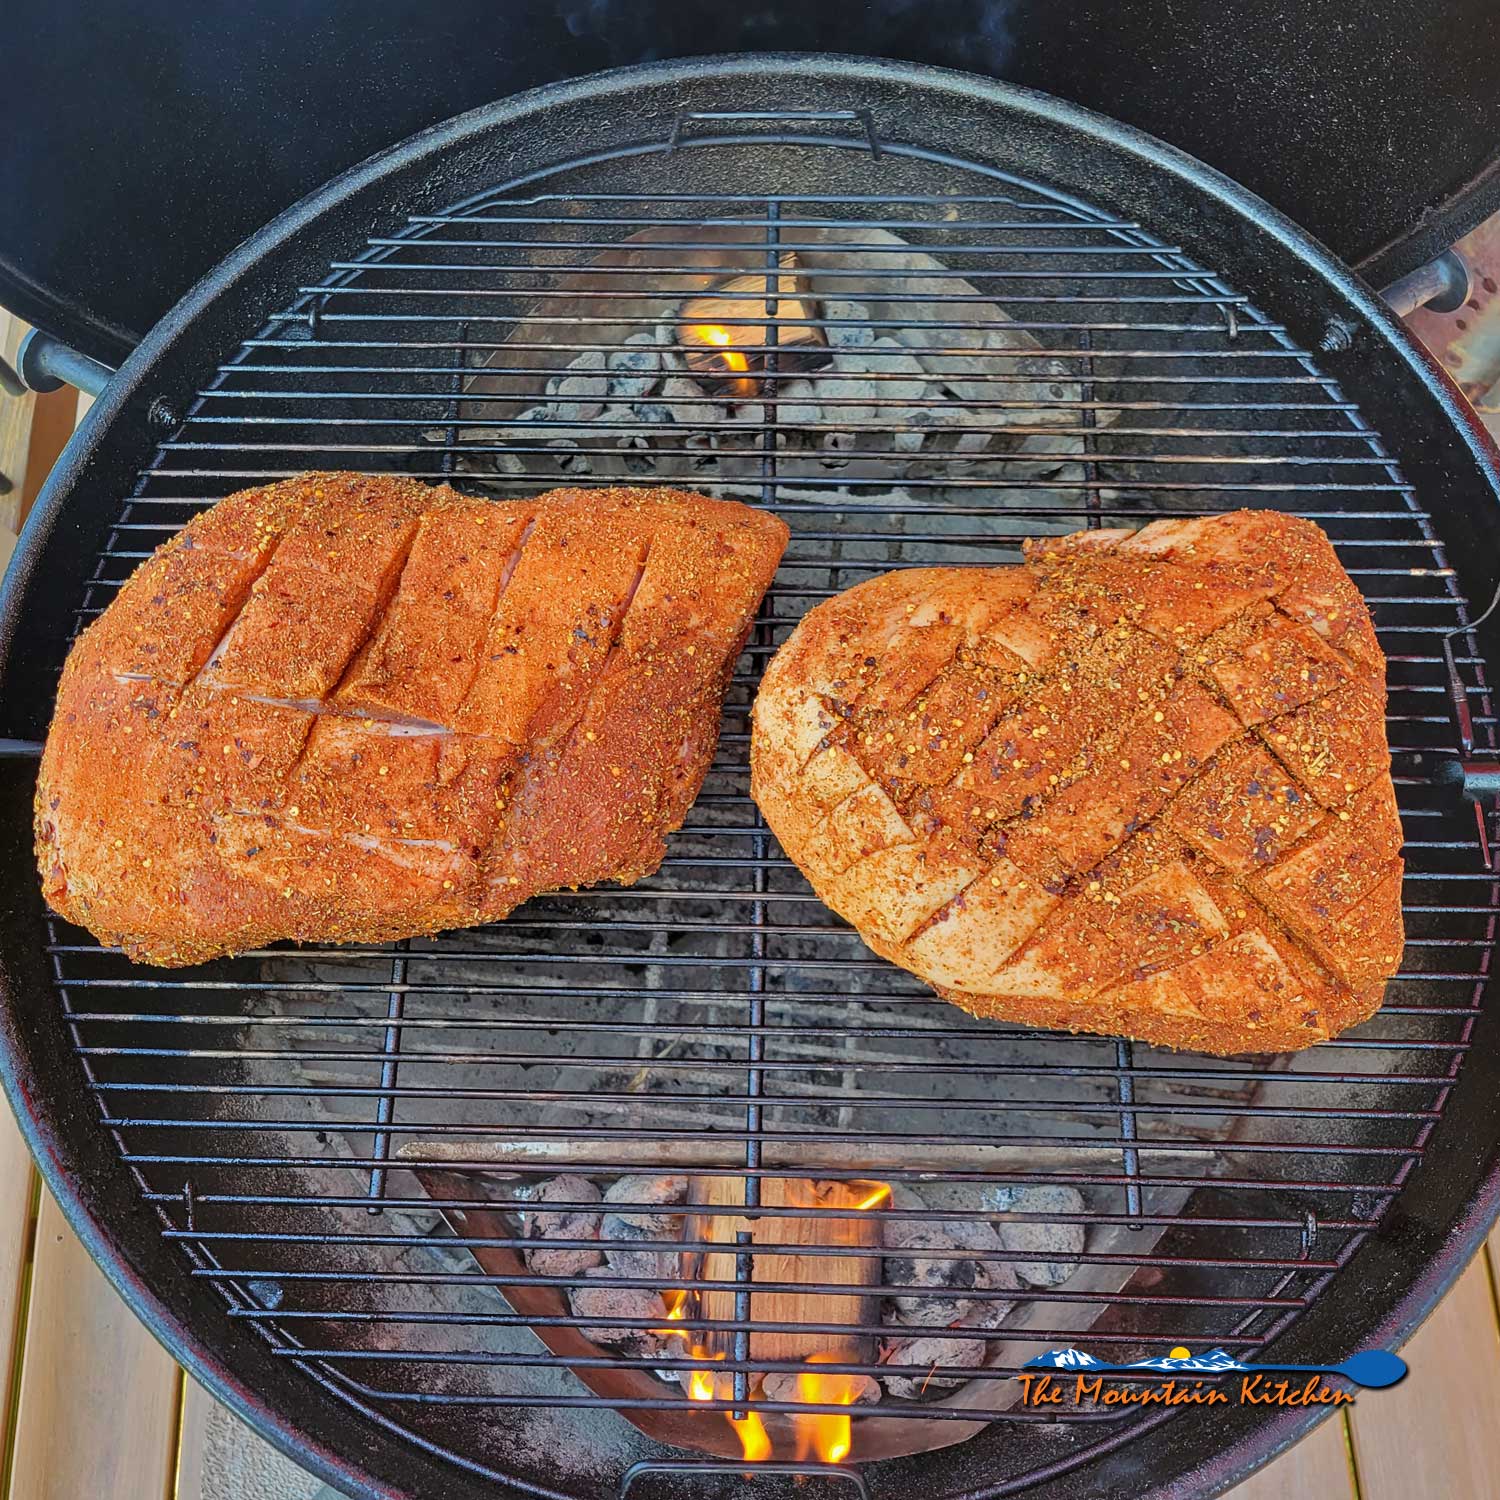
SCORE THE PORK SKIN
Scoring meat is a culinary term that means cutting slits on the surface of the food. Scoring the meat helps the smoke penetrate it better, allowing the fat to render when smoked.
Score the skin side of the pork shoulder after it is brined to prevent it from taking too much salt by following the steps below:
- Use a sharp knife to make diagonal cuts approximately 1-2 inches apart across the skin of the shoulder. Allow the knife to penetrate the skin and fat without slicing into the meat below.
- Turn the meat 90 degrees and make a crosshatch score across the skin in the opposite direction. (see the photo above)
PREHEATING THE GRILL OR SMOKER
This recipe was tested on an 18″ Weber Smokey Mountain Cooker, but you can use whatever smoker or grill you have.
Preheat the smoker or grill from 225 to 250 degrees F. Use only half as much charcoal as usual to maintain this low temperature. (A half chimney-full.)
Set up your smoker or grill for what is called the burn-down method. Fill the charcoal bed with unlit coals and add only a few lit coals to the top. The coals on top slowly light the ones underneath and burn down slowly over time.
If you use a charcoal grill, set it up for an indirect heat 3-zone split, with a drip pan filled with half the leftover brine and half water directly underneath the meat to stabilize the temperature.
SMOKING A PORK SHOULDER
You are ready to smoke when the smoker or grill is within the ideal temperature range.
- Place the pork shoulder onto the hot grate over the drip pan, skin side up.
- Probe the meat with a thermometer (if using).
- Toss a few wood chunks onto the coals and cover the smoker or grill.
- Bring the temperature back up to 225 degrees F and do your best to maintain this temperature, using the vents to regulate the temperature.
- Add fresh coals and more wood chunks to the smoker or grill every hour for at least the first 5 hours.
TEST FOR DONENESS
After 5 hours, use an instant-read meat thermometer to check the temperature in all areas of the meat. This will give you a good idea of how much more time it will need to cook. It’s more important to concentrate on the internal temp of the meat vs. the time.
David uses a Thermapen® ONE digital instant-read meat thermometer by Thermoworks to test for doneness.

WAITING OUT THE STALL
When the pork’s internal temperature reaches about 165 degrees F, the surface evaporation causes the meat’s internal temperature to plateau. Pit Masters call this “the stall.” Don’t panic. It will pass. Just wait out the stall.
WHEN THE PORK SHOULDER IS DONE
According to the USDA, pork is safe to eat at 145 degrees F, but you want to smoke pork shoulder at a much higher temperature, especially if you are making pulled pork.
Cooking a pork shoulder can take 1-1 ½ hours per pound, sometimes even longer, depending on the size and fat content of the shoulder. It took David about 10 hours to smoke a 10-pound smoke shoulder.
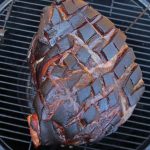
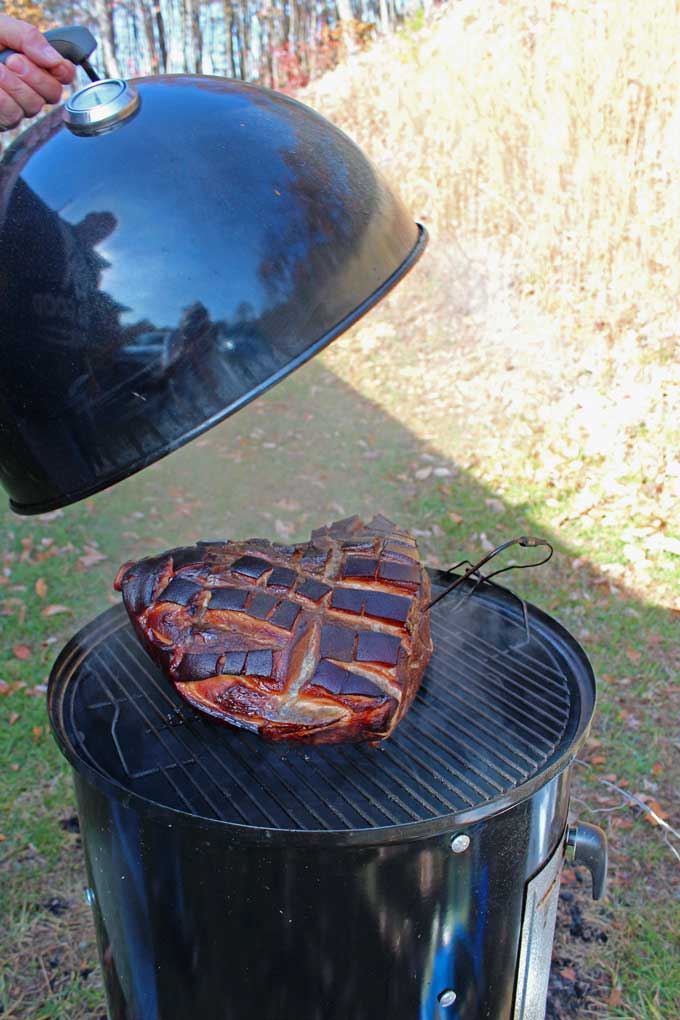
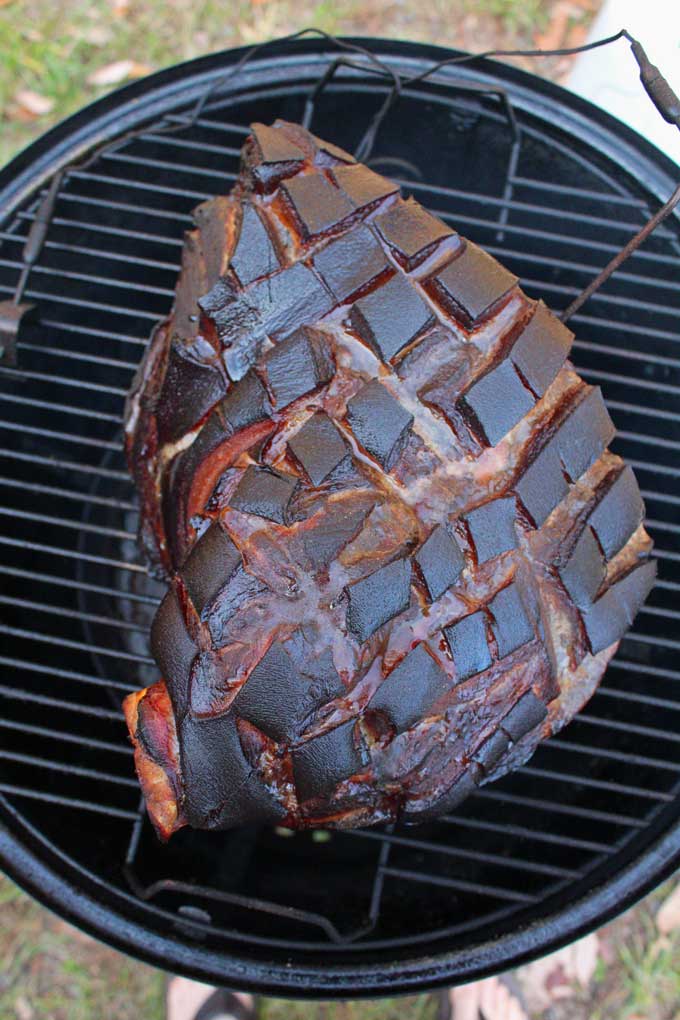
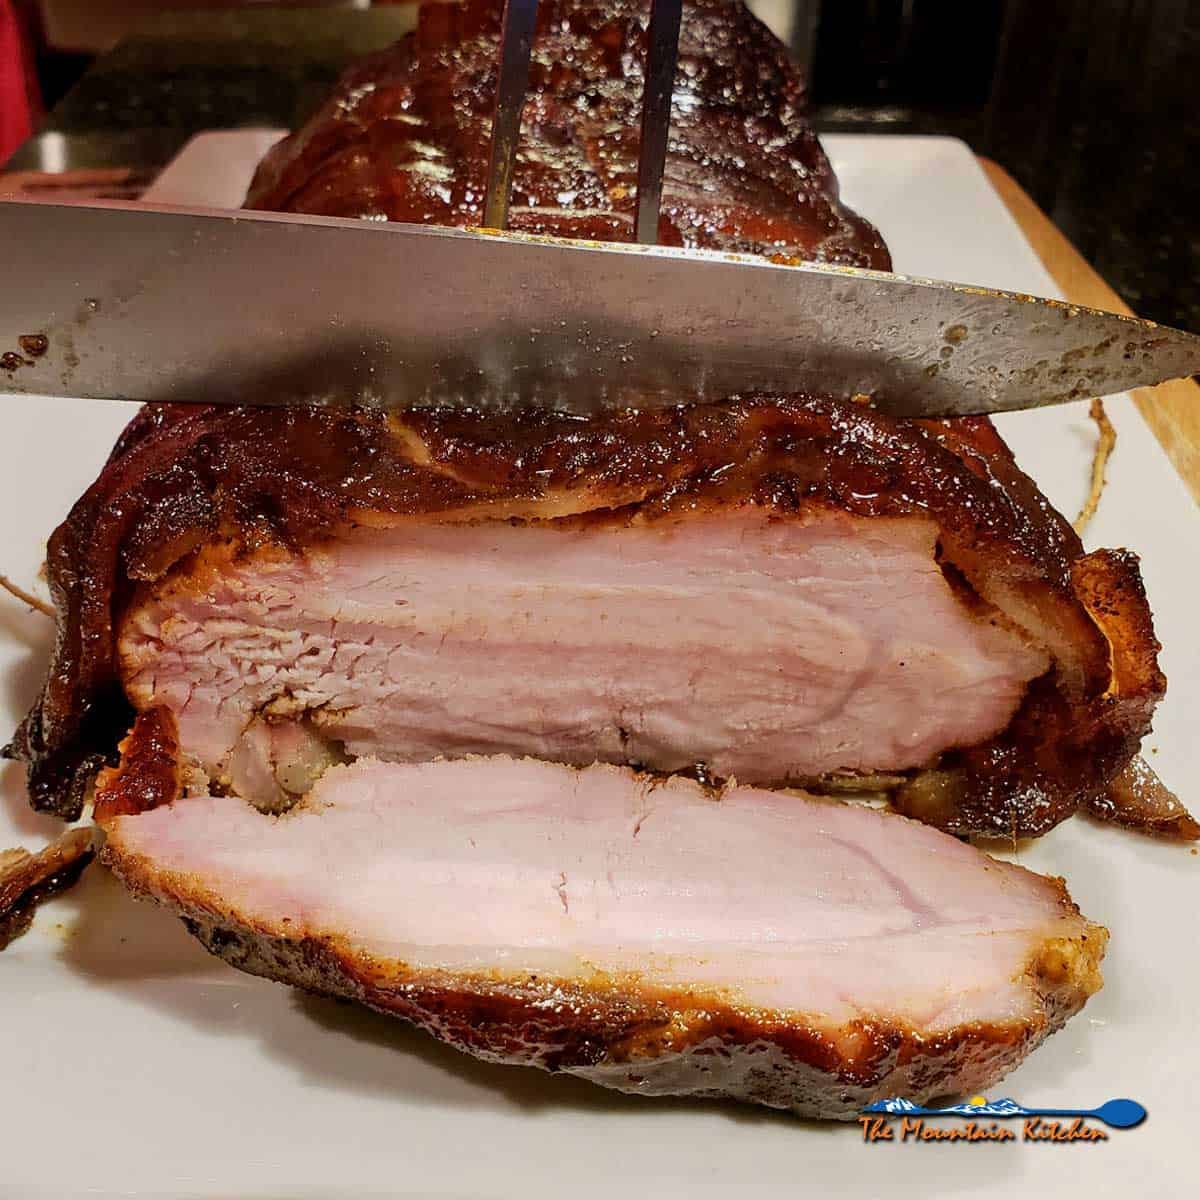
Smoke the pork shoulder until a dark “bark” (outside crust) forms on the skin and the internal temperature of the meat is about 195-205 degrees F. Use an instant-read thermometer to check the pork all over before removing it from the smoker.
LET THE MEAT REST
At 200 degrees F, the pork is about to fall apart. Carefully remove the smoked pork shoulder from the smoker or grill. Allow the meat to rest for at least 1 hour under loosely tented foil.
Allowing the pork to rest before slicing or chopping lets the meat fibers relax. Some of the dissolved proteins redistribute the moisture that was driven out and reabsorbed. It also keeps your cutting board from flooding with meat juices when you slice into the pork.
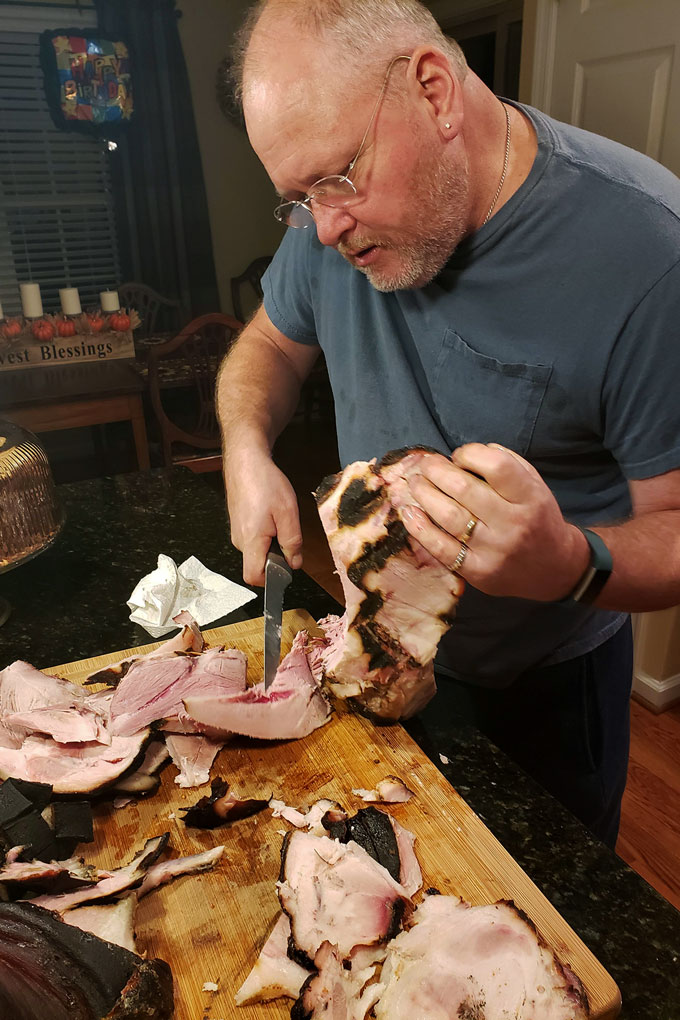
CARVE & SERVE
Hold the meat firmly with a carving fork to carve the pork shoulder. Wedge a knife underneath the pork skin and gently push through, slicing through the connective tissue so the skin comes off in one piece. Next, hold the meat firmly with the carving fork, and make a diagonal cut downward (using wide, sweeping strokes) to create thick slices.
Tips For Smoking Pork Shoulder
- It is best to inject the brine into the meat inside the zip-top bag. Injecting brine can have unexpected messes. Sometimes a quick plunge can cause the injector to squirt brine solution everywhere. The bag will keep you from having to wash your cabinets or, even worse, rinse your eye out! I learned this kind of tip from watching David make his messes.
- Reserve the cooked pork shoulder bone to season soups and beans.
- Resist the temptation to open the lid. Only open the charcoal door or the lid if you need to add more charcoal or wood chunks to maintain temperature and smoke.
- It is important to know that the internal temperature of the pork can increase by 10 degrees even after it’s been removed from the smoker or grill, so keep that in mind.
- Knowing the temp in your grill is crucial. Having a temperature gauge directly on the grate of the smoker or grill is extremely important. You can purchase a digital BBQ thermometer with a remote control, such as Thermoworks’ Smoke™, with two channels, one for the meat and one for the smoker or grill. The remote control lets you monitor the temperature without worry and wonder. There are built-in alarms that sound each time the temperature of the smoker or grill rises above or falls below the ideal smoking temperature. We highly recommend the Thermoworks’ Smoke™. It’s a great tool!
Pork shoulder is very versatile. Perfectly cooked meat should be moist and juicy. If you wish, drizzle it with some barbecue sauce and serve slices of flat fanned like a deck of cards. You can serve it sliced on a plate or pull it to serve on a pulled pork sandwich. The possibilities are endless!
We hope you enjoy this delicious recipe. If so, give us a comment and a star rating. We’d love to hear from you!

Smoked Pork Shoulder (Brined)
Useful Equipment:
- 2-gallon zip-top bag or pan (or pot that pork will fit into)
- Hickory Wood Chunks
- Charcoal
- water
- Heavy-Duty Aluminum Foil
Ingredients
- 11 pound pork shoulder For this recipe look for a picnic shoulder that is between 10 and 12 pounds range.
- brine solution recipe to follow
Brine Solution:
- 7 cups water
- 2 cup apple juice
- ½ cup kosher salt
- ½ cup maple syrup
- ¼ cup brown sugar
- 2 tablespoons crushed red pepper
- 2 tablespoons garlic powder
- 2 tablespoons onion powder
Instructions
PREP THE PORK FOR BRINE
- Blot the meat dry it with paper towels and place the prepared pork shoulder into a 2-gallon size zip-top bag and set aside.Combine the brine solution in a large bowl. Whisk the solution until the salt dissolves completely. Allow the brine to sit undisturbed for about 5 minutes. This will allow the red crushed pepper flakes to rise to the top, which will keep the meat injector from clogging up.
INJECT THE MEAT
- Submerge the meat injector into the bowl and fill with the brine solution. If the meat injector clogs, simply push the plunger to release some brine solution and then pull the plunger back again to continue filling the injector with brine.Plunge the needle deep inside the meat, while pushing the plunger with a slow and steady force. Withdraw the needle gradually with each plunge.It’s important to minimize the number of holes you put into the meat. You can do this by angling the needle in 2 or 3 different directions using the same entry point. Continue to inject the meat until the meat cannot hold any more liquid and the brine solution begins to leak from the holes.
- Pour the rest of the brine solution over the pork shoulder inside the zip-top bag covering the pork completely. Seal the bag squeezing as much air out of the bag as possible. Place the bag inside a bowl (to ensure there are no messy leaks inside the refrigerator). Refrigerate for 44 to 48 hours. Keep the pork shoulder cold inside the refrigerator until you’re ready to smoke it.
PFEP THE PORK SHOULDER FOR SMOKING
- On the day of the smoke, remove the pork shoulder from the brine and pat dry with paper towels. Reserve the brine solution to use in the water pan underneath the meat on the smoker.
SCORE THE SKIN
- To score the meat, use a sharp knife to make diagonal cuts approximately 1 to 2-inches apart across the skin of the shoulder. Allow the knife to penetrate the skin and fat without slicing into the meat below. Next, turn the meat 90 degrees and make a crosshatch score across the skin in the opposite direction. (see the photo above)
PREHEAT THE GRILL OR SMOKER
- Preheat the smoker or grill from 225 to 250 degrees F. Use only half as much charcoal as usual to maintain this low temperature. (A half chimney-full. Set up your smoker or grill for what is called the burn-down method. Fill the charcoal bed with unlit coals and add only a few lit coals to the top. The coals on top slowly light the ones underneath and burn down slowly over time. If you use a charcoal grill, set it up for an indirect heat 3-zone split, with a drip pan filled with half the leftover brine and half water directly underneath the meat to stabilize the temperature.
#5 Smoking the pork
- You are ready to smoke when the smoker or grill is within the ideal temperature range. Place the pork shoulder onto the hot grate over the drip pan, skin side up.Probe the meat with a thermometer (if using). Toss a few wood chunks onto the coals and cover the smoker or grill. Bring the temperature back up to 225 degrees F and do your best to maintain this temperature, using the vents to regulate the temperature. Add fresh coals and more wood chunks to the smoker or grill every hour for at least the first 5 hours.
TEST FOR DONENESS
- After 5 hours, use an instant-read meat thermometer to check the temperature in all areas of the meat. This will give you a good idea of how much more time it will need to cook. It's more important to concentrate on the internal temp of the meat vs. the time.
WAITING OUT THE STALL
- When the pork’s internal temperature reaches about 165 degrees F, the surface evaporation causes the meat’s internal temperature to plateau. Pit Masters call this “the stall.” Don’t panic. It will pass. Just wait out the stall.
WHEN THE PORK IS DONE
- According to the USDA, pork is safe to eat at 145 degrees F, but you want to smoke pork shoulder at a much higher temperature, especially if you are making pulled pork. Cooking a pork shoulder can take 1-1 ½ hours per pound, sometimes even longer, depending on the size and fat content of the shoulder. It took David about 10 hours to smoke a 10-pound smoke shoulder. Smoke the pork shoulder until a dark “bark” (outside crust) forms on the skin and the internal temperature of the meat is about 195-205 degrees F. Use an instant-read thermometer to check the pork all over before removing it from the smoker.
LET THE MEAT REST
- At 200 degrees F, the pork is about to fall apart. Carefully remove the smoked pork shoulder from the smoker or grill. Allow the meat to rest for at least 1 hour under loosely tented foil. Allowing the pork to rest before slicing or chopping lets the meat fibers relax. Some of the dissolved proteins redistribute the moisture that was driven out and reabsorbed. It also keeps your cutting board from flooding with meat juices when you slice into the pork.
CARVE & SERVE
- Hold the meat firmly with a carving fork to carve the pork shoulder. Wedge a knife underneath the pork skin and gently push through, slicing through the connective tissue so the skin comes off in one piece. Next, hold the meat firmly with the carving fork, and make a diagonal cut downward (using wide, sweeping strokes) to create thick slices. Pork shoulder is very versatile. Perfectly cooked meat should be moist and juicy. If you wish, drizzle it with some barbecue sauce and serve slices of flat fanned out like a deck of cards. You can serve it simply sliced on a plate or you could pull it to serve on a pulled pork sandwich. The possibilities are endless!
Notes
-
- It is best to inject the brine into the meat inside the zip-top bag. Injecting brine can have unexpected messes. Sometimes a quick plunge can cause the injector to squirt brine solution everywhere. The bag will keep you from having to wash your cabinets or, even worse, rinse your eye out! I learned this kind of tip from watching David make his messes.
-
- Reserve the cooked pork shoulder bone to season soups and beans.
-
- Resist the temptation to open the lid. Only open the charcoal door or the lid if you need to add more charcoal or wood chunks to maintain temperature and smoke.
-
- It is important to know that the internal temperature of the pork can increase by 10 degrees even after it’s been removed from the smoker or grill, so keep that in mind.
- Knowing the temp in your grill is crucial. Having a temperature gauge directly on the grate of the smoker or grill is extremely important. You can purchase a digital BBQ thermometer with a remote control, such as Thermoworks’ Smoke™, with two channels, one for the meat and one for the smoker or grill. The remote control lets you monitor the temperature without worry and wonder. There are built-in alarms that sound each time the temperature of the smoker or grill rises above or falls below the ideal smoking temperature. We highly recommend the Thermoworks’ Smoke™. It’s a great tool!


Mimi says
Oh this looks good. Brined AND smoked? Yes please.
The Mountain Kitchen says
Thanks, Mimi. It was incredibly moist, to say the least.
Les Vandagriff says
Phenomenal, best receipe I have found so far!
The Mountain Kitchen says
Hi Les! Thank you so much for the great comment. So glad this recipe turned out for you.
Diane says
I have used this recipe a few times just love it.
The Mountain Kitchen says
So happy to hear that, Diane. Thank you!
Robert says
Hello,
When a local supermarket had a whole pork shoulder on special at $1 CDN a pound I said “Now is the time to try this recipe.” I smoked an 11 lb piece for 14 hours with indirect maple wood smoke in an offset smoker. Outside temperature was about -5 C. The results were great. I was able to cut slices in parts, used other parts for pulled pork and also had chunks. The meat was moist throughout. I was unable to taste the maple syrup but I’m sure it had an effect. This is a far superior result than previous recipes using picnic shoulder butts and dry rubs. Even with a wet drip pan underneath the meat ended much drier and has to be mixed with sauce afterwards. Thanks for the recipe.
The Mountain Kitchen says
Hi Robert! It’s our pleasure to share our recipe with you. Maybe next time tack on some extra maple syrup at the end of the cook? Thanks so much for the feedback!