Discover an easy, dry brine recipe for smoked salmon. Simple ingredients, easy-to-follow steps, and delicious results every time!
Y’all, sometimes the simplest ingredients make the most amazing dishes. While there are numerous ways to approach a recipe, discovering an easier, more effective method can be a real game changer. Today, we’re focusing on smoked salmon, specifically how to dry brine it with minimal effort and maximum flavor.
Although salmon might seem sophisticated, this recipe is easy to follow. So, grab a salmon fillet, prepare your smoker, and let’s get started!
The Process
The process involves three critical steps: curing, drying, and maintaining precise temperature control during smoking.
- Curing: Begin by curing the salmon to enhance its flavor and texture. This involves applying a mixture of salt and sugar to the fish, which draws out moisture and firms up the flesh.
- Drying: After curing, the salmon must be dried until a pellicle (a tacky surface layer) forms. This pellicle makes the smoke adhere better, producing a richer, smoky flavor.
- Smoking: Maintain a consistent low temperature between 150°F and 200°F during smoking. This low-and-slow approach ensures the salmon cooks evenly and absorbs the smoky essence without drying out.
By carefully managing these steps, you can create a moist, flaky smoked salmon with a perfect balance of saltiness and sweetness. Oh my goodness! It’s so good!.
Dry Brine vs. Wet Brine: What’s the Difference?
When it comes to brining salmon, you have two main options: dry brine and wet brine.
A dry brine is a simple mixture of salt and sugar that’s rubbed directly onto the fish. It draws out moisture while infusing the salmon with amazing flavor. The best part? It’s easy and requires just a few basic ingredients you likely already have in your kitchen.
A wet brine, on the other hand, involves submerging the salmon in a liquid solution of water, salt, and sometimes other flavorings. This method can produce great results, like our honey smoked salmon recipe, which uses a wet brine and honey glaze and is way more involved. Wet brining requires a large (potentially leak) bag, a lot of liquid, and the hassle of submerging the fish. In comparison, a dry brine is much simpler. Rub the fish and let it sit. This dry brine for salmon has changed our whole salmon game!

Ingredients You’ll Need To Dry Brine Salmon
Simple ingredients mean big flavor. Here’s what you’ll need to make a dry brine for your salmon:
Salmon: You’ll need a one-pound wild-caught salmon fillet. This recipe can easily be multiplied depending on how many salmon filets you plan to smoke.
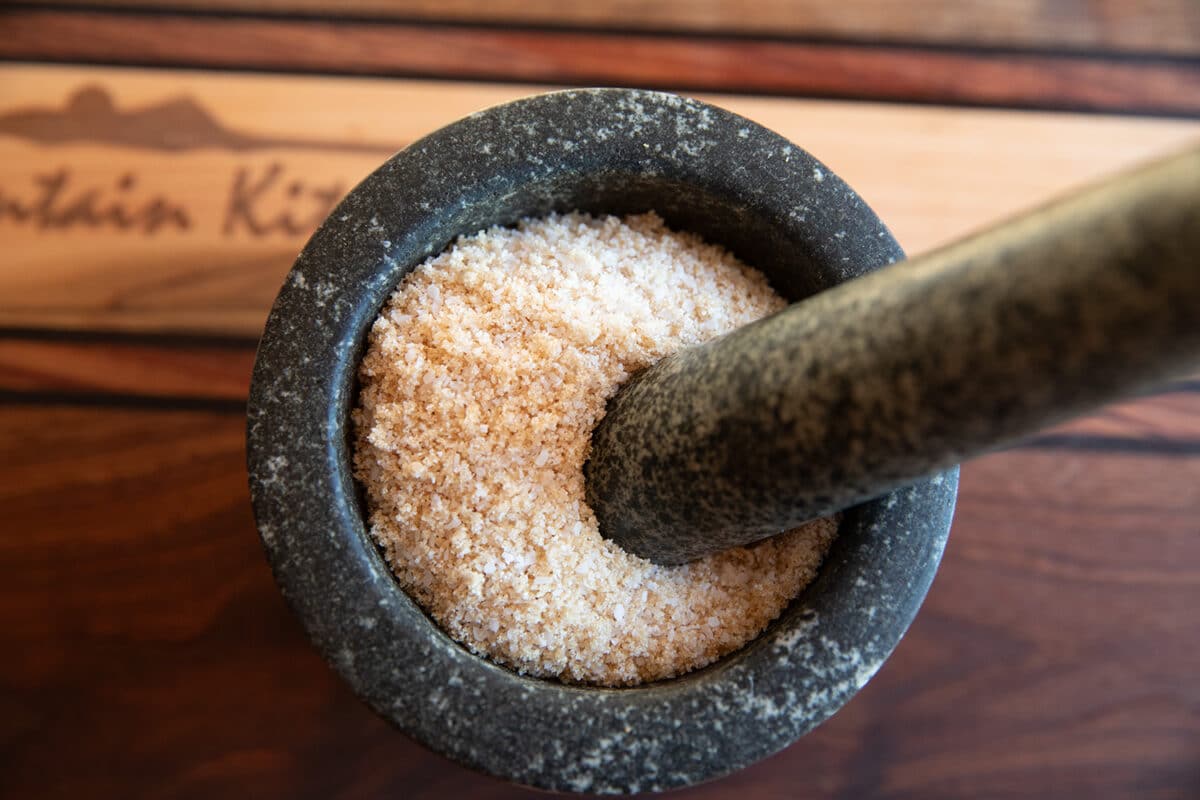
Brown Sugar: the sweetness that offsets the salt and smoke; this is the secret ingredient.
Kosher Salt – Not table salt! Kosher salt has large crystals that distribute more evenly across the fish. This makes it easier to control the salinity. Kosher salt is a more consistent seasoning than finer table salt, which can clump and lead to uneven salting.
The recipe card at the end of this post lists the full ingredient list with measurements.
How to Dry Brine Salmon
Here’s a summary of how to dry brine salmon to smoke on your grill or smoker. The recipe card at the end of this post provides detailed instructions with times and temperatures.
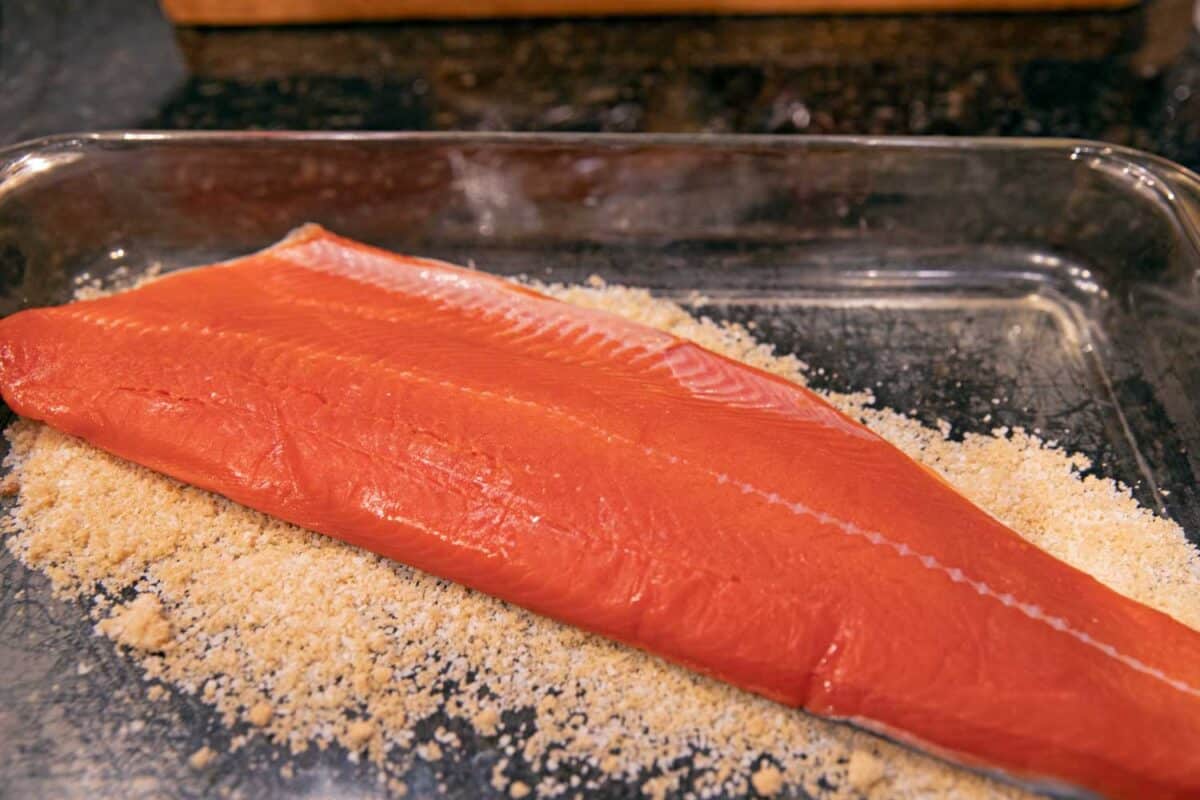
- Prep Your Salmon: Start with a nice fillet of salmon, skin on, with pin bones removed. Pat it dry with a paper towel so the brine sticks better.
- Mix Your Brine: Combine all the ingredients in a bowl and mix well. You want a consistent blend to coat the fish evenly.
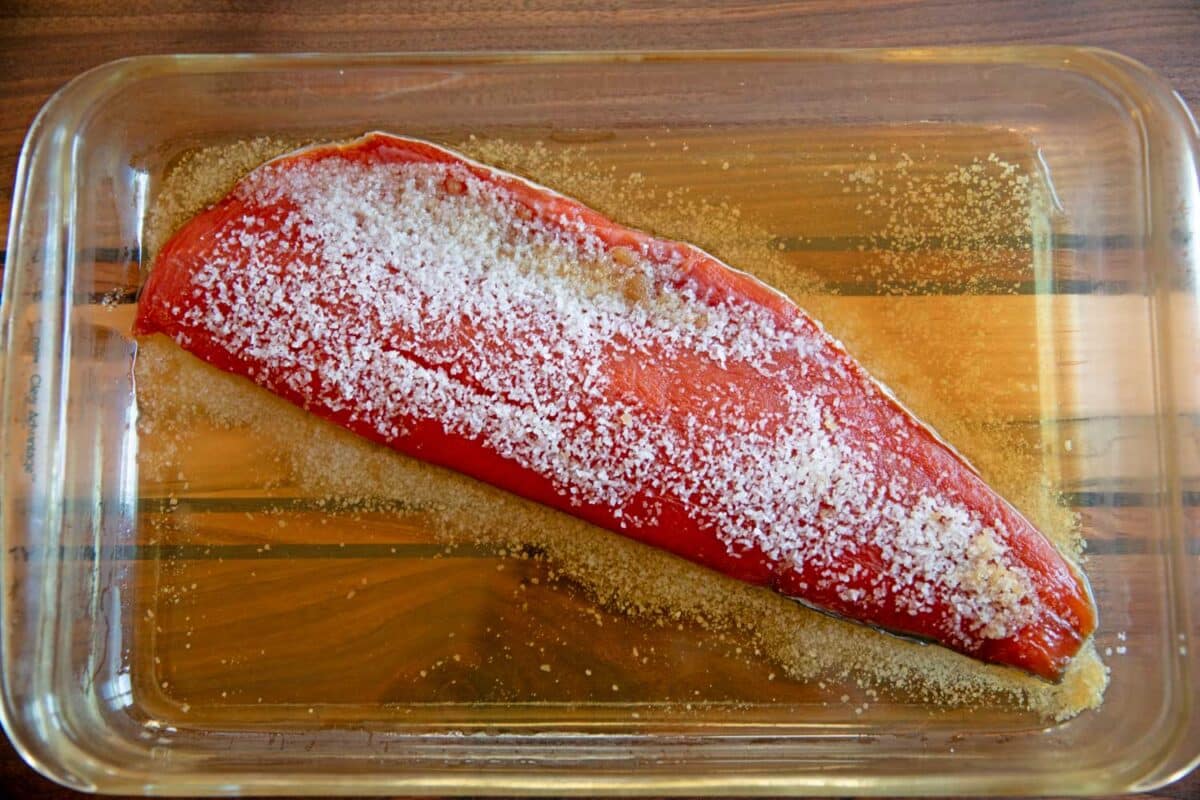
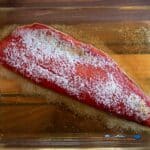
- Rub It Down: Place your salmon on a plate or baking sheet and generously coat it with the brine. Make sure it’s covered completely.
- Let It Sit: Refrigerate the brined salmon for 6-8 hours. The salt and sugar will work their magic, so be patient.
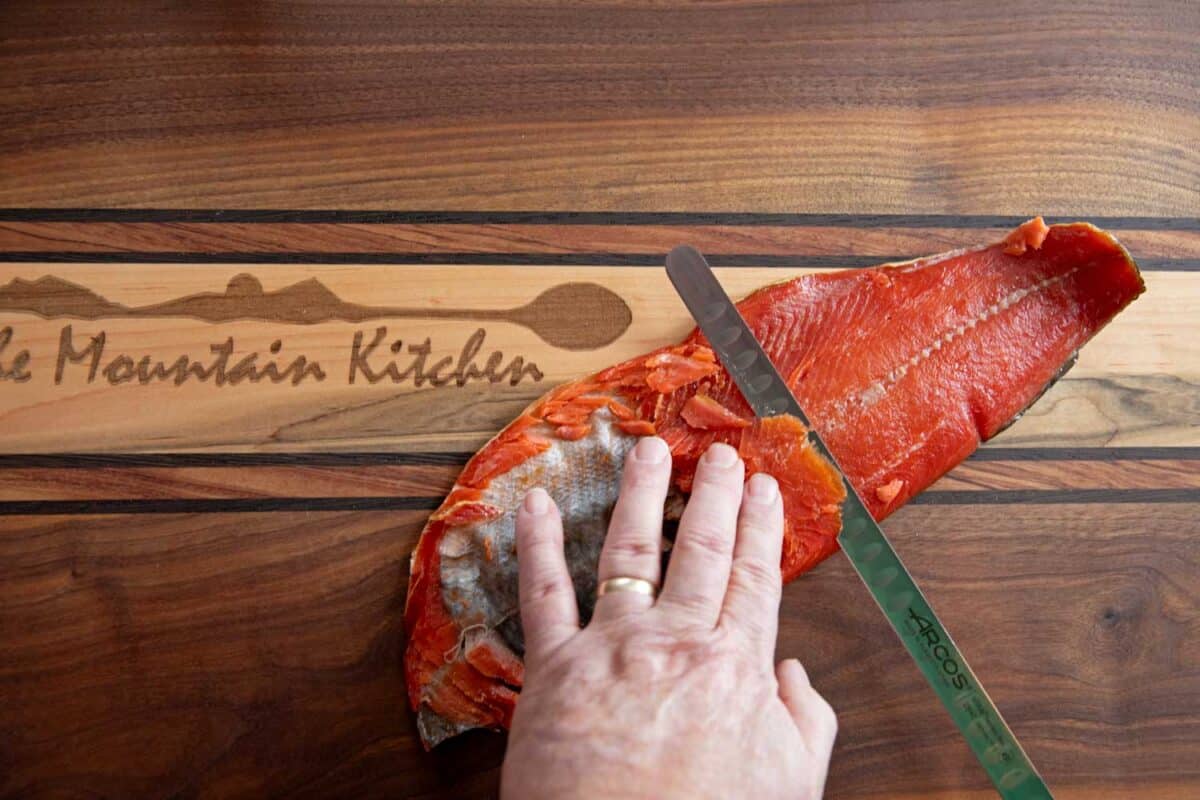
- Rinse and Pat Dry: After brining, rinse the salmon under cold water to remove excess salt. Then, pat it dry with a paper towel—this is key.
- Let It Air Dry: Lay the salmon on a wire rack and refrigerate it for at least one hour or overnight. This helps form a pellicle, a sticky layer that makes the smoke cling to the fish.
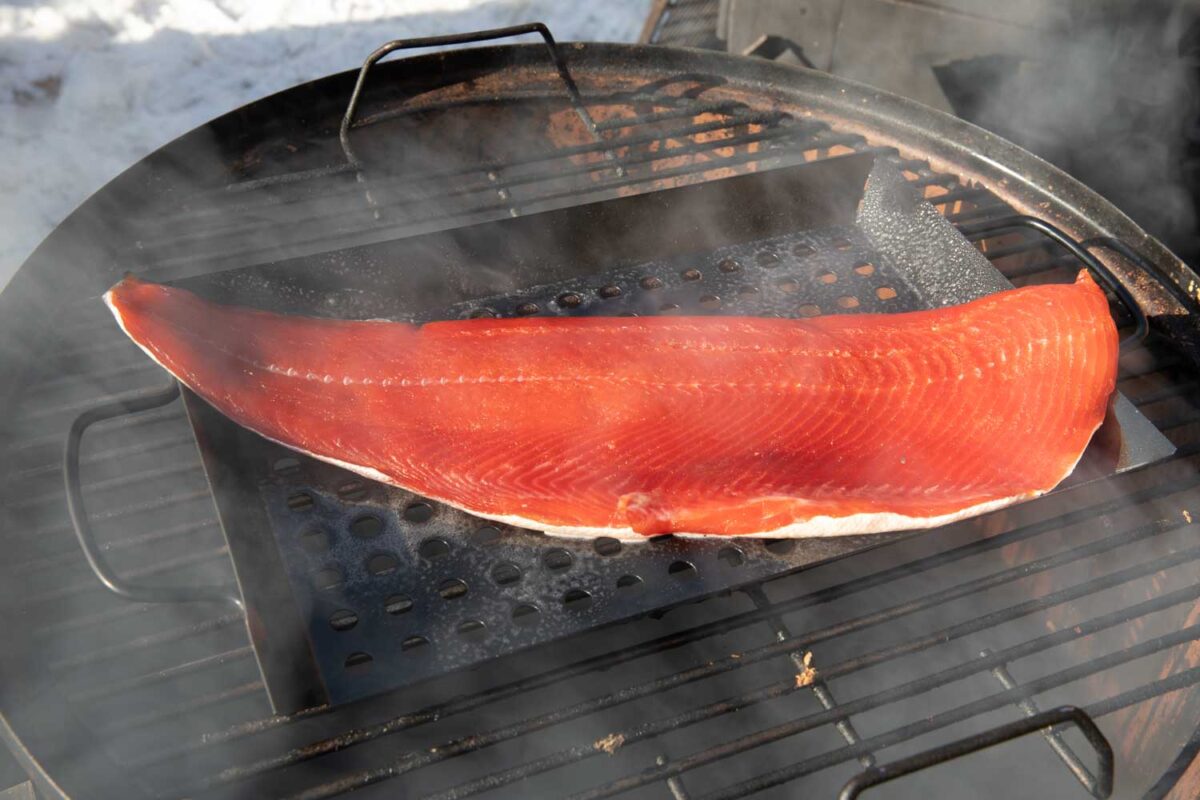
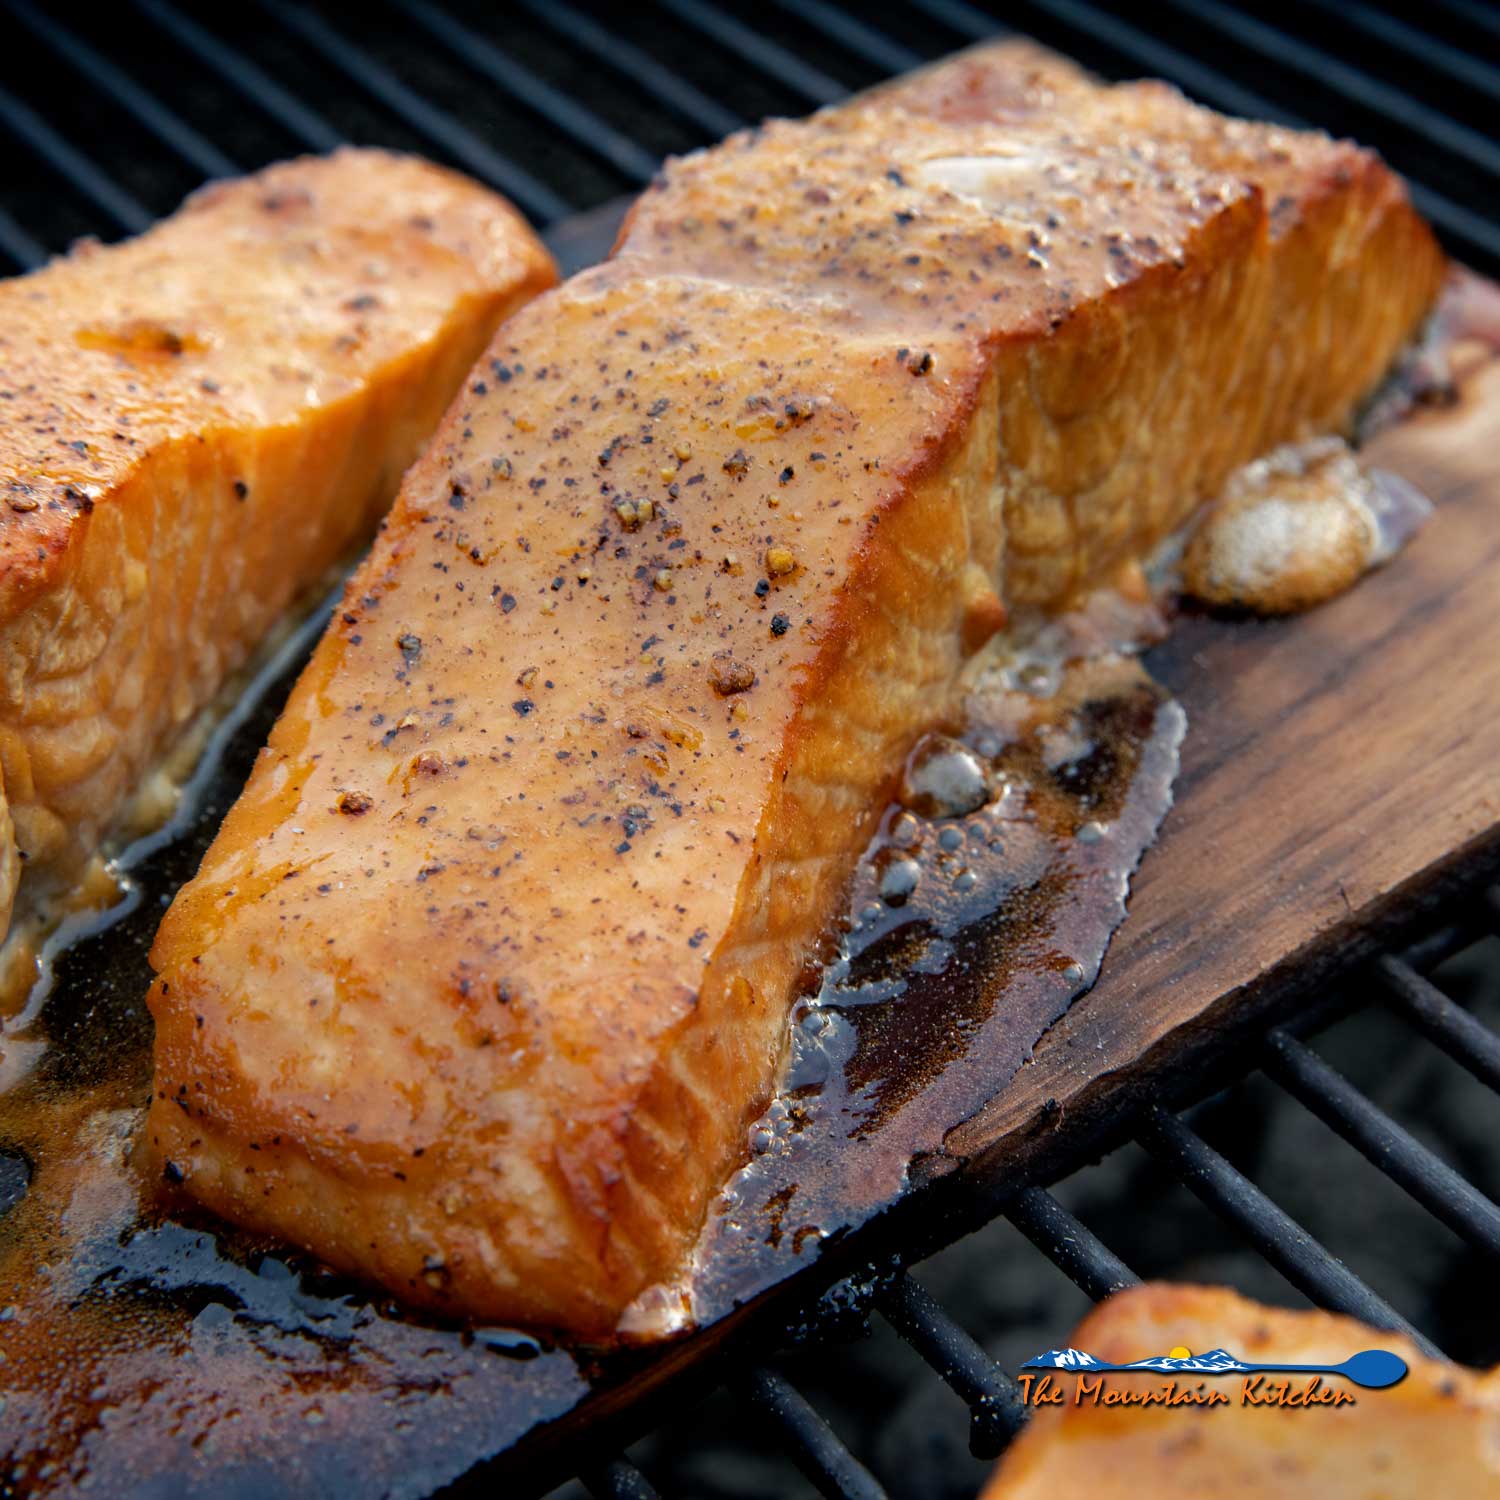
Smoking the Salmon
Now that your salmon is brined and ready, fire up the smoker. Smoking salmon is an art that rewards patience and precision. Here’s a simplified guide to help you master the process.
Wood for Smoking Salmon
Use your favorite wood. We LOVE CHERRY! Other types of wood to use for smoking salmon include alder, apple, cherry, pecan, and maple. You don’t want to overpower the delicate salmon. Avoid using woods such as hickory, mesquite, or oak, in which the smoke flavor is too strong.
1. Prepare the Grill:
- Light about 12 charcoal briquettes in a chimney starter.
- Once ready, arrange coals for indirect heat by placing them in a charcoal basket or on one side of the grill.
- Add a chunk or handful of cherry wood chips to the coals for added flavor.
- Preheat the grill or smoker, adding more charcoal if necessary to maintain temperature.
2. Smoke the Salmon:
- Lightly oil the grill grates using a paper towel to prevent sticking.
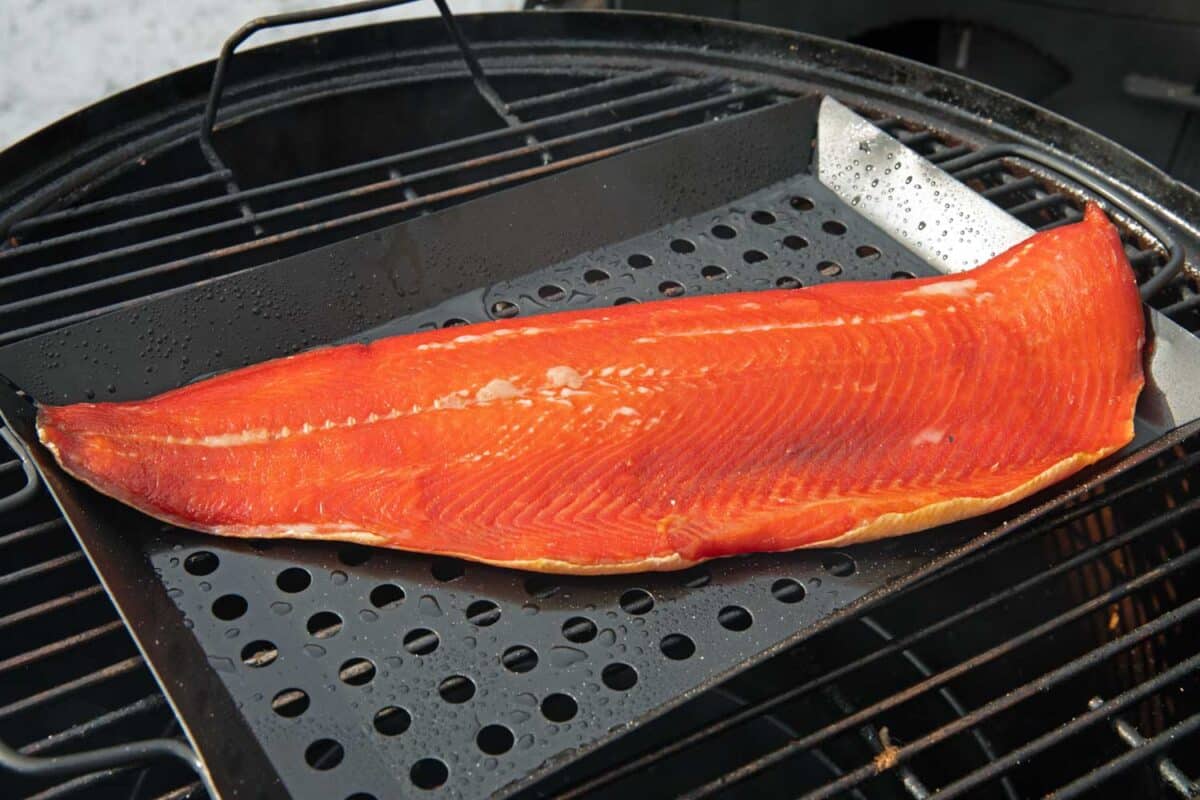
- Place the cured and dried salmon fillet skin-side down on the cooler side of the grill.
- Cover the grill and maintain a steady temperature between 150-200 degrees F.
- Smoke the salmon for 1 to 2 hours, adding coals and wood as needed.
- Use an instant-read thermometer to monitor the internal temperature; the salmon is done when it reaches 135-145 degrees F and flakes easily.
3. Resting:
- Allow the salmon to rest at room temperature for 10 to 15 minutes before serving.
- Alternatively, after cooling completely, wrap the fillet tightly in plastic wrap and refrigerate overnight to enhance the smoky flavor.
Tips for Smoking Salmon with Dry Brine
- Use a 3:1 ratio for the dry brine mixture of 3 parts brown sugar to 1 part kosher salt.
- For added flavor, you may incorporate optional ingredients such as garlic powder, black pepper, or crushed bay leaves into the brine mixture.
- The variety of salmon you choose will ultimately determine the amount of time you dry brine the fish and how long you smoke it. Thinner fillets like sockeye require less brining and less smoking than thicker fillets like King Salmon. The size and thickness do not matter, but ALWAYS BUY WILD-CAUGHT SALMON. Wild Salmon is the best!
Storage and Shelf Life
Store smoked salmon in the fridge sealed in plastic wrap airtight for about a week to keep smoked salmon fresh. We do not recommend freezing it because ice crystals form within the meat, making it a little mushy.
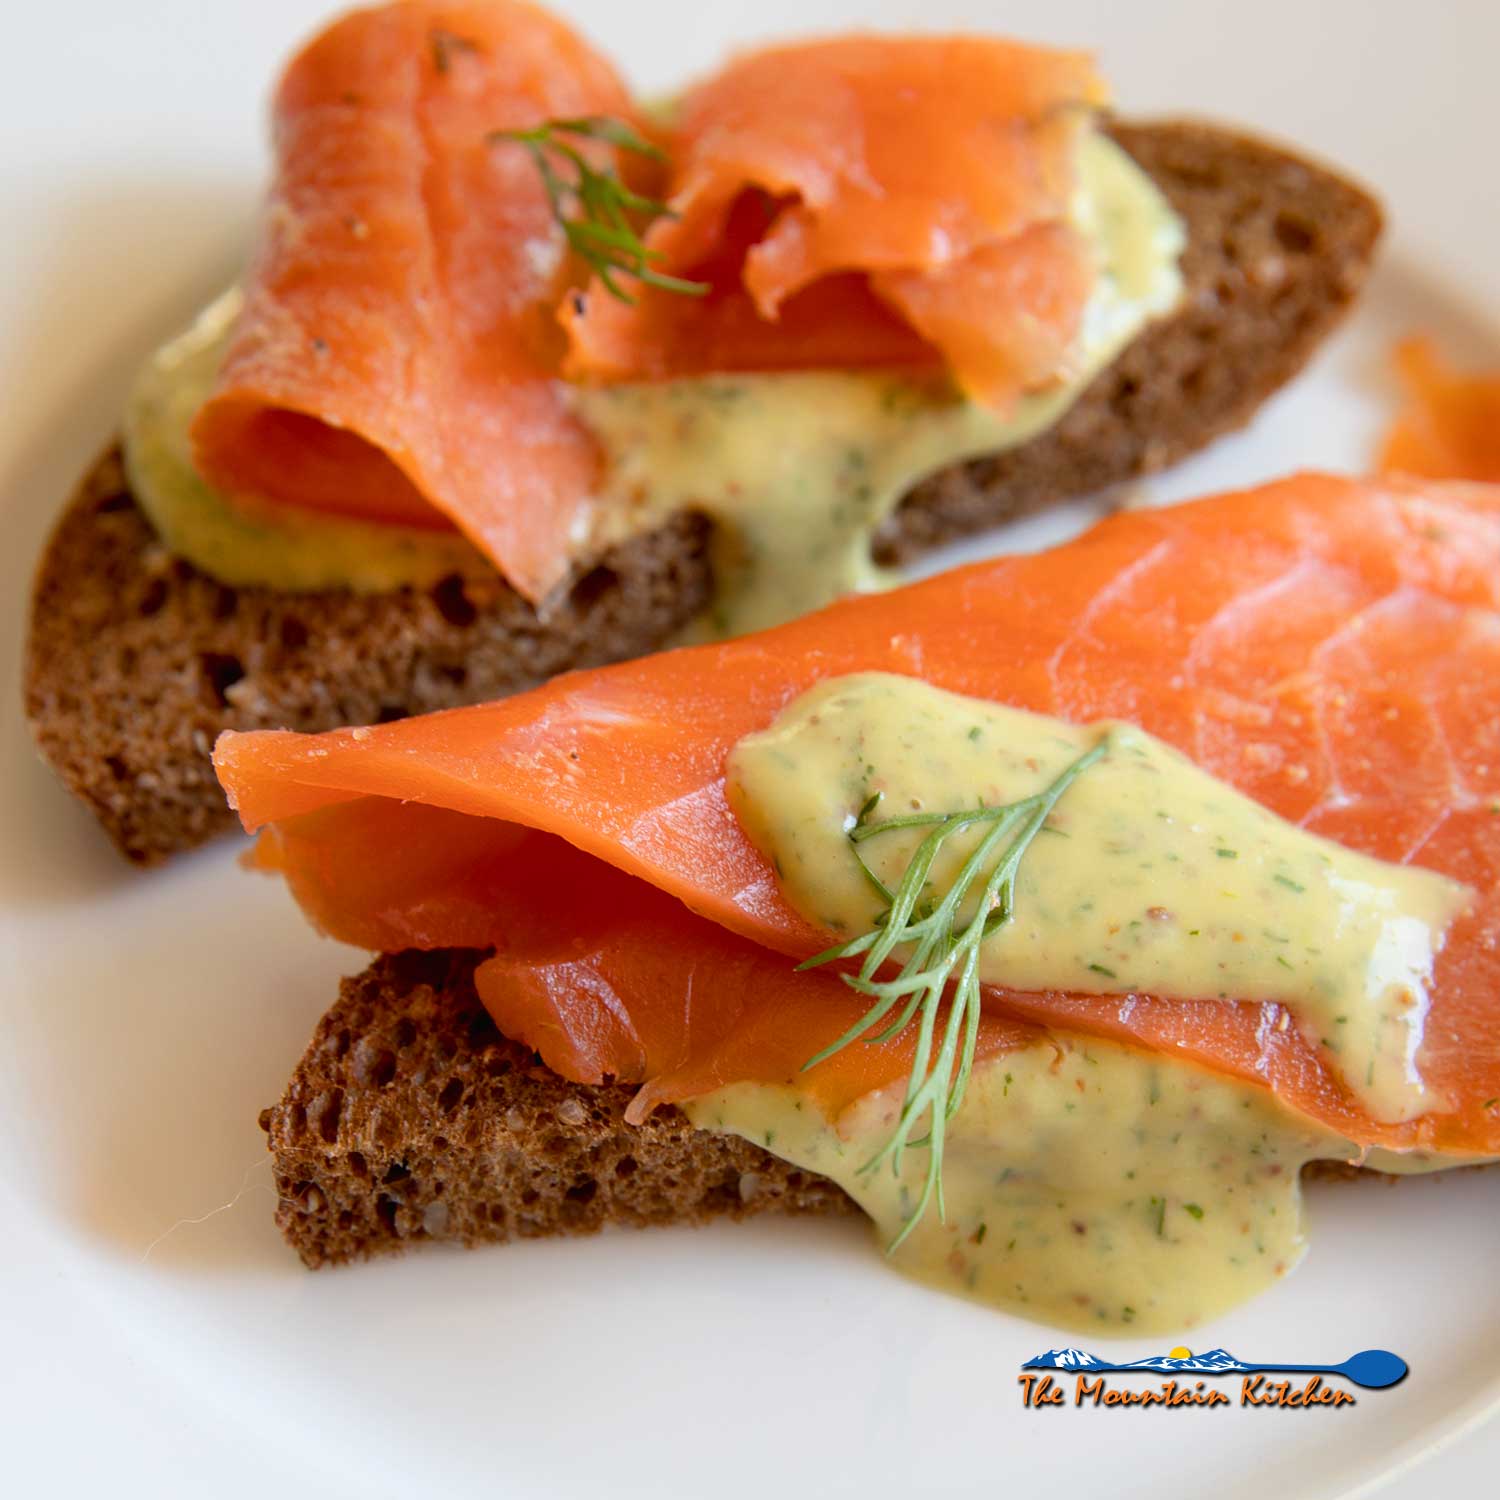
Ways to Use This Smoked Salmon Dry Brine Recipe
Smoked salmon is a versatile ingredient that brings something really special to any meal. Enjoy it on a classic bagel with cream cheese, toss it into pasta, fold it into scrambled eggs or omelet, and add it to salads for extra flavor. It’s perfect in wraps or as a topping for toast. For entertaining, serve it as an appetizer on a charcuterie board alongside crackers, cheeses, olives, fresh vegetables, and meats, or make it into a creamy smoked salmon dip. However, you use it, smoked salmon adds a rich, smoky touch to any dish.
There you have it – a smoked salmon dry brine recipe that’s simple to make and full of flavor. Try this next time you want to smoke something other than the usual ribs or brisket. You won’t regret it.
If you make this recipe, let me know how it turns out in the comments. We’d love to hear about your smoking adventures!
Let’s fire up the smoker and make some memories!

Smoked Salmon Dry Brine
Useful Equipment:
Ingredients
- 2-3 pounds wild-caught salmon
- 1 ½ cups brown sugar
- ½ cup kosher salt
- Optional: honey or maple syrup to brush on as a glaze at the end of smoking.
Instructions
Step 1: Prepare the Salmon
- Begin by inspecting the salmon fillet for pin bones. Starting at the tail end, run your fingers along the center of the fillet toward the head, feeling for any bones. If you detect any, use clean needle-nose pliers or fish tweezers to carefully remove them.
Step 2: Apply the Dry Brine
- In a mixing bowl, combine the brown sugar and kosher salt. Use a whisk to mix well. The exact amount of dry brine will depend on the size and number of salmon fillets. You need enough to coat the fish thoroughly. Place a thin layer of the brine mixture at the bottom of a baking dish or a large plastic container. Lay the salmon fillet on top, skin-side down, and then cover it completely with the remaining brine mixture, making sure it is well-coated. Cover the container and refrigerate for 6-8 hours.
- The curing time will vary depending on the thickness of the salmon fillet. For thinner fillets, 4 to 6 hours is usually enough, while thicker pieces may require up to 6-8 hours. Be cautious not to over-brine; this causes the salmon to be too salty.
- After the curing period, remove the salmon from the brine, rinse it under cool running water to eliminate excess salt and sugar, and pat it dry with paper towels.
Step 3: Air-Dry the Salmon to Form the Pellicle
- After brining, it's important to develop a pellicle—a slightly tacky, glossy layer on the salmon's surface that helps smoke adhere better. To do this, remove the salmon from the brine and rinse it gently under cool running water. Pat the fillet dry with paper towels and place it skin-side down on a rack over a sheet pan or a platter. Leave the salmon uncovered in the refrigerator for at least 4 hours, or overnight, to allow the pellicle to form.
Step 4: Prepare the Grill and Manage the Temperature
- Smoking salmon requires maintaining a consistently low temperature between 150-200 degrees F. Begin by lighting about a dozen charcoal briquettes in a chimney starter. Once the coals are ready, arrange them for indirect heat by placing them into a charcoal basket or pushing them to one side of the grill. Add a chunk or handful of cherry wood chips to the coals for flavor. Preheat the grill or smoker to approximately 170 degrees F, adding more charcoal if necessary to achieve the desired temperature.
Step 5: Smoke the Salmon
- To prevent the salmon from sticking during grilling, lightly oil the grill grates using a paper towel before placing the fish. Position the cured and dried salmon fillet skin side down on the cooler side of the preheated grill. This helps ensure even cooking and minimizes sticking. Alternatively, a perforated grilling pan can be used to allow even smoke and heat distribution, which is especially useful for skinless fillets.
- Cover the grill with the lid and maintain a low, steady temperature. Avoid rapid temperature increases, as this can cause a white protein called albumin to surface, which is harmless but can affect the salmon's appearance. Forming the pellicle and carefully monitoring the grill temperature can help minimize this.
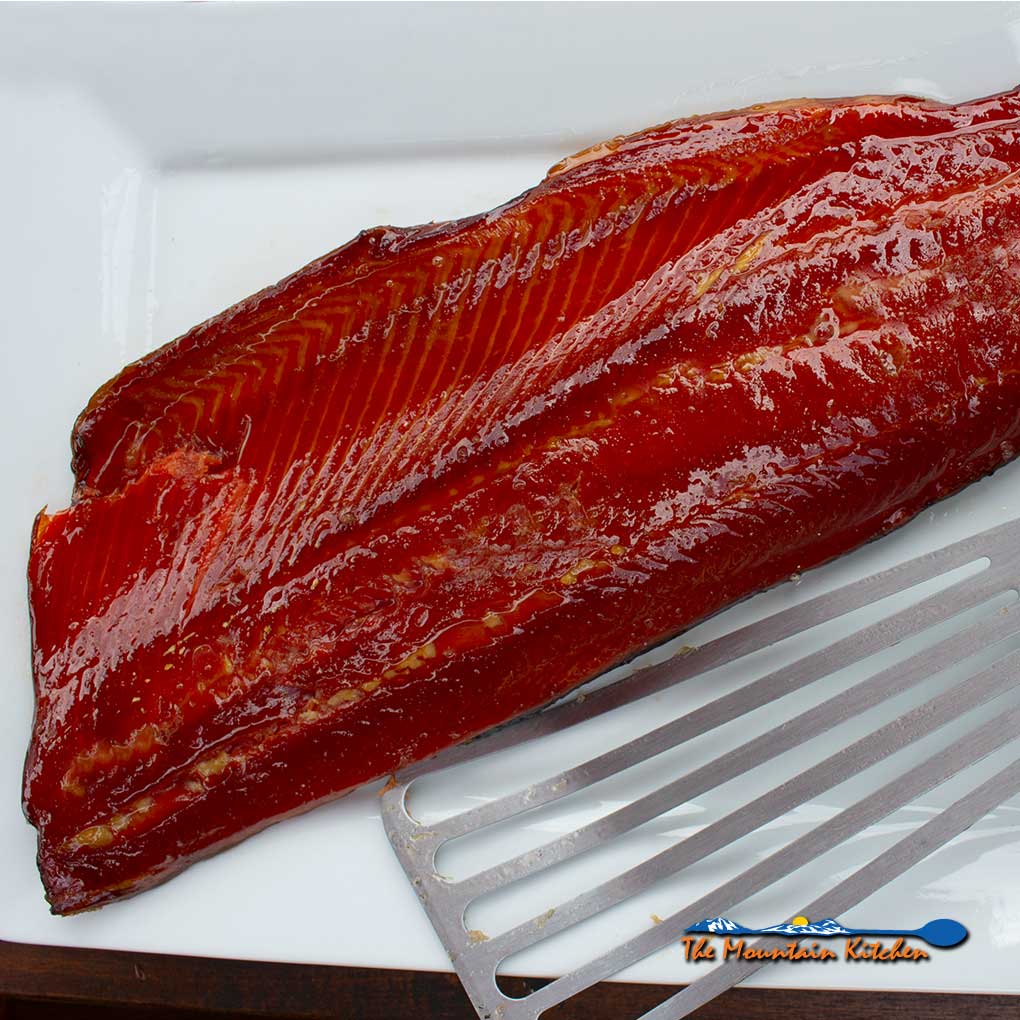
- Smoke the salmon for about 1 to 2 hours, adding more coals and wood as needed. Use an instant-read thermometer to check the salmon's internal temperature; it should reach 120 degrees F during cooking. Now is the time to brush on a glaze like honey or maple syrup if you choose to do so. The salmon is done when it flakes easily and reaches an internal temperature of 135-145 degrees F in the thickest part. Remove from the grill or smoker.
- After smoking, allow the salmon to rest at room temperature for 10 to 15 minutes before serving. Alternatively, after the fillet has cooled completely, wrap it tightly in plastic wrap and refrigerate it overnight. This is normally what David and I like to do. This resting period enhances the melding of smoky flavors into the fish.
Notes
- Use a 3:1 ratio for the dry brine mixture of 3 parts brown sugar to 1 part kosher salt.
- For added flavor, you may incorporate optional ingredients such as garlic powder, black pepper, or crushed bay leaves into the brine mixture.
- The thickness of the fish will determine the amount of time you dry brine the fish as well as how long you smoke it. Thinner fillets like sockeye salmon require less brining and less smoking than thicker fillets like King Salmon.


Tami says
Hello from the salmon happy PNW. Love this recipe and technique. Followed it exactly and we were not disappointed. Smoked some coho and just love the ease of hot smoking this way. First time in a kettle vs cold smoke in old fridge with single burner, old school, I know! Thank you for the clear and concise method.